Phalcon Tutorial
Phalcon is introduced as one of the recent frameworks of PHP, developed by a group of enthusiastic developers. Phalcon is a loosely coupled framework, which means it allows its objects to be treated like glue components, based on the needs of application.
Phalcon offers some unique features in comparison to other frameworks (traditional or existing) in PHP. Following are some of the most prominent features of Phalcon −
-
It is a full stack open source framework.
-
A user needs quite less amount of code to take advantage of several components.
-
It can be used to create an independent framework as required. For example, if we just need Phalcon’s Cache component, we can use it in any application written either in pure PHP or using a framework.
-
For a developer having knowledge of Model-View-Controller (MVC) and Object- Relational Modeling (ORM), working with Phalcon is like a cakewalk.
Performance
The performance of Phalcon is a feature which distinguishes it from other traditional frameworks of PHP. Phalcon has a combination of both PHP and C; each of them can be used as a standalone module. The compilation of every request is considered on a higher speed in Phalcon which makes everything seem out-of-the-box.

C Language
Phalcon is compatible with C which increases the compilation rate. Also, C in combination with Phalcon provides Object Relational Mapping (ORM) which provides consistency with models created. Every model created in Phalcon is associated with the table of relational database. ORM in Phalcon is purely implemented in C.
Developer Tools
Developer tools are used for developing web application. These tools help in generating scaffold application with a combination of all features (C – Create, R – Read, U – Update, D – Delete). Developer tools also include extensible support for third party libraries to be implemented in Phalcon.
Object Relational Mapping
Phalcon supports a wide range of databases. It is not limited to access of relational databases. It supports both relational and non-relational databases which is like adding a feather to the cap of Phalcon framework.
Phalcon Vs Other Frameworks
The following table highlights how Phalcon differs from other popular frameworks such as Yii and Laravel.
| Yii | Laravel | Phalcon | |
|---|---|---|---|
| Type of Projects | Yii helps in creating large scale projects like forums, portals, CMS, RESTful web services, etc. | Laravel is used for building web applications. It is known for exquisite and sophisticated syntax. | Phalcon is used to design variety of projects. |
| Database Support | Yii supports all relational and non-relational databases. | Laravel supports all relational databases. | Phalcon gives equal support to relational and non-relational databases. |
| Language | Yii framework is purely written in PHP. | Laravel is written in PHP and follows MVC pattern. | Phalcon includes both PHP and C. |
| Scalability | Yii is quite scalable for small and medium projects. | Scalability is high for Laravel with all kinds of projects. | Good for medium projects. |
| Performance | Comparatively low. | High but less in comparison with Phalcon. | High Performance. |
Phalcon – Environmental Setup
Prerequisites − We need WAMP/LAMP/MAMP or XAMPP stack for this framework.
Following are the steps for the installation process of Phalcon framework in Windows.
Step 1 − Phalcon installation is completely dependent on dll file. DLL (Dynamic Link Library) creates the required package and plugins for Phalcon.
The following link is used for downloading dll file − https://phalconphp.com/en/download
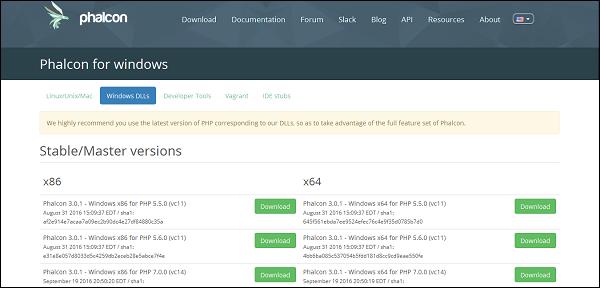
Step 2 − Download the required dll file. Check for the appropriate configuration of the system and download the required dll file. After downloading the file, extract phalcon-php.dll to /php/ext in the xampp folder.
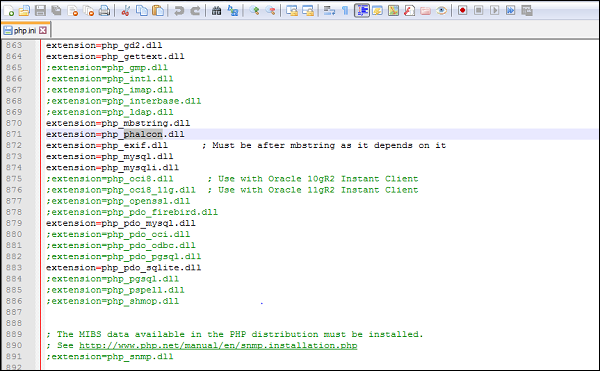
Step 3 − Edit the path in php.ini file to get it configured in a similar manner of other .dll files.
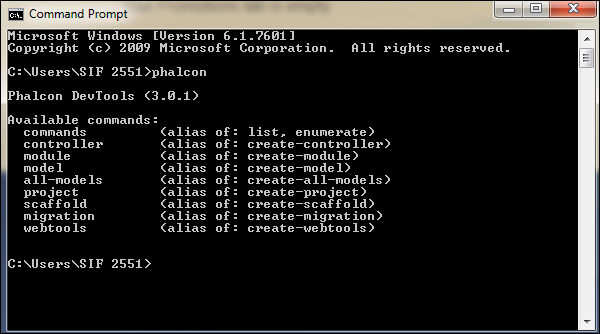
Step 4 − Once the path is edited, restart the xampp/wamp stack. It will be clearly visible in the dashboard, once the dll file is properly set.

Step 5 − After downloading the package, set the path variable in the system properties.

Step 6 − The dll files and Phalcon tools together help in creating the project/web application. The user can verify through command prompt whether Phalcon framework has been successfully installed. The output will be displayed as shown in the following screenshot.
Step 7 − Once this necessary output is received, create a project using the following command −
phalcon create-project
The following output will be displayed.

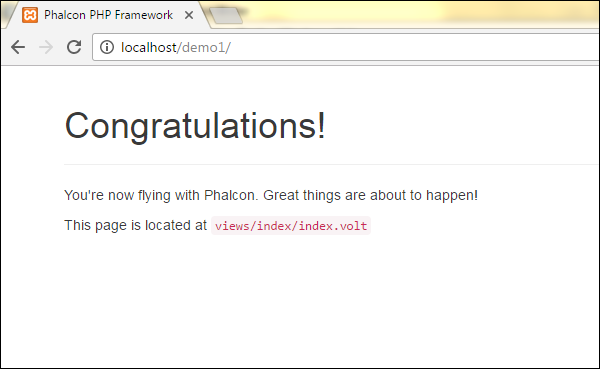
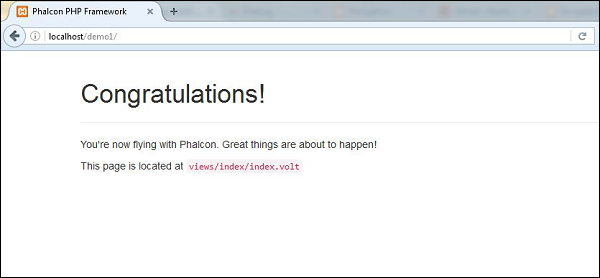
Step 8 − The web application is successfully created. Click the following URL − http://localhost/demo1
The output will be displayed as shown in the following screenshot. It is the welcome page for Phalcon PHP.
Phalcon – Application Structure
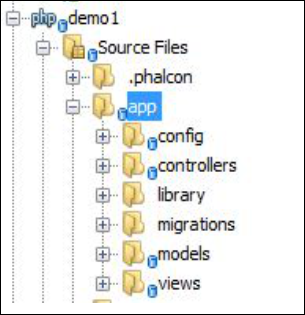
In this chapter, we will discuss the Application Structure of Phalcon. Following is the complete directory structure of a Phalcon project.

There is one root folder which is considered as the code base and is publicly available for the web server. It is also called as web directory. Other folders outside the web root directory are considered out of reach for the web server and for Phalcon project.
Once a project is created, the directory structure will be visible as follows in the wamp/xampp folder. Consider for the project which we created in the previous chapter.

Following are the folders and sub-folders of the project.
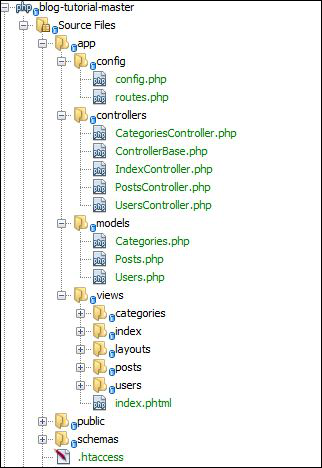
App
This folder consists of all vital script files and folders. The complete web application is designed on the basis of “app” folder. The configuration files help in assisting the necessary configuration for running the application smoothly.
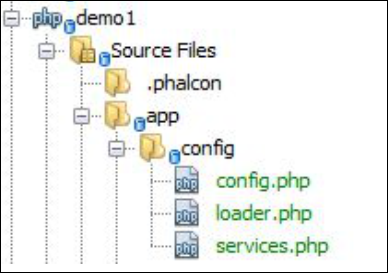
Following is the detailed view of app folder for the given Phalcon web application.

It consists of config, controllers, library, migrations, models and views.
Config

All the configuration required for the web application in Phalcon is comprised in this folder. It includes information related to database connectivity, third-party libraries to be added if any, and the services to be included.
Controllers
All the controllers are included in this folder. They are used for processing requests and generating response.
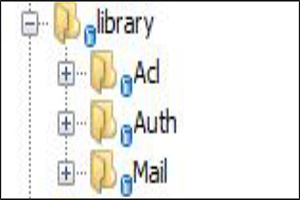
Library
Third-party libraries for the web application (apart from the existing Phalcon framework).
Migrations
This sub-folder consists of all the files associated with data migration, which can also be used in any other framework.
Models
Models include all the logic required to interact with the database. It is actually used for data representation.
Views
It constitutes all the views related to the web application. These views are displayed to the end users with the help of controllers.
Cache
This directory includes data related to caching, which helps in improving the performance.
Public
It includes all the folders for asset management purpose which comprises of CSS, JavaScript, files to be uploaded, and some meta data.
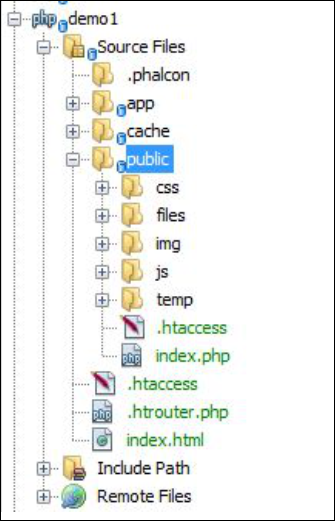
.htaccess File
Web servers running on Apache Web Server software use .htaccess as a configuration file. When it is placed in a directory, all the necessary configuration is loaded as soon as the server is started.
For example, it is possible to configure a website so that it will available only to specific IP addresses with .htaccess file.
Phalcon – Functionality
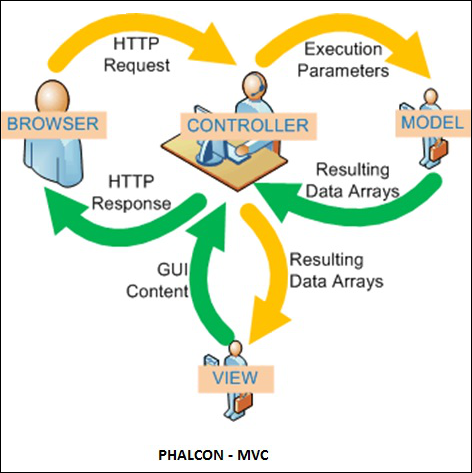
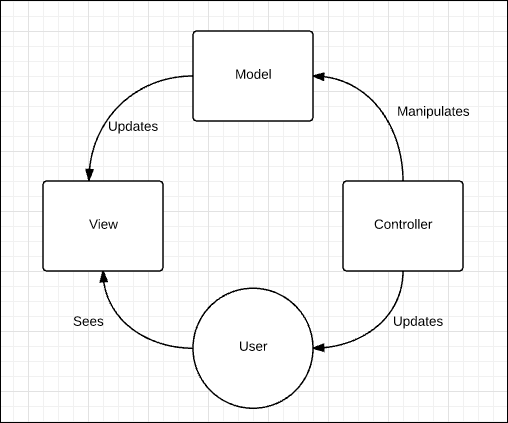
Model View Controller (MVC) is a software design and structural pattern for developing webbased applications. This software architectural separates the representation of information from the user’s interaction with it.
The MVC model defines the web applications with three logic layers.

Model
Models are objects which represent knowledge. There should be a one-to-one relationship between the model and its parts. It includes all the logic to be used for database connectivity and performing CRUD operations.
View
A view is a visual representation of its model. View interacts with the model or its parts and gets the data necessary for the presentation from the model. This is achieved by sending requests and receiving appropriate responses. View includes all the data that end user sees.
Controller
A controller acts as the intermediary between the user and the system (model and view). It accepts the request from the user, through the view sends it to the model. The model manipulates it and sends the response to the controller, which is displayed as the output to the end user through view.
The controller receives such user output and translates it into the appropriate messages. These messages are used by view to display as appropriate responses.
Workflow in Phalcon
The workflow in Phalcon is as follows −
-
The user interacts with the user interface (view) and the interaction is maintained with the help of some method/event.
-
These methods and events are handled by the controller.
-
The controller accesses the model by updating the user’s action.
-
View uses the model to generate an appropriate output.
-
View fetches data from its model. The model has no direct interaction with view.
-
The user interface waits for further user interactions, which starts with a new cycle of request and response.
Phalcon includes directories for Model, View, and Controller. The following screenshot gives a better scenario.
All business logic is described in the controller, and the model interacts with the database which includes all files with respect to each and every table.
Note −
-
All the controllers created in Phalcon web application extends PhalconMvcController.
-
All the models associated with the database tables extends PhalconMvcModel.
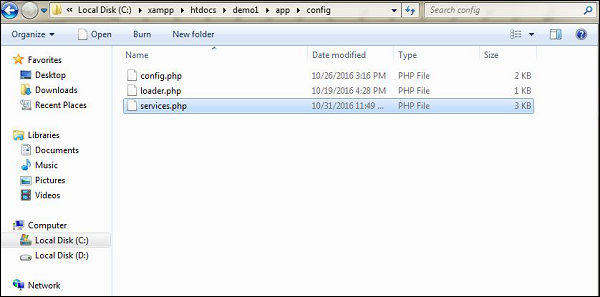
Phalcon – Configuration
The config folder of the web application includes the following files −
- config.php
- loader.php
- services.php
config.php
It includes the configurations for database connectivity and routing as per the directory path.
php

/*
   * Modified: preppend directory path of current file,
      because of this file own different ENV under between Apache and command line.
   * NOTE: please remove this comment.
*/

defined('BASE_PATH') || define('BASE_PATH', getenv('BASE_PATH') ?:
   realpath(dirname(__FILE__) . '/../..'));
defined('APP_PATH') || define('APP_PATH', BASE_PATH . '/app');

return new PhalconConfig([
   'database' => [
      'adapter'     => 'Mysql',
      'host'        => 'localhost',
      'username'    => 'root',
      'password'    => '',
      'dbname'      => 'test',
      'charset'     => 'utf8',
   ],
   'application' => [
      'appDir'         => APP_PATH . '/',
      'controllersDir' => APP_PATH . '/controllers/',
      'modelsDir'      => APP_PATH . '/models/',
      'migrationsDir'  => APP_PATH . '/migrations/',
      'viewsDir'       => APP_PATH . '/views/',
      'pluginsDir'     => APP_PATH . '/plugins/',
      'libraryDir'     => APP_PATH . '/library/',
      'cacheDir'       => BASE_PATH . '/cache/',
      'baseUri'        => '/demo1/',
   ]
]);
loader.php
It extends the existing class of PhalconLoader(). The loader class registers the directories which requires web application.
php
$loader = new PhalconLoader();

/**
   * We're a registering a set of directories taken from the configuration file
*/

$loader->registerDirs( [
      $config->application->controllersDir,
      $config->application->modelsDir
   ]
)->register();
services.php
This file associates all the functions which implement the services of a web project. It implements PhalconDi interface. It also implements a dependency injection of the services by loading them.
Basically, services.php file inside the config folder acts as a container of all services. This interface helps in initializing all the services like database connection, setting up cookies, creating a new session, or connecting with NoSQL database.
php

use PhalconMvcView;
use PhalconMvcViewEnginePhp as PhpEngine;
use PhalconMvcUrl as UrlResolver;
use PhalconMvcViewEngineVolt as VoltEngine;
use PhalconMvcModelMetadataMemory as MetaDataAdapter;
use PhalconSessionAdapterFiles as SessionAdapter;
use PhalconFlashDirect as Flash;

/**
   * Shared configuration service
*/

$di->setShared('config', function () {
   return include APP_PATH . "/config/config.php";
});

/**
   * The URL component is used to generate all kind of urls in the application
*/

$di->setShared('url', function () {
      $config = $this->getConfig();
      $url = new UrlResolver();
      $url->setBaseUri($config->application->baseUri);
   return $url;
});

/**
   * Setting up the view component
*/

$di->setShared('view', function () {
   $config = $this->getConfig();
   $view = new View();
   $view->setDI($this);
   $view->setViewsDir($config->application->viewsDir);

   $view->registerEngines([
      '.volt' => function ($view) {
         $config = $this->getConfig();
         $volt = new VoltEngine($view, $this);

         $volt->setOptions([
            'compiledPath' => $config->application->cacheDir,
            'compiledSeparator' => '_'
         ]);
         return $volt;
      },
      '.phtml' => PhpEngine::class
   ]);
   return $view;
});

/**
   * Database connection is created based in the parameters defined in the configuration
      file
*/

$di->setShared('db', function () {
   $config = $this->getConfig();
   $class = 'PhalconDbAdapterPdo' . $config->database->adapter;
   $connection = new $class([
      'host'     => $config->database->host,
      'username' => $config->database->username,
      'password' => $config->database->password,
      'dbname'   => $config->database->dbname,
      'charset'  => $config->database->charset
   ]);
   return $connection;
});
Phalcon – Controllers
In MVC framework, “C” stands for the Controller which refers to the switchboards of the web application. The actions undertaken by the controller, helps to pass parameters to the view so that it can display and respond to the user input accordingly.
For example, if we register through a sign-up form which includes details of the user such as username, email address and password, and click the Submit button, the data inserted or posted by the user is sent through the controller with the help of associated action or function.
Features of a Controller
A controller accepts inputs from the view and interacts with the associated model.
-
It helps in updating the model’s state by sending commands to the model. It can also send commands to the associated view, which helps in changing the presentation of the view as per the model’s state.
-
A controller acts as an intermediary between the model and the view.
Workflow of a MVC in Phalcon
The following illustration shows the workflow of MVC in Phalcon
Steps to Create a Controller in Phalcon
Step 1 − Redirect to the project path with the help of command prompt. Refer to the following screenshot.
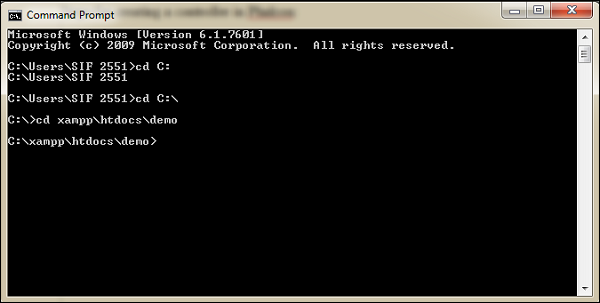
As referred in the above screenshot, “demo” is the project associated with Phalcon PHP framework.
Step 2 − Use the following command to create an associated controller.
phalcon controller
Following is the output on successful execution of the above command.

Note − The class names of the controllers must have the suffix “controller”. This implies a good naming convention which is followed in Phalcon.
By default, when the application is created in Phalcon PHP framework, it includes a controller named “IndexController”. This controller is invoked by default to trigger the actions.
This controller is extended by controller-base unlike other controllers which extends PhalconMvcController.
Code −
php
class IndexController extends ControllerBase {
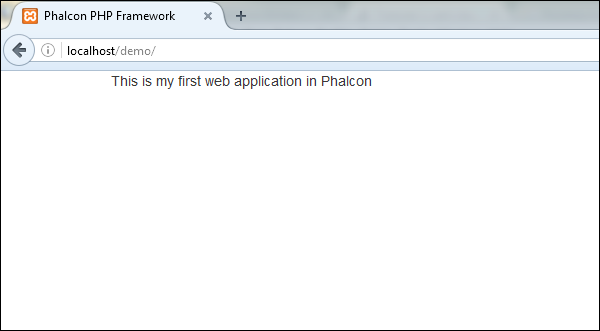
public function indexAction() {
echo "This is my first web application in Phalcon";
}
}
Output −
Phalcon – Models
Model in MVC architecture includes the logic of application. Model is the core interaction with the database. It should be able to manage updating, deleting, inserting, and fetching of records as per the user’s request.
For understanding the model interaction in Phalcon PHP framework, following steps should be followed.
Step 1 − Creation of database.
For any LAMP, WAMP, XAMPP software stack, it is quite easy to create a database with the help of phpmyadmin database tool.
Following is the SQL query to create a database.
create database
Step 2 − In the phpmyadmin section, click the Databases tab, mention the database name and further click the Create button as shown in the following screenshot.
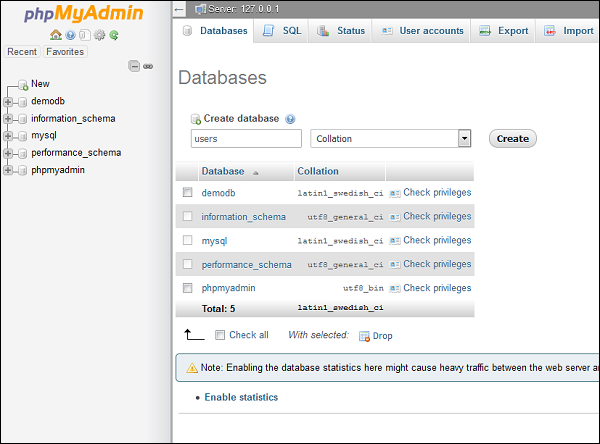
Step 3 − Once the database is created successfully, create a table which will help its association for creating a model in Phalcon framework.
Use the following query to create a new table named “users”.
DROP TABLE IF EXISTS `users`;

CREATE TABLE `users` (
   `id` int(11) NOT NULL AUTO_INCREMENT,
   `name` varchar(25),
   `emailid` varchar(50),
   `contactNumber` number
   PRIMARY KEY (`id`)
)
ENGINE = InnoDB DEFAULT CHARSET = utf8;
Once the table is created, its structure looks like as shown in the following screenshot.

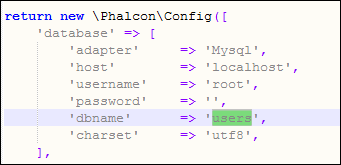
Step 4 − To create a model associated with the ‘Users’ table which we created in the above step, open command prompt instance. It is important to redirect to the appropriate project path. Before that, it is vital to check whether the database configuration has been correctly set as shown in the following screenshot.
Step 5 − Use the following command to create any model in Phalcon framework.
phalcon model
Following is the output on execution of the above command.
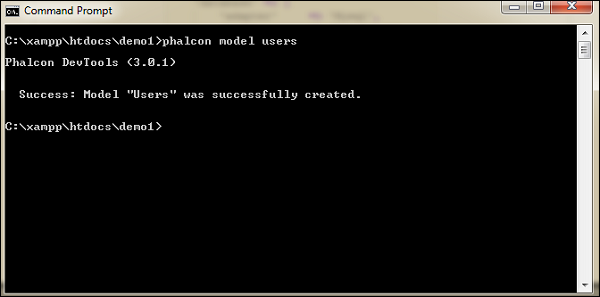
This implies that the model has been created successfully.
Step 6 − Model created successfully is present in the models folder. Use the following path to view where the model is created.
C:
mpphtdocsdemo1ppmodels
Following is the complete code for Users.php.
php

class Users extends PhalconMvcModel {
   /**
      *
      * @var integer
      * @Primary
      * @Identity
      * @Column(type = "integer", length = 11, nullable = false)
   */

   public $id;
   /**
      *
      * @var string
      * @Column(type = "string", length = 25, nullable = true)
   */

   public $name;
   /**
      *
      * @var string
      * @Column(type = "string", length = 50, nullable = true)
   */

   public $emailid;
   /**
      *
      * @var integer
      * @Column(type = "integer", length = 11, nullable = true)
   */

   public $contactNumber;
   /**
      * Returns table name mapped in the model.
      *
      * @return string
   */

   public function getSource() {
      return 'users';
   }
   /**
      * Allows to query a set of records that match the specified conditions
      *
      * @param mixed $parameters
      * @return Users[]
   */

   public static function find($parameters = null) {
      return parent::find($parameters);
   }
   /**
      * Allows to query the first record that match the specified conditions
      *
      * @param mixed $parameters
      * @return Users
   */

   public static function findFirst($parameters = null) {
      return parent::findFirst($parameters);
   }
}
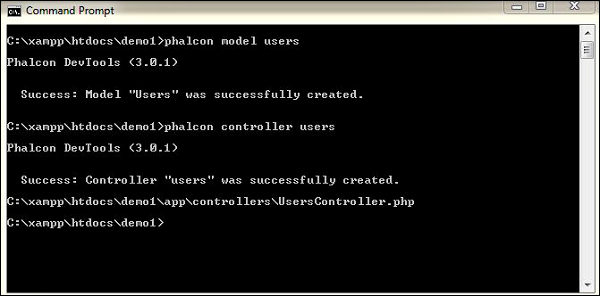
Step 7 − The Controller interacts with the model and the view to get the necessary output. As with the model, use the following command terminal to create a controller.
Phalcon controller
On successful execution of the above command, following is the output.
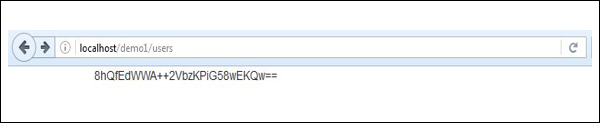
Following is the code for UserController.php.
php

class UsersController extends PhalconMvcController {
   public function indexAction() {
      echo "Users Controller has been called";
   }
}
The output will be displayed if we hit the following URL − http://localhost/demo1/users

Phalcon – Views
Views are information being presented to the end user. A view can be considered as a web page with the appropriate response to be displayed. The response is received through the controller which interacts with the model.
Specifically in Phalcon, the view consists of Volt code, PHP and HTML. A set of special delimiters is available to enter in Volt mode. {% … %} is used to execute statements such as for-loops or assign values, and {{ … }} prints the result of an expression to the template.
Views in Phalcon are basically classified into two types −
- Volt
- phtml
Volt
Following is the screenshot of the output we had created for the project demo1 in the previous chapter.
This output is achieved with the help of file views/index/index.volt.
Features of Volt Files
-
It is a template written in C language and is considerably fast as compared to other languages.
-
It includes a set of highly integrated components, which are very beneficial in Phalcon.
-
It can also be used as a stand-alone component.
-
Volt is compiled to pure PHP code.
Following is the code for index.volt which loads by default for any project.
This is my first web application in Phalcon
Hierarchical Rendering
Views in Phalcon support hierarchical rendering and PhalconMvcView is used as default rendering component. This component uses PHP as template engine in comparison with volt files which uses C as a template language.
These views should have .phtml extension. The default directory of views for the given project consists of the following three files −
-
Action view − This view is called to execute a particular action. It is called when “show” action is executed.
-
Controller layout − This view is present inside the layouts folder. For example, C: mpphtdocsdemoppiewslayouts. It invokes the method calls associated with the appropriate controller. The code implemented in layout will be implemented as and when required.
-
Main layout − This layout view will invoke the main action and it will be shown for every controller or action within the web application.
Difference between .volt and .phtml Files
| .volt | .phtml |
|---|---|
| .volt extension is used when the template engine set up in the application is written in C | .phtml is used when the template engine is PHP itself |
| It can be used as a stand-alone component | It cannot be used as a stand-alone component |
| Volt views are compiled to PHP code | phtml files itself includes PHP code so there is no need of compilation in Phalcon framework |
Variables
Variables are assigned and changed in the template using ‘set’.
Declaring an array
{% set fruits = ['Apple', 'Banana', 'Orange'] %}
Declaring a string
{% set name = ”John Kennedy” %}
Comments
Comments may also be added to a template using the {# … #} delimiters. All text inside them is just ignored in the final output.
{# note: this is a comment
   {% set price = 100; %}
#}
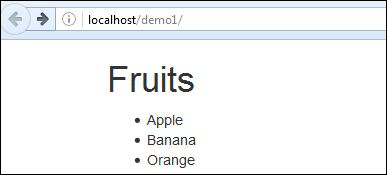
Example
{% set fruits = ['Apple', 'Banana', 'Orange'] %}Fruitsh1>
{% for fruit in fruits %}
- {{ fruit|e }}li> {% endfor %} ul> {% set robots = ['Voltron', 'Astro Boy', 'Terminator', 'C3PO'] %}
{% for robot in robots %}
- {{ robot }}li> {% endfor %} ul>
Output
The code will produce the following output screen −
Phalcon – Routing
The router component allows to define routes that are mapped to the controllers or handlers that should receive the request. A router parses a URI as per the information received.
Every router in the web application has two modes −
- MVC mode
- Match-only mode
The first mode is ideal for working with MVC applications. Following is the syntax to define a route in Phalcon.
$router = new Router();

// Define a route

$router->add(
   "",
   [
      "controller" => "",
      "action"     => "",
   ]
);
Example
For searching a category, let us create a route in routes.php of config folder.

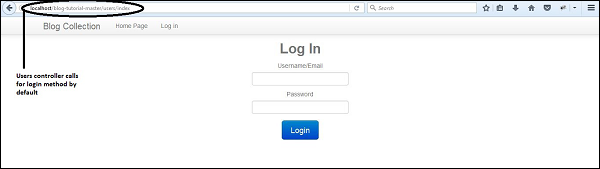
Consider creating a route which will call a method login as we invoke “UsersController”. In such a case, it is suggested to create a route which maps the given URL.
php

$router = new PhalconMvcRouter();

$router->add('/login', array(
   'controller' => 'users',
   'action' => 'login',
));

return $router;
Output
The code will produce the following output −
Phalcon – Database Connectivity
In this chapter, we will discuss the database connectivity related to Phalcon.
Creation of Database and Design
We will focus on creating a database for blogs which maintains posts along with the categories as per the entries of users.
Database Name: blog-tutorial
Query used for creating the database −
drop database blog-tutorial (if exists)
create database blog-tutorial
After creation of the database, the database will be listed as shown in the following screenshot.

Phalcon uses commands for creation of models, controllers, and even projects. Let’s see how it works.
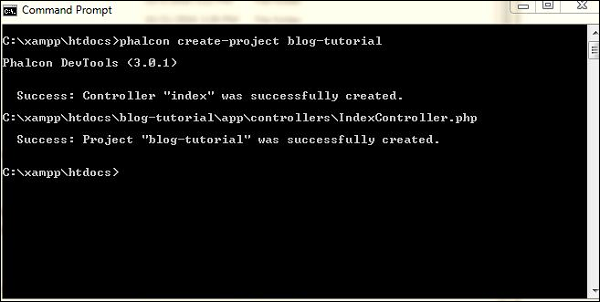
Step 1 − Create a project named blog-tutorial.
Step 2 − Configure the web application that connects to the database which we created for managing blogs.
php
return new PhalconConfig (array (
   'database' => array (
      'adapter'  => 'Mysql',
      'host'     => 'localhost',
      'username' => 'root',
      // 'dbname'   => 'blog_tutorial',
      'password' => '',
      'name'     => 'blog_tutorial',
   ),
   'application' => array (
      'controllersDir' => __DIR__ . '/../../app/controllers/',
      'modelsDir'      => __DIR__ . '/../../app/models/',
      'viewsDir'       => __DIR__ . '/../../app/views/',
      'baseUri'        => '/blog-tutorial/',
   )
));
Phalcon – Switching Databases
We have used a MySQL database in our application. If we wanted to change the database software midstream, it would not be too hard, as long as we have the same data structure in our new database.
PostgreSQL
Configure the web application which will connect to PostgreSQL database.
This can be achieved using the following code. The services will include PhalconDbAdapterPdoPostgresql
use PhalconDbAdapterPdoPostgresql;

$config = [
   'host'     => 'localhost',
   'dbname'   => 'blog_tutorial',
   'port'     => 5432,
   'username' => 'root',
   'password' => ''
];

$connection = new Postgresql($config);
SQLite
For implementing SQLite connection, the configuration should be extended with PhalconDbAdapterPdoSqlite abstract class.
php

use PhalconDbAdapterPdoSqlite;

$connection = new Sqlite(['dbname' => '/tmp/blog_tutorial.sqlite']);
Oracle
For implementing Oracle database connection in Phalcon, the configuration should be extended with PhalconDbAdapterPdoOracle abstract class.
php

use PhalconDbAdapterPdoOracle;

$config = array (
   "dbname" => "//localhost/blog_tutorial",
   "username" => "root",
   "password" => ""
);

$connection = new PhalconDbAdapterPdoOracle($config);
Phalcon – Scaffolding Application
Scaffolding usually refers to a type of code generation where we point it to a web application database, which results in creating a basic CRUD (Create, Read, Update, Delete) application.
Before designing a CRUD application, it is important to design database tables as per the need of the application.
Step 1 − Create a scaffolding application which will include all crud operations.
Command: phalcon scaffold
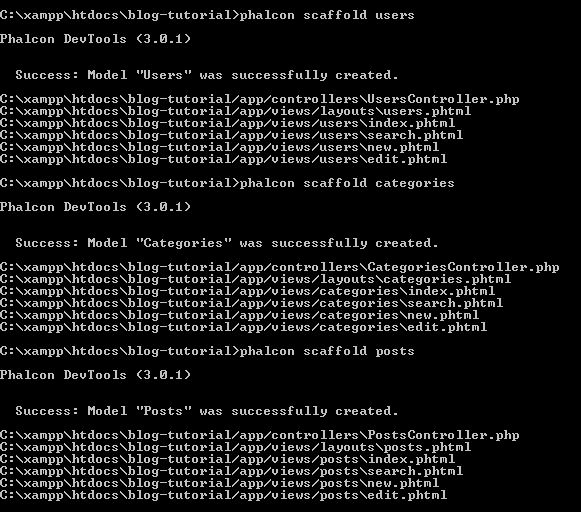
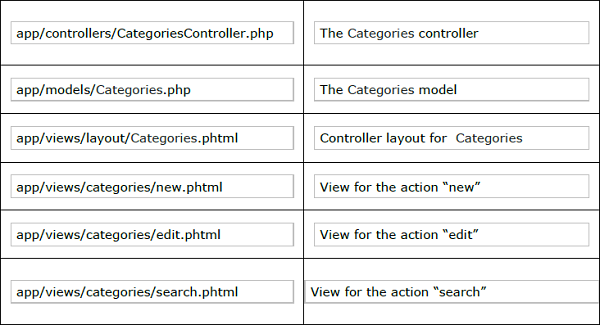
The scaffold generator of Phalcon once executed will create files and folders which are described in the following table.
Step 2 − Create an index page (Combination of phtml and volt).
Code to be included in index.phtml in users folder.
php use PhalconTag as Tag ?>


       charset = "utf-8">
      </span><span class="pln">Blog Tutorial</span><span class="tag">
       rel = "stylesheet" type = "text/css"
         href = "http://netdna.bootstrapcdn.com/twitter-bootstrap/2.2.1/css/bootstrapcombined.min.css"/>
       name = "viewport" content = "width = device-width, initial-scale = 1.0">


       class = "navbar navbar-fixed-top">
          class = "navbar-inner">
             class = "container">
                class = "btn btn-navbar" data-toggle = "collapse" datatarget = ".nav-collapse">
                   class = "icon-bar">
                   class = "icon-bar">
                   class = "icon-bar">

                class = "brand" href = "#">Blog Collection

                class = "nav-collapse">
                   class = "nav pull-left">

                        php echo PhalconTag::linkTo('index', 'Home Page') ?>


                     php if ($this->session->has('auth')) { ?>

                           php echo PhalconTag::linkTo('posts/index', '+Posts') ?>


                           php echo PhalconTag::linkTo('categories/index', '+Categories') ?>


                           php echo PhalconTag::linkTo('users/logout', 'Log out') ?>

                     php } else { ?>

                           php echo PhalconTag::linkTo('users/index', 'Log in') ?>

                     php } ?>


      php echo $this->getContent() ?>
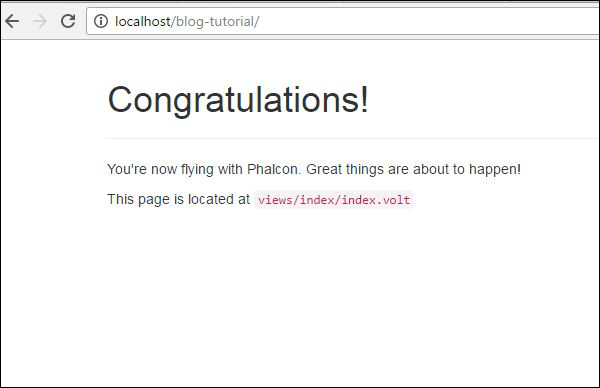
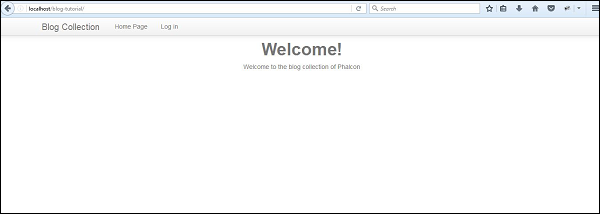
Default file index.volt will include the following code.
php echo $this->getContent() ?>

 align = "center">
   Welcome!
   Welcome to the blog collection of Phalcon
Successful execution of the above code produces the following output.
Step 3 − Change with the respective models.
Users.php
php

class Users extends PhalconMvcModel {
   /**
      * @var integer
      *
   */

   public $id;
   /**
      * @var string
      *
   */

   public $login;
   /**
      * @var string
      *
   */

   public $password;
   /**
      * Initializer method for model.
   */

   public function initialize() {
      $this->hasMany("id", "Posts", "users_id");
   }
}
The function named ‘initialize’ helps in implementing relationship between id and users_id in Posts table, which means that each unique user has many posts associated in the table.
Posts.php
php

class Posts extends PhalconMvcModel {
   /**
      * @var integer
      *
   */

   public $id;
   /**
      * @var string
      *
   */

   public $title;
   /**
      * @var string
      *
   */

   public $slug;
   /**
      * @var string
      *
   */

   public $content;
   /**
      * @var string
      *
   */

   public $created;
   /**
      * @var integer
      *
   */

   public $users_id;
   /**
      * @var integer
      *
   */

   public $categories_id;
   /**
      * Initializer method for model.
      */

   public function initialize() {
      $this->belongsTo("users_id", "Users", "id");
      $this->belongsTo("categories_id", "Categories", "id");
   }
}
The function ‘initialize’ includes relationship constraint mentioning the foreign key and primary key relationship with the table.
users_id refers to id in “Users” table.
categories_id refers to id in “Categories” table.
Categories.php
php

class Categories extends PhalconMvcModel {
   /**
      * @var integer
      *
   */

   public $id;
   /**
      * @var string
      *
   */

   public $name;
   /**
      * @var string
      *
   */

   public $slug;
   /**
      * Initializer method for model.
   */

   public function initialize() {
      $this->hasMany("id", "Posts", "categories_id");
   }
}
Similar to Users model, the ‘initialize’ function specifies that it includes many categories_id for the given post.
Designing the Login Page
Creating Views
Following is the complete structure of Blog-tutorial-master project.
The associated view for displaying the home page after the user successfully logs in is “index.phtml”.
php use PhalconTag as Tag ?>


       charset = "utf-8">
      </span><span class="pln">Blog Tutorial</span><span class="tag">
       rel = "stylesheet" type = "text/css" href = "http://netdna.bootstrapcdn.com/twitter-bootstrap/2.2.1/css/bootstrapcombined.min.css"/>
       name = "viewport" content = "width = device-width, initial-scale = 1.0">


       class = "navbar navbar-fixed-top">
          class = "navbar-inner">
             class = "container">
                class = "btn btn-navbar" data-toggle = "collapse" datatarget = ".nav-collapse">
                   class = "icon-bar">
                   class = "icon-bar">
                   class = "icon-bar">

                class = "brand" href = "#">Blog Collection

                class = "nav-collapse">
                   class = "nav pull-left">

                        php echo PhalconTag::linkTo('index', 'Home Page') ?>

                     php if ($this->session->has('auth')) { ?>

                           php echo PhalconTag::linkTo('posts/index', '+Posts') ?>


                           php echo PhalconTag::linkTo('categories/index', '+Categories') ?>


                           php echo PhalconTag::linkTo('users/logout', 'Log out') ?>

                     php } else { ?>

                           php echo PhalconTag::linkTo('users/index', 'Log in') ?>

                     php } ?>


      php echo $this->getContent() ?>
Category Management
Phalcon – Query Language
Phalcon Query Language (PHQL) also called as PhalconQL is a high-level SQL dialect which standardizes SQL queries for the database systems supported by Phalcon.
It includes a parser, written in C, which translates the syntax in target RDBMS.
Here is a list of some of the prominent features of Phalcon query language −
-
For security of web application, it uses bound parameters.
-
Tables are treated as models whereas columns are treated as class attributes.
-
All the data manipulation statements are used to prevent data loss which can occur.
-
SQL injection is prevented by keeping SQL query call one at a time.
Creating a PHQL Query
Queries are created by instantiating class PhalconMvcModelQuery.
Example
// Instantiate the Query
$query = new Query(
   "SELECT * FROM Users",
   $this->getDI()
);

// Execute the query returning a result if any
$cars = $query->execute();
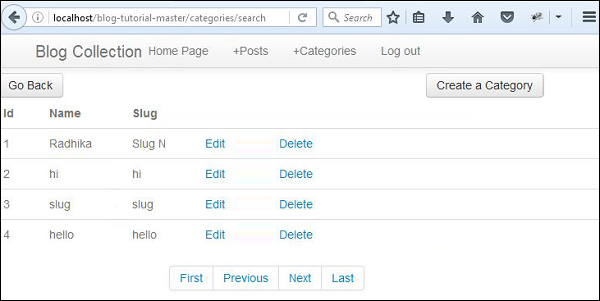
In the previous chapters, we have seen the working of scaffold web application named blog tutorial. It included searching categories as per name or slug.
Following is the code included for searchAction.
public function searchAction() {
   $numberPage = 1;
   if ($this->request->isPost()) {
      $query = Criteria::fromInput($this->di, "Categories", $_POST);
      $this->session->conditions = $query->getConditions();
   } else {
      $numberPage = $this->request->getQuery("page", "int");
      if ($numberPage <= 0) {
         $numberPage = 1;
      }
   }

   $parameters = array();
   if ($this->session->conditions) {
      $parameters["conditions"] = $this->session->conditions;
   }

   // $parameters["order"] = "id";
   $categories = Categories::find($parameters);
   if (count($categories) == 0) {
      $this->flash->notice("The search did not find any categories");

      return $this->dispatcher->forward(array(
         "controller" => "categories",
         "action" => "index"
      ));
   }

   $paginator = new PhalconPaginatorAdapterModel(array(
      "data" => $categories,
      "limit"=> 10,
      "page" => $numberPage
   ));

   $page = $paginator->getPaginate();
   $this->view->setVar("page", $page);
}
The PHQL query executed (highlighted) in the controller will fetch all the results as per the search condition. The result of any search query as per condition will be displayed as in the screenshot.
Following is the output received on successful execution of the above code.
PHQL Life Cycle
Being a high-level language, PHQL provides the ability to the developers to personalize and customize various aspects as per requirements.
Following is the life cycle of each PHQL statement executed in Phalcon −
-
Every PHQL statement is parsed and converted as an Intermediate Representation (IR) which is completely independent of the SQL implemented by the database system.
-
The IR is converted to SQL statement as per the database system which is used in the web application. SQL statements generated are associated with the model.
-
All PHQL statements are parsed once and cached in the memory. If the same statement result is executed, it will help in faster performance.

Phalcon – Database Migration
Database migration is important for the following reasons −
-
Database migration helps in transferring data between the specified storage types.
-
Database migration refers to the context of web-based applications migrating from one platform to another.
-
This process usually takes place to keep a track of data which is being outdated.
Phalcon performs database migration process in the following way −
Step 1 − Create a project named “dbProject” in xampp/wamp directory.

Step 2 − Configure the project with the appropriate database connectivity.
php

/*
   * Modified: preppend directory path of current file,
      because of this file own different ENV under between Apache and command line.
   * NOTE: please remove this comment.
*/

defined('BASE_PATH') || define('BASE_PATH', getenv('BASE_PATH') ?: realpath(dirname(__FILE__) . '/../..'));
defined('APP_PATH') || define('APP_PATH', BASE_PATH . '/app');
return new PhalconConfig(['database' => [
   'adapter' => 'Mysql',
   'host' => 'localhost',
   'username' => 'root',
   'password' => '',
   'dbname' => 'demodb',
   'charset' => 'utf8', ],

'application' => [ 'appDir' => APP_PATH . '/',
   'controllersDir' => APP_PATH .
   '/controllers/', 'modelsDir' => APP_PATH .
   '/models/', 'migrationsDir' => APP_PATH .
   '/migrations/', 'viewsDir' => APP_PATH .
   '/views/','pluginsDir' => APP_PATH .
   '/plugins/', 'libraryDir' => APP_PATH .
   '/library/', 'cacheDir' => BASE_PATH .
   '/cache/', 'baseUri' => '/dbProject/',
] ]);
Step 3 − Execute the command for migration of tables included within the database “demodb”. For now, it includes one table “users”.
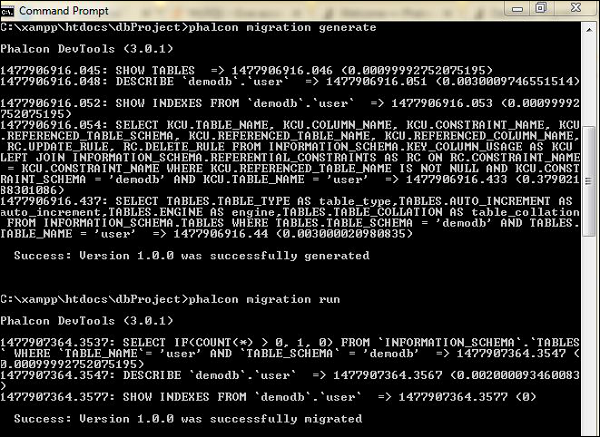
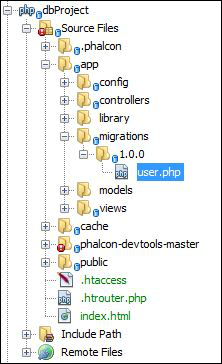
Step 4 − The database files migrated are stored inside the migrations directory within “app” folder.
Thus, the tables are successfully migrated.
Understanding the Anatomy of Migrated Files
The migrated file has a unique class which extends PhalconMvcModelMigration class. The Migration class in Phalcon includes the methods up() and down(). The up() method is used for performing migration while the down method rolls back the operation.
Users.php
php

use PhalconDbColumn;
use PhalconDbIndex;
use PhalconDbReference;
use PhalconMvcModelMigration;

/**
   * Class UserMigration_100
*/

class UserMigration_100 extends Migration {
   /**
      * Define the table structure
      *
      * @return void
   */
   public function morph() {
      $this->morphTable('user', [
         'columns' => [
            new Column( 'Id', [
               'type' => Column::TYPE_INTEGER,
               'notNull' => true,
               'autoIncrement' => true,
               'size' => 11, 'first' => true ] ),
            new Column( 'username', [
               'type' => Column::TYPE_VARCHAR,
               'notNull' => true,
               'size' => 40,
               'after' => 'Id' ] ),
            new Column( 'email', [
               'type' => Column::TYPE_VARCHAR,
               'notNull' => true,
               'size' => 40,
               'after' => 'username' ] ),
            new Column( 'password', [
               'type' => Column::TYPE_VARCHAR,
               'notNull' => true,
               'size' => 10,
               'after' => 'email' ] )
         ],
         'indexes' => [new Index('PRIMARY', ['Id'], 'PRIMARY') ],
            'options' => [ 'TABLE_TYPE' => 'BASE TABLE',
               'AUTO_INCREMENT' => '3', 'ENGINE' => 'InnoDB',
               'TABLE_COLLATION' => 'latin1_swedish_ci' ],
      ] );
   }

   /**
      * Run the migrations
      *      * @return void
   */

   public function up() {
   }

   /**
      * Reverse the migrations
      *
      * @return void
   */
   public function down() {
   }
}
The class UserMigration_100 as shown in the example above includes associative array with four sections which are −
-
Columns − Includes a set of table columns.
-
Indexes − Includes a set of table indexes.
-
References − Includes all the referential integrity constraints (foreign key).
-
Options − Array with a set of table creation options.
As seen in the example above, version 1.0.0 of the database was successfully migrated. Phalcon may include and run multiple migration processes depending on how the database content is kept.
Phalcon – Cookie Management
Cookies also known as browser cookies are small text files stored in the browser. It saves all the information related to user identity. This information is used to validate the users once they browse through different pages.
There are two different types of Cookies −
-
Session Cookies − These type of cookies stay on the browser and retain information until the browser is closed. As soon as the browser is opened, it will be treated as a new session for the same user.
-
Persistent Cookies − It includes a stipulated lifespan and remains in the browser within the given lifespan. Those websites which use persistent cookies keep track of each and every user, even if the browser is closed by the user.
Let us now discuss how cookies work in Phalcon.
Cookies in Phalcon
Phalcon uses PhalconHttpResponseCookies as a global storage for cookies. Cookies are stored in Phalcon while sending a request to the server.
Following is the syntax for setting up a Cookie −
$this->cookies->set(
   "",
   "",
   time
);
Consider the following example. Using the following code, we will create cookies of the user when the user logs in to the web application.
php

class UsersController extends PhalconMvcController {
   public function indexAction() {
      if ($this->cookies->has("login-action")) {
         // Get the cookie
         $loginCookie = $this->cookies->get("login-action");

         // Get the cookie's value
         $value = $loginCookie->getValue();
         echo($value);
      }
      $this->cookies->set(
         "login-action",
         "abc",
         time() + 15 * 86400
      );
   }
}
The encrypted cookies will be displayed as output.
Description
Cookie named “loginAction” has been created with value “abc”.
The method “indexAction” checks whether the cookie exists and prints the value accordingly.
Encryption of Cookies
Cookies in Phalcon are encrypted before being sent to the server as a request and decrypted as soon as we get an appropriate response from the server. This assures security of the authorized users.
It is always suggested to avoid storing sensitive data in cookies, despite the functionality of encryption and decryption. The configuration for encryption of cookies is included in services.php file.
/**
   * Enable encryption key for setting values of cookies
*/

$di->set(
   "cookies", function () {
      $cookies = new Cookies();
      $cookies->useEncryption(false);
      return $cookies;
   }
);

/**
   * Set encryption key
*/

$di->set(
   "crypt", function () {
      $crypt = new Crypt();
      $crypt->setKey('AED@!sft56$'); // Use a unique Key!
      return $crypt;
   }
);
Note −
-
It is always suggested to use encryption while sending cookies to the server.
-
If encryption is not used, all the internal application will be exposed to the attacker.
-
It is also recommended to store small data and literals in cookies.
Phalcon – Session Management
Sessions are server-side information storage which helps in user interaction with the website or web application. Each session is uniquely defined with a session ID, which is passed to the web server whenever the browser makes an HTTP request. The session ID is paired every time with the internal database such that all stored variables are retrieved.
Sessions in Phalcon
Phalcon uses session components which includes the wrappers to access the session data.
Following are the features in Phalcon −
-
Session data can be isolated from other components on the same domain.
-
According to the application needs, the session value can be changed with the help of the session adapter.
Starting a Session in Phalcon
All the session activities are associated with the adapter files which are declared in Services.php file inside the /config folder of the web application.
/**
   * Start the session the first time some component requests the session service
*/
$di->setShared('session', function () {
   $session = new SessionAdapter();
   $session->start();
   return $session;
});
Creating a Session
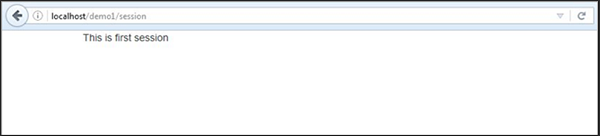
Step 1 − Create a session controller for instantiating a session such that data can be retrieved appropriately.

Step 2 − Create a session with a name and value.
php

class SessionController extends PhalconMvcController {
   public function indexAction() {
      //Define a session variable
      $this->session->set("user-name", "Omkar");

      //Check if the variable is defined
      if ($this->session->has("user-name")) {
         //Retrieve its value
         $name = $this->session->get("user-name");
         echo($name);
      }
   }
}
The above code produces the following output.
Removing a Session
It is possible to destroy the session or unset some variable values within the session in Phalcon.
Following is the syntax to unset variable values in session.
$this->session->remove();
As shown in the example above, the variable name created in the session is “data-content” which can be removed using the following code.
public function removeAction() {
   // Remove a session variable with associated session
   $this->session->remove("data-content");
}
;
Following is the syntax to destroy the complete session.
$this->session->destroy();
Phalcon – Multi-Lingual Support
Phalcon includes a component PhalconTranslate which provides multi-lingual support and it is very helpful to create web pages, which gets translated in multiple languages.
It includes an adapter which helps in binding arrays and assists in reading translation messages.
Example
Let us create an output with the help of Translate component in Phalcon, which will help to display the output as per the language suggested.
Step 1 − Phalcon gives freedom to every developer to organize translation strings. Consider keeping two different files namely: en.php (for English strings) and fr.php (for French strings).
The file will contain an array of key-value pair, where the keys are unique and values will differ as per the translation needed.
en.php
php

// app/messages/en.php

$messagesContent = [
   "bye"     => "Good Bye",
   "hi-name" => "Hello %name%",
   "song"    => "Your favorite song is %song%",
];
fr.php
php

// app/messages/fr.php

$messagesContent = [
   "bye"        => "Au revoir",
   "hello-name" => "Bonjour %name%",
   "song"       => "Votre chanson préférée est %song%",
];
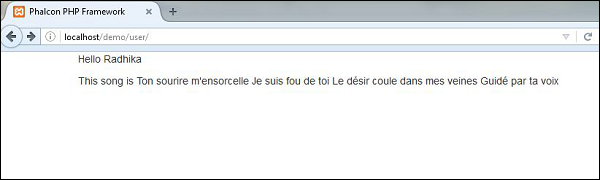
Step 2 − In an application, create a UserController which will take parameters as to which file should be used for translation.
php

use PhalconTranslateAdapterNativeArray;

class UserController extends PhalconMvcController {
   protected function getMessageTransalation() {
      // Ask for the best language
      // Display the output in desired language
      require "en.php";

      // Return a translation object
      return new NativeArray( ["content" => $messagesContent,]);
   }
   public function indexAction() {
      $this->view->name = "Radhika";
      $this->view->song= "Ton sourire m'ensorcelle Je suis fou de toi Le désir coule dans mes veines Guidé par ta voix";
      $this->view->t    = $this->getMessageTransalation();
   }
}
For the default method, two parameters are taken, first is name and the second is the favorite song of the user. Later, the function getMessageTranslation is being called which returns the desired output.
For now, we want the output in English.
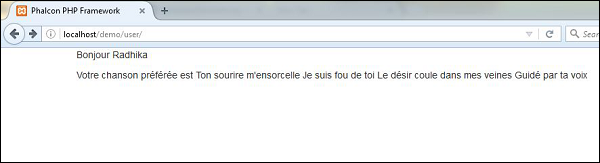
Step 3 − The associated code view demoppiewsUserindex.volt will include the following code −
_("hello-name", ["name" => $name]); ?>
_("song", ["song" => $song]); ?>
If we want the complete output to be displayed in French, we only need to change the file name.
require "fr.php";
Following is the output in French.
Phalcon – Asset Management
Assets are all about the additional components apart from the existing framework in Phalcon. Phalcon has an asset manager which helps to manage all the asset components like CSS or JS files.
The common methods used are −
| Method | Importance |
|---|---|
| __construct(variable $options) | Initializes the component PhalconAssetsManager |
| addCss(string $path, variable $local, variable $filter, variable $attributes) | Adds a CSS resource from the ‘css’ collection to a particular view |
| addJs(string $path, variable $local, variable $filter, variable $attributes) | Adds a JavaScript resource to the ‘js’ collection |
Example
Consider the sample project of Phalcon “vokuro” which is the best illustration for adding css files. It will include assets/Manager for invoking all the css files.
The default controller for the project will invoke all the css files.
php

namespace VokuroControllers;
use PhalconAssetsManager;

/**
   * Display the default index page.
*/

class IndexController extends ControllerBase {
   /**
      * Default action. Set the public layout (layouts/public.volt)
   */
   public function indexAction() {
      $this->assets->addCss("public/style.css");
      $this->view->setVar('logged_in', is_array($this->auth->getIdentity()));
      $this->view->setTemplateBefore('public');
   }
}
Style.css
div.remember {
   margin-top: 7px;
   color: #969696;
}
div.remember label {
   padding-top: 15px;
}
div.forgot {
   margin-top: 7px;
   color: #dadada;
}
footer {
   background: url("../img/feature-gradient.png") no-repeat scroll center 100% white;
   color: #B7B7B7;
   font-size: 12px;
   padding: 30px 0;
   text-align: center;
}
footer a {
   margin-left: 10px;
   margin-right: 10px;
}
table.signup td {
   padding: 10px;
}
table.signup .alert {
   margin-bottom: 0;
   margin-top: 3px;
}
table.perms select {
   margin-top: 5px;
   margin-right: 10px;
}
table.perms label {
   margin-right: 10px;
}
div.main-container {
   min-height: 450px;
}
The assets will be managed inside views, which will display css files as an output.
Index.volt
{{ content() }} {{ assets.outputCss() }} <header class = "jumbotron subhead" id = "overview"> <div class = "hero-unit">Welcome!h1> <p class = "lead">This is a website secured by Phalcon Frameworkp> <div align = "right"> {{ link_to('session/signup', ' Create an Account', 'class': 'btn btn-primary btn-large') }} div> div> header>
Output
It will produce the following output −

Phalcon – Working with Forms
Forms are used in all web applications to accept inputs from the user as request. The data is accepted as an input, then manipulated and saved in the database or any other operation is being performed.
Phalcon includes a component named PhalconForms which helps in the creation and maintenance of forms.
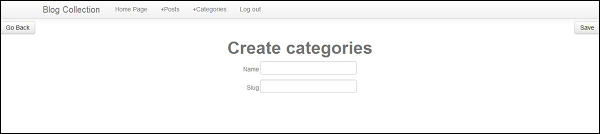
Consider the example of Blog-tutorial, which we created in the previous chapters. It includes a form which is used to create a new category.
php echo PhalconTag::form(array("categories/create", "autocomplete" => "off")) ?>
    width = "100%">

          align = "left">
            php echo PhalconTag::linkTo(array("categories", "Go Back", "class" => "btn")) ?>

          align = "right"><
            ?php echo PhalconTag::submitButton(array("Save", "class" => "btn")) ?>


   php echo $this->getContent(); ?>

    align = "center">
      Create categories

    align = "center">

          align = "right">
             for = "name">Name

          align = "left">
            php echo PhalconTag::textField(array("name", "size" => 30)) ?>


          align = "right">
             for = "slug">Slug

          align = "left">
            php echo PhalconTag::textField(array("slug", "size" => 30)) ?>
Output − It will produce the following output.
The input fields of form are rendered with the help of Phalcon/tag component. Each element in the form can be rendered as per the requirement of the developer.
Following is the syntax for rendering value.
echo $form->render(element-name)
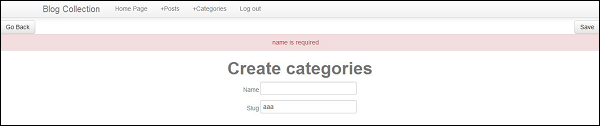
Validation −
Once the values are rendered in the controller, the values will be entered in the database with the help of models. Phalcon forms are integrated with the validation component to offer instant validation. Built-in or custom validators can be set to each element.
php
use PhalconFormsElementText;
use PhalconValidationValidatorPresenceOf;
use PhalconValidationValidatorStringLength;

$name = new Text(
   "Name"
);

$name->addValidator(
   new PresenceOf([ "message" => "name is required", ])
);

$form->add($name);
Output − It will produce the following output.
Phalcon – Object Document Mapper
Before starting with the concepts of Object Relational Mapper (ORM) and Object Document Mapper (ODM), it is important to understand the difference between SQL and NoSQL databases.
The following table highlights the differences between SQL and NoSQL −
| SQL | NoSQL |
|---|---|
| They are also termed as Relational Databases (RDBMS) | They are called as non-relational or distributed database |
| The structure of database is constituted as tables and views | It consists of document based and graph databases |
| It includes a predefined schema | It has a dynamic schema |
| It is very powerful for defining and manipulating data | It is powerful in maintaining data as collection of documents |
Phalcon has the ability to map with SQL and NoSQL databases. This is achieved with the help of Object Document Mapper (ODM) for NoSQL database and Object Relational Mapper (ORM) for SQL database.
In Phalcon, ORM concept comprises of creating a model associated with the given table-name as we have seen in the previous chapters. It follows all the referential integrity constraints.
Object Document Mapper (ODM)
It is an object associated with NoSQL database. As the name suggests it maps the document related module. Phalcon uses it to map with databases like MongoDB.
Example
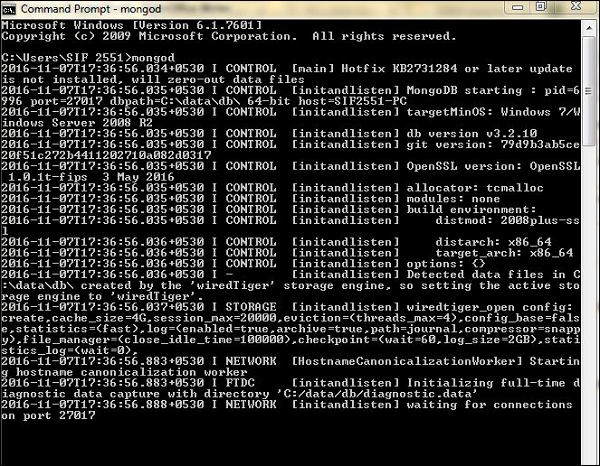
Step 1 − Create a database of MongoDB named “test”. We will use this database to map with and get the appropriate response.
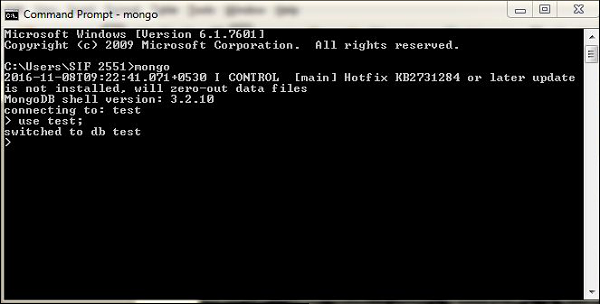
Step 2 − Check for the inserted records in the database. The command associated with it is −
db.collection.find()
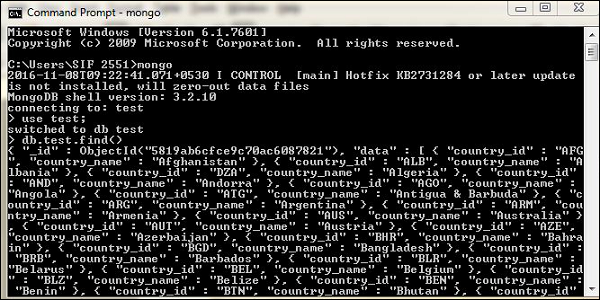
It is observed that every document is mapped with ObjectId which is a feature of ODM. The value of ObjectId is unique and later used to fetch all the data stored with respect to that particular Id.
Step 3 − Set up model for the database created. A model is a class which extends PhalconMvcCollection. Test.php model will include the following code.
php
use PhalconMvcCollection;

class Test extends Collection {
   public function initialize() {
      $this->setSource("test");
   }
}
Step 4 − Configure the project including database connectivity in services.php.
// Simple database connection to localhost

$di->set(
   "mongo",
   function () {
      $mongo = new MongoClient();
      return $mongo->selectDB("test");
   },
   true
);

// Connecting to a domain socket, falling back to localhost connection

$di->set(
   "mongo",
   function () {
      $mongo = new MongoClient(
         "mongodb:///tmp/mongodb-27017.sock,localhost:27017"
      );
      return $mongo->selectDB("test");
   },
   true
);
Step 5 − Print the values with respect to ObjectId with the help of TestController.php.
php

use PhalconMvcController;

class TestController extends Controller {
   public function index() {
      // Find record with _id = "5087358f2d42b8c3d15ec4e2"
      $test = Test::findById("5819ab6cfce9c70ac6087821");
      echo $test->data;
   }
}
The output will display data which matches the objectId. If the objectId is not matched as per the records in the documents, then the appropriate output will not be displayed as the number of records is fetched.

Phalcon – Security Features
Phalcon provides security features with the help of Security component, which helps in performing certain tasks like password hashing and Cross-Site Request Forgery (CSRF).
Hashing Password
Hashing can be defined as the process of converting a fixed length bit string into a specified length in such a way that it cannot be reversed. Any change in the input string will change the value of hashed data.
Decryption of hashed data takes place by taking the value entered by the user as input and comparing hash form of the same. Usually for any web-based applications, storing passwords as plain text is a bad practice. It is prone to third-party attacks as those who have access to the database can easily procure passwords for any user.
Phalcon provides an easy way to store passwords in encrypted form which follows an algorithm like md5, base64 or sh1.
As seen in the previous chapters, where we created a project for blogs. The login screen accepts input as username and password for the user. To receive the passwords from the user and decrypt it in a particular form, the following code snippet is used.
The decrypted password is then matched with the password accepted as input from the user. If the value matches, the user can successfully log in to web application else an error message is displayed.
php
class UsersController extends PhalconMvcController {
public function indexAction() {
}
public function registerUser() {
$user = new Users();
$login = $this->request->getPost("login");
$password = $this->request->getPost("password");
$user->login = $login;
// Store the hashed pasword
$user->password = $this->security->sh1($password);
$user->save();
}
public function loginAction() {
if ($this->request->isPost()) {
$user = Users::findFirst(array(
'login = :login: and password = :password:',
'bind' => array(
'login' => $this->request->getPost("login"),
'password' => sha1($this->request->getPost("password"))
)
));
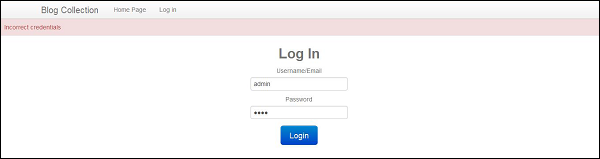
if ($user === false) {
$this->flash->error("Incorrect credentials");
return $this->dispatcher->forward(array(
'controller' => 'users',
'action' => 'index'
));
}
$this->session->set('auth', $user->id);
$this->flash->success("You've been successfully logged in");
}
return $this->dispatcher->forward(array(
'controller' => 'posts',
'action' => 'index'
));
}
public function logoutAction() {
$this->session->remove('auth');
return $this->dispatcher->forward(array(
'controller' => 'posts',
'action' => 'index'
));
}
}
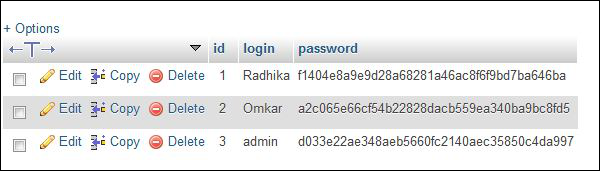
The passwords stored in the database are in an encrypted format of sh1 algorithm.
Once the user enters an appropriate username and password, the user can access the system, else an error message is displayed as a validation.
Cross-Site Request Forgery (CSRF)
It is an attack which forces authenticated users of web application to perform certain unwanted actions. Forms which accept inputs from the users are vulnerable to this attack. Phalcon tries to prevent this attack by protecting the data which is sent through forms outside the application.
The data in each form is secured with the help of token generation. The token generated is random and it is matched with the token to which we are sending the form data (mostly outside the web application through POST method).
Code:
php echo Tag::form('session/login') ?>

   php echo $this->security->getTokenKey() ?>"
      value = "php echo $this->security->getToken() ?>"/>
Note − It is important to use session adapter while sending tokens of form, as all the data will be maintained in the session.
Include session adapter in services.php using the following code.
/**
   * Start the session the first time some component request the session service
*/

$di->setShared('session', function () {
   $session = new SessionAdapter();
   $session->start();
   return $session;
});
Disclosure: We are a professional review site that receives compensation from the companies whose products we review. We are independently owned and we have spent time and effort doing our best to offer you the most relevant and accurate information. All the "customer reviews" are posted by real webmasters (hosting customers) and we're not responsable for their opinions. Purchasing any service from the hosting companies listed on our site is your solely decision.
Statistics Panel
| Stats Panel | Last 24h | Last Month | Total |
| Articles | 0 | 88 | 5166 |
| News | 0 | 576 | 18356 |
| Hosting Sites | 0 | 1 | 2452 |
| Reviews | 0 | 24 | 1807 |
| Coupons | 0 | 0 | 561 |