Drupal is a free and open source Content Management System (CMS) that allows organizing, managing and publishing your content. It is built on PHP based environments. This is carried out under GNU i.e. General Public License, which means everyone has the freedom of downloading and sharing it with others. Drupal is used on million sites such as WhiteHouse.gov, World Economic Forum, Stanford University, Examiner.com and mtany more.
What is Content Management System?
The Content Management System (CMS) is a software which stores all the data of your content (such as text, photos, music, documents, etc.) and is made available on your website. A CMS helps in editing, publishing and modifying the content of the website.
History
The standard release of Drupal known as Drupal core was developed by Dries Buytaerti in January 2001. It is considered as a leading CMS in variety of industries.
Why to use Drupal?
If you are developing a website with content management system, Drupal CMS is very flexible than any other CMS. Drupal is very powerful and can be used for building large, complex sites. It is PHP based template and allows non-technical users to add and edit the content without any HTML or Web design knowledge. Using Drupal CMS, it is easy to interact with other sites or technologies as Drupal can handle complex forms and workflows. It is available with more than 16000 modules which can be addressed with Drupal core and add-on modules.
Features
-
Drupal makes it easy to create and manage your site.
-
Drupal translates anything in the system with built-in user interfaces.
-
Drupal connects your website to other sites and services using feeds, search engine connection capabilities, etc.
-
Drupal is an open source software hence requires no licensing costs.
-
Drupal designs highly flexible and creative website with effective display quality thus increasing the visitors to the site.
-
Drupal can publish your content on social media such as Twitter, Facebook and other social mediums.
-
Drupal provides more number of customizable themes, including several base themes which are used to design your own themes for developing web applications.
-
Drupal manages content on informational sites, social media sites, member sites, intranets and web applications.
Advantages
-
Drupal is a flexible CMS that allows handling content types including video, text, blog, menu handling, real-time statistics, etc.
-
Drupal provides a number of templates for developing web applications. There is no need to start from scratch if you are building simple or complicated web applications.
-
Drupal is easy to manage or create blog or website. It helps to organize, structure, find and reuse content.
-
Drupal provides some interesting themes and templates which gives your website an attractive look.
-
Drupal has over 7000 plug-ins to boost your website. Since Drupal is an open source, you can create your own plug-ins.
Disadvantages
-
Drupal is not a user-friendly interface. It requires advanced knowledge and few basic things about the platform to install and modify.
-
Drupal is a new content management system. It is not compatible with other software.
-
Performance is low compared to other CMS. The website which is built using Drupal will generate big server loads and will never open with a slow internet connection.
Drupal - Installation
This chapter provides step-by-step procedure for Drupal installation. Before installing Drupal, the following system requirements are necessary.
System Requirements for Drupal
-
Database − MySQL 5.1 +
-
-
WAMP (Windows)
-
LAMP (Linux)
-
XAMP (Multi-platform)
-
MAMP (Macintosh)
-
Nginx
-
Microsoft IIS
-
-
Operating System − Cross-platform
-
Browser Support − IE (Internet Explorer 8+), Firefox, Google Chrome, Safari, Opera
-
SSL (Secure Socket Layer) − A valid security certificate is required for HTTPS
-
PHP Compatibility − PHP 5.2+
Download Drupal
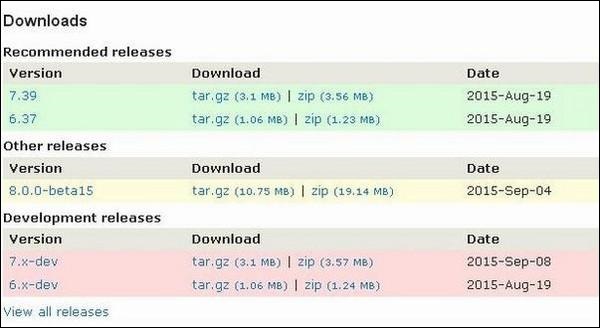
Step 1 − Download the Drupal and copy to your web server from this link − https://www.drupal.org/project/drupal
Step 2 − Select the latest version of zip file which you want to download as shown in the following screen. The Recommended releases are the latest stable releases of either version.
Setup Wizard
It's very easy to setup Drupal on your system. The following steps describe how to setup Drupal locally on your system.
Step 1 − Download the zip file and extract it to your local computer. Rename the folder from its current name to any name of your choice to refer to your site.
Step 2 − Drupal requires MySQL database. Create a new empty database with user/password for Drupal to use. (For e.g., user as "root" and password as "root" or else you can set as per your choice).
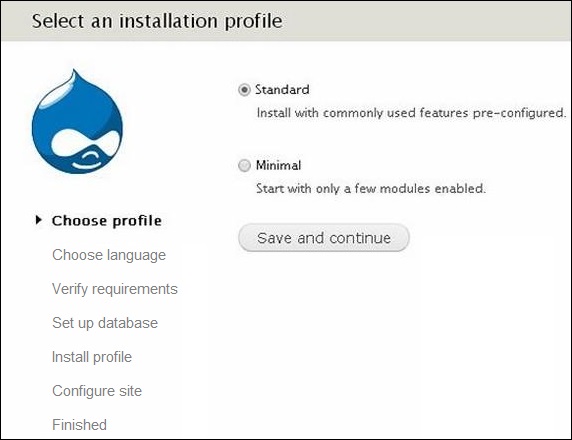
Step 3 − Open your browser and navigate to your Drupal file path, you will see the first Drupal installer screen as shown in the following image. In our case the path is localhost/< Your_drupal_folder >. Select the Standard option and click Save and continue.
Step 4 − Select the default language for Drupal website.
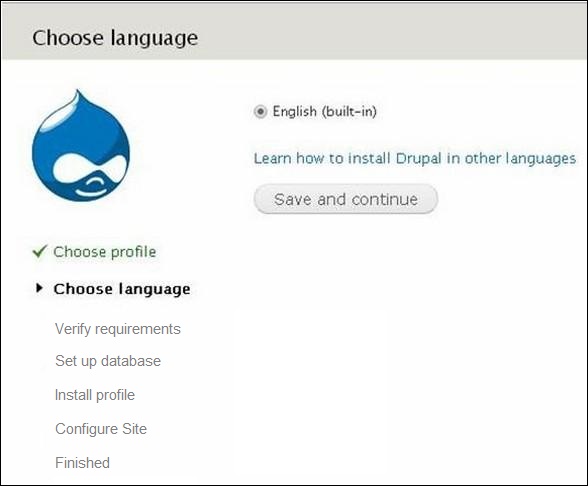
After selecting the language, click Save and continue.
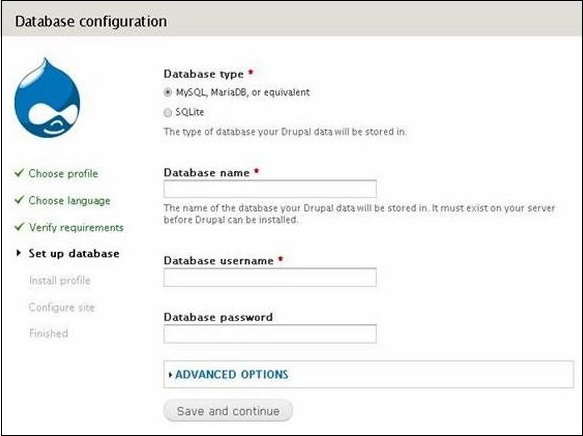
Step 5 − Go to Database configuration page. You need to enter the type of database you will be using, and other details as follows.
-
Database Type − Select the database type. By default, it will be MySQL.
-
Database name − Enter the database name for Drupal.
-
Database username − Enter the user name of your MySQL database.
-
Database password − Enter the password which you had set for MySQL Database.
When you click the ADVANCED OPTIONS, you will see the following screen −

You can fill the advanced options for the database −
-
Database Host − Enter the host name where your database is located.
-
Database port − Enter the database port.
-
Table Prefix − It is used to add prefix in the database tables, which helps to run multiple sites on the same database.
After filling all the information, click the Save and continue button.
Step 6 − The installation process starts on your machine.
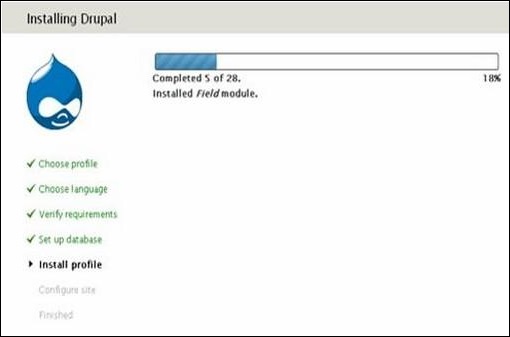
Step 7 − The Configure site page appears on the screen −
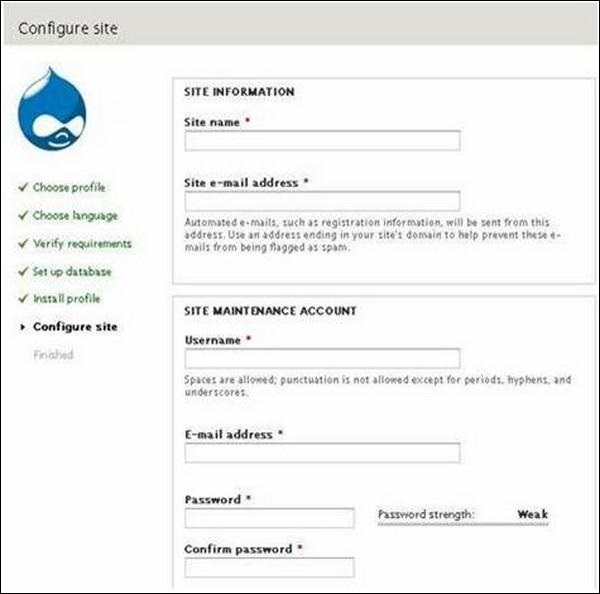
It contains the following fields −
-
Site name − The name that you want to give to your site.
-
Site e-mail address − The e-mail address to which automated e-mails will be sent.
-
Username, Email-address and Password − These are all administrative details used for the maintenance account.
You need to enter all these fields and click Save and continue.
Step 8 − The following page indicating that your Drupal installation is successful will appear on your screen.
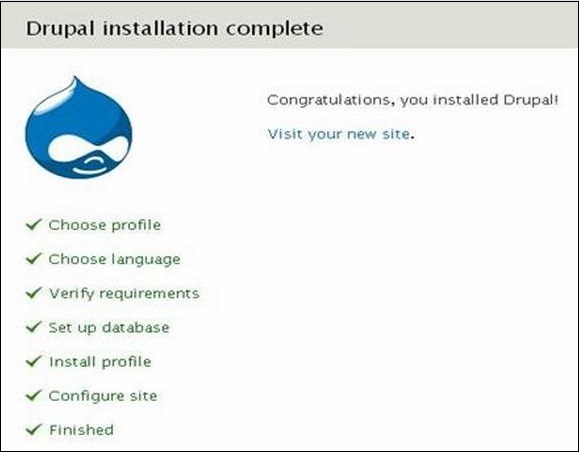
Step 9 − Click the Visit your new site link as shown in this image.

Step 10 − Finally, the newly installed Drupal homepage appears on your screen as seen in the preceding image.
Drupal - Architecture
Drupal is a platform for web content management which is a powerful tool for building simple and complex sites. In this chapter, we are going to discuss the architectural style of Drupal for implementing user interfaces. The following diagram shows the architecture of Drupal −
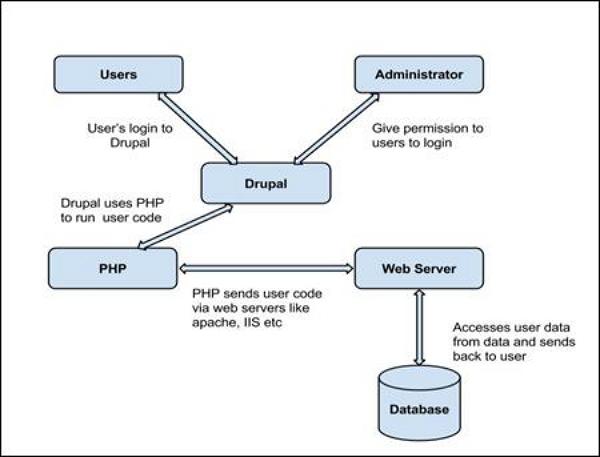
The architecture of Drupal contains the following layers &miuns;
-
Users
-
Administrator
-
Drupal
-
PHP
-
Web Server
-
Database
Users − These are the users on the Drupal community. The user sends a request to a server using Drupal CMS and web browsers, search engines, etc. acts like clients.
Administrator − Administrator can provide access permission to authorized users and will be able to block unauthorized access. Administrative account will be having all privileges for managing content and administering the site.
Drupal − Drupal is a free and open source Content Management System (CMS) that allows organizing, managing and publishing your content and is built on PHP based environments. Drupal CMS is very flexible and powerful and can be used for building large, complex sites. It is very easy to interact with other sites and technologies using Drupal CMS. Further, you will be able to handle complex forms and workflows.
PHP − Drupal uses PHP in order to work with an application which is created by a user. It takes the help of web server to fetch data from the database. PHP memory requirements depend on the modules which are used in your site. Drupal 6 requires at least 16MB, Drupal 7 requires 32MB and Drupal 8 requires 64MB.
Web Server − Web server is a server where the user interacts and processes requests via HTTP (Hyper Text Transfer Protocol) and serves files that form web pages to web users. The communication between the user and the server takes place using HTTP. You can use different types of web servers such as Apache, IIS, Nginx, Lighttpd, etc.
Database − Database stores the user information, content and other required data of the site. It is used to store the administrative information to manage the Drupal site. Drupal uses the database to extract the data and enables to store, modify and update the database.
Drupal - Main Menu
In this chapter, we will study how to Create Menus in Drupal. Menus are very important to easily navigate in your website. Menus offer a set of links that helps you navigate. The Drupal menu allows you to add, remove and rename the menus and menu items.
Following are the simple steps to create menus in Drupal.
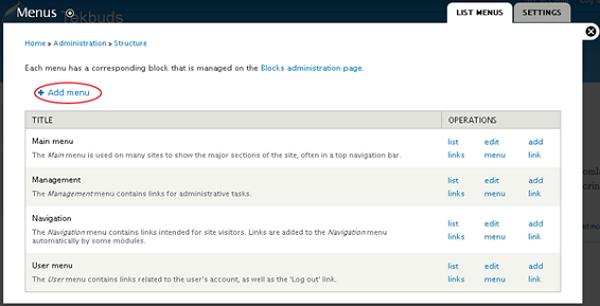
Step 1 − Click Structure → Menus as shown in the following screen.

Step 2 − Click on Add menu option to add menu.
Step 3 − Fill in the required details as shown in the following screen.

-
Title − It displays title in the Administrator Menu bar.
-
Description − Enter a brief description about the menu. The description field will display only in the admin dashboard under the menu list, but it does not display any information to site visitors.
After filling all the information about the menu, click on Save button to save your created menu bar.
Step 4 − Once you save the menu bar, the following screen will get displayed. Here you have to define the path link to your created menu page. Click Add link as shown in the following screen.
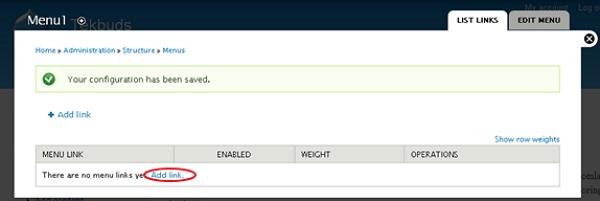
Step 5 − The created Menu 1 page gets displayed as shown in the following screen.
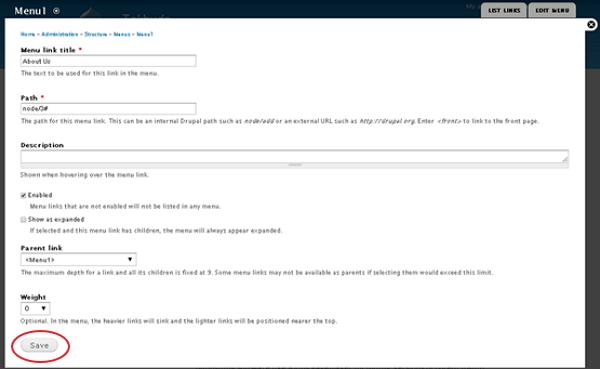
It contains below fields −
-
Menu link title− Specify the name of the menu item.
-
Path − Specify the URL path of the page which you want to display.
-
Description − Description about the menu link.
-
Enabled − It enables the item to display on menu.
-
Show as expanded − If it consists of sub menus, then it will be displayed under the parent menu item.
-
Parent Link − It sets the main structure of menu.
-
Weight − Sets the order of menu items.
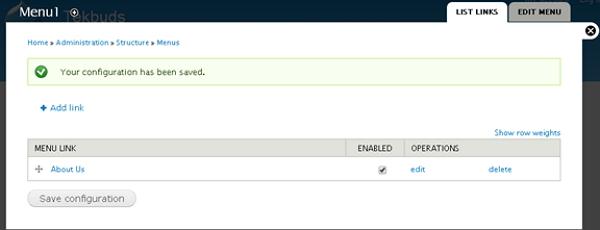
After filling all the information about the menu link, click the Save button, this will save your Menu link.
Step 6− Now the following screen pops up.
Step 7 − Click Structure → Menus to get the following screen.
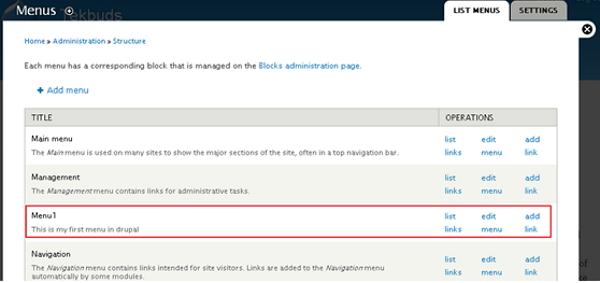
Here, you will see the created Menu 1 name in the list of Menus.
Drupal - Blocks & Regions
In this chapter, we will study about Drupal Blocks & Regions. Blocks are container objects that are used to organize your content of your website. It can be displayed in the regions on your page.
Following are the simple steps for creating Drupal Blocks.
Step 1 − Click Structure in Drupal as shown in the following screen.

Step 2 − Then, click Blocks.
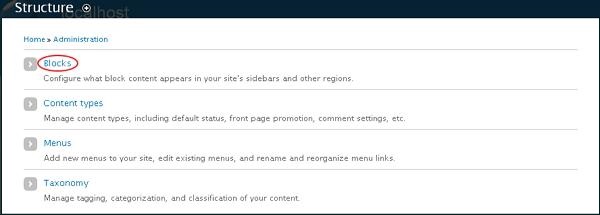
Step 3 − Blocks page gets displayed. Click Add block.

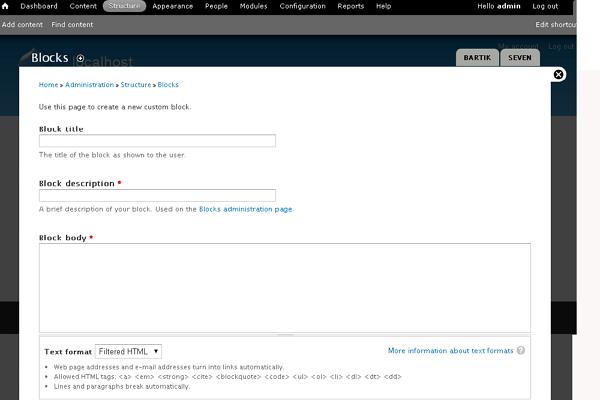
Step 4 − A block page will gets displayed to create a new custom block as shown in the following screen.
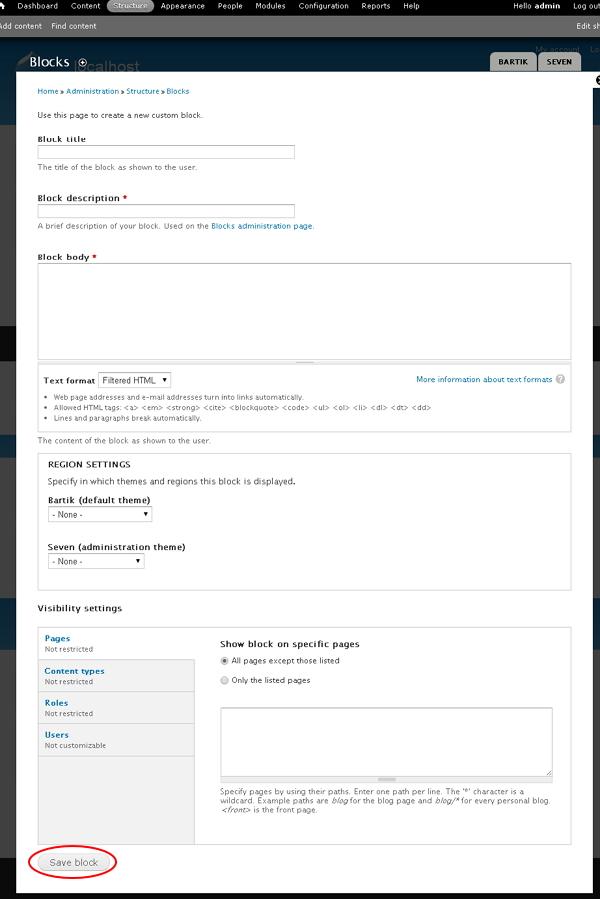
The following fields appear on the Blocks page.
-
Block Settings
-
-
Block title − Enter the title for your block.
-
Block description − Enter the description about block.
-
Block body − Enter the content of the block.
-
Text format − Select the format for your text i.e. Filtered HTML, Full HTML, and Plain text.
-
-
Region Settings
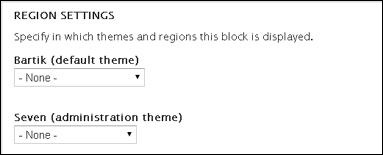
-
-
Bartik (default theme) − Select the region to display block in the theme.
-
Seven (administration theme) − Select the region to display block in the administration theme.
-
-
Visibility Setting

-
-
Page − Allows displaying blocks on all or specific pages.
-
Content Types − Allows to display the blocks in specific content, i.e. Article or Basic Page.
-
Roles − Allows displaying the blocks for specific types of users, i.e. anonymous user, authenticated user, or administrator user.
-
Users − Allows each user to customize the visibility of block in their settings.
-
Now, click the Save block after filling all the fields.
Step 5 − You can view the created block as shown in the following screen.
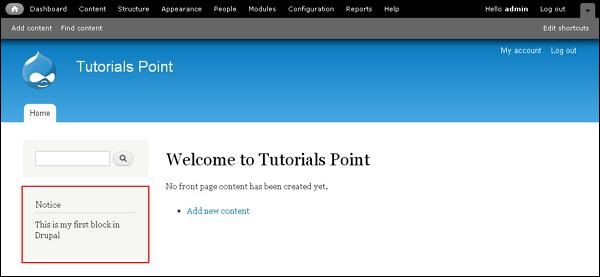
Drupal - Themes & Layouts
In this chapter, let us study about Themes and Layouts. Drupal will install Bartik theme as default theme during installation. You can select paid or free themes from Drupal official site. In general, layout is an arrangement of text and graphics. It is a good thought to choose a theme, keeping in mind what different layouts to use on your site.
Step 1 − Go to Drupal official site and click Get Started.

Step 2 − Click on All Themes as shown in the following screen.
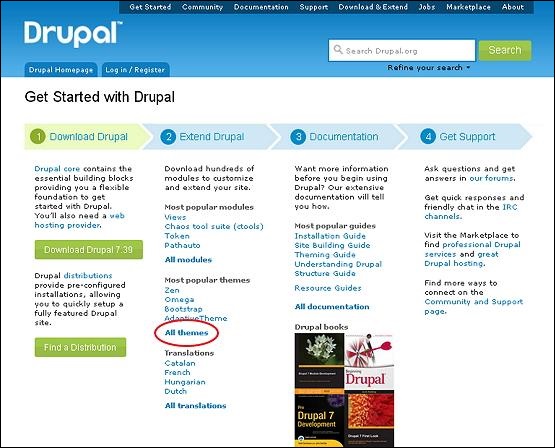
Step 3 − You will get a list of themes. Select theme of your choice (let us select Adaptive theme as it consists Layout & General Settings, which will be covered later in this chapter) and click Version as shown in the following screen.
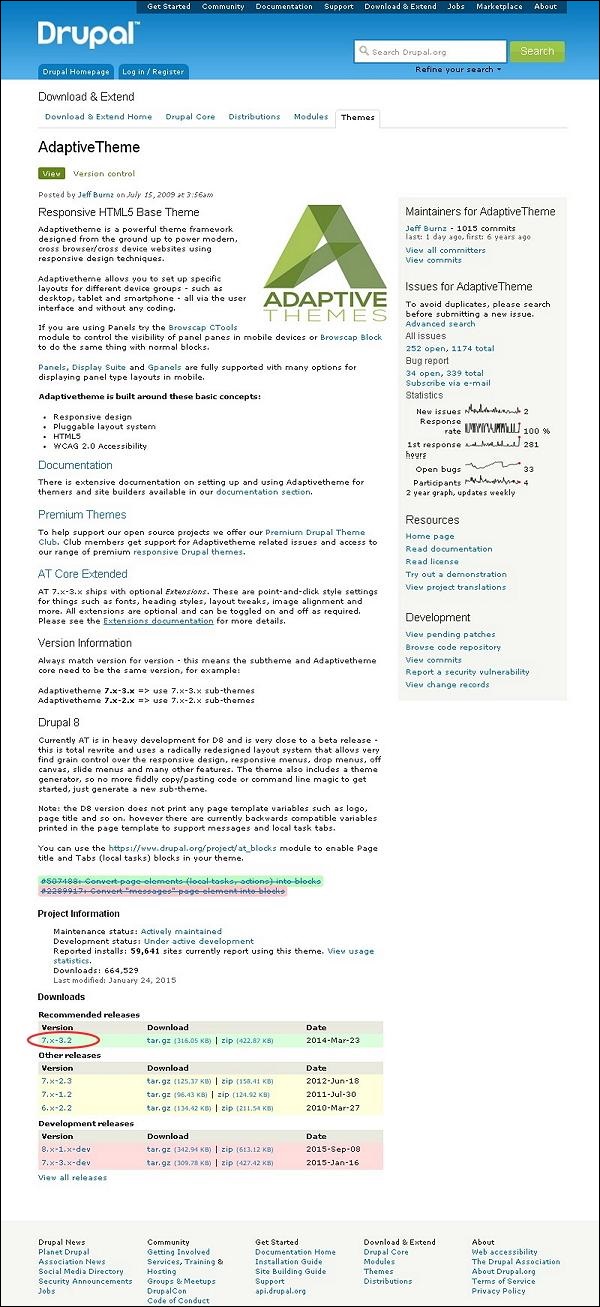
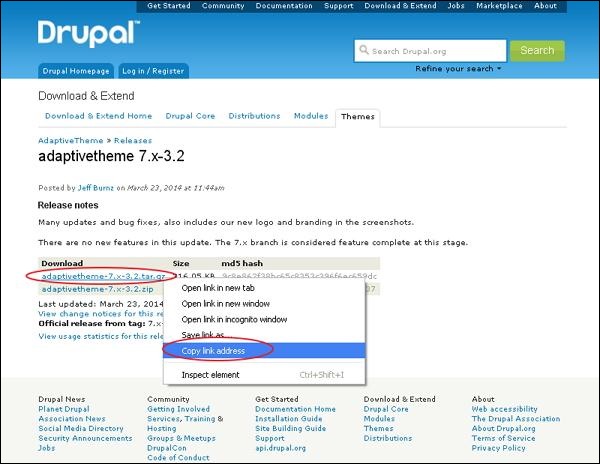
Step 4 − Next, right click Download file and copy the link address as shown in the following screen.
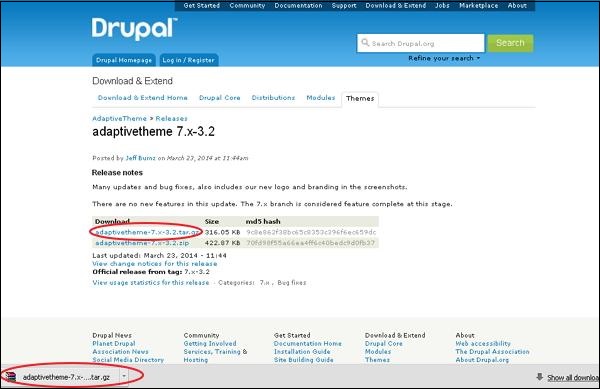
Step 5 − You can also download the theme directly by clicking on archive file and the module will be downloaded locally on your computer as shown in the following screen.
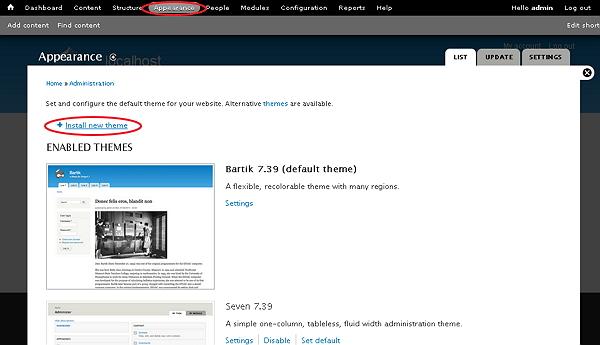
Step 6 − Go to Appearance and click Install new theme as shown in the following screen.
Step 7 − You can paste the link address you copied in step (4) and click the install button as shown in the following screen.

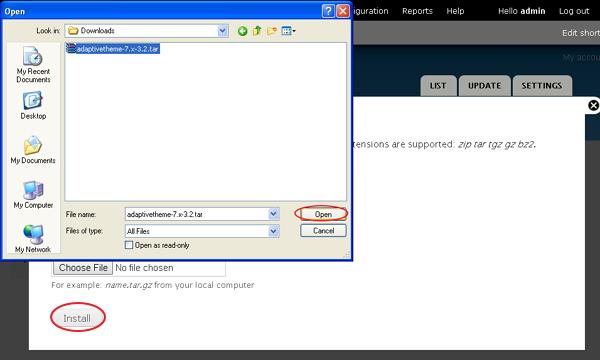
Step 8 − You can also upload the theme archive, instead of copying the link address, if you have downloaded it and click Install as shown in the following screen.
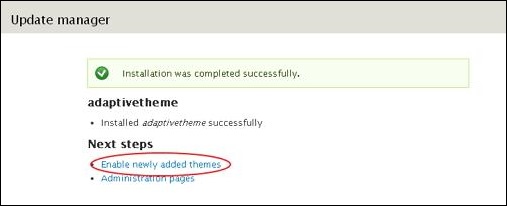
Step 9 − The following screen appears, wait until installation completes.

Step 10 − Next, click Enable newly added themes as shown in the following screen.
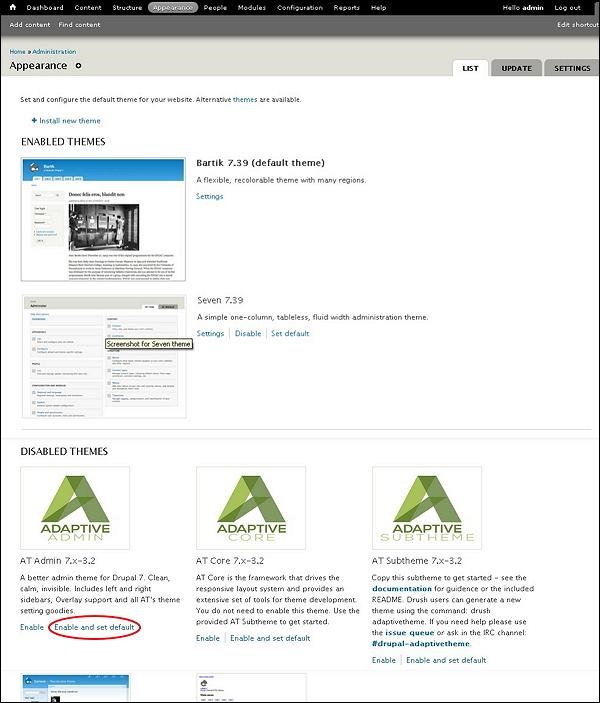
Step 11 − By default the themes are disabled. To enable them, click Enable and set default as shown in the following screen.
Step 12 − Click on Settings as shown in the following screen to set the appearance for your site.

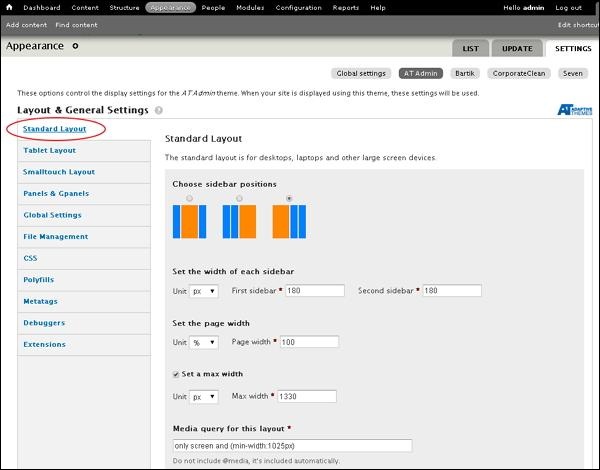
Step 13 − The Layout & General Settings option pops up on the screen, in this Adaptive theme consists of Standard layout, Tablet Layout, Smalltouch layout and Panels & Gpanels. These options control the display settings for the current AT Admin theme that is already in use. When your site displays the theme, these settings will be used. Now, let us discuss these layouts one by one.

Step 14 − In Standard layout you can choose layout for desktops, laptops and other large screen devices.
-
Choose sidebar positions − You can choose sidebar position by clicking on radio button.
-
Set the width of each sidebar − You can set width of first sidebar and second sidebar and unit in % or px or em.
-
Set the page width − You can set width of the page.
-
Set a max width −You can check or uncheck to set maximum width.
-
Media query for this layout − Media query defines different style rules for different media devices and by default for this layout will be 1025px.
Step 15 − Next, click Tablet Layout as shown in the following screen. Tablet devices will have two orientations Landscape and Portrait. You can configure a different layout for each orientation.
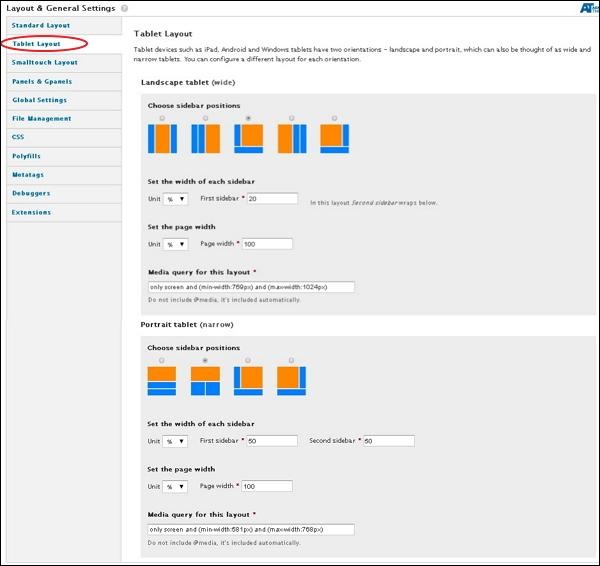
Under Landscape tablet and Portrait tablet you can choose sidebar position, width of each sidebar and page width. Media query for Landscape tablet will be min-width:769px and max-width:1024px. For Portrait tablet it will be min-width:581px and max-width:768px
Step 16 − Now, click Smalltouch Layout as shown in the following screen. Smalltouch layout will also have two orientations Landscape and Portrait. You can configure a different layout for each orientation.
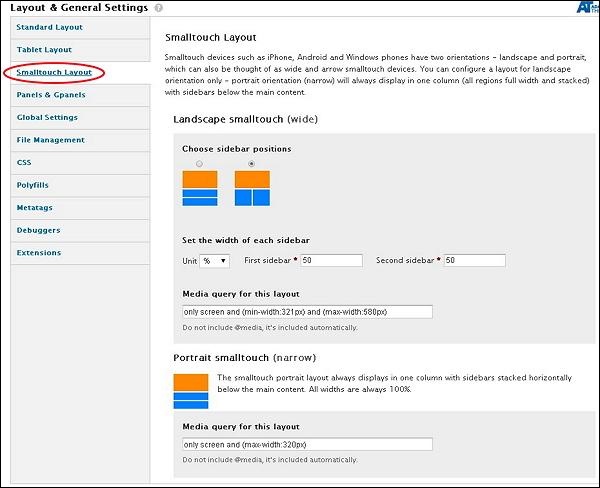
In Landscape Smalltouch you can choose sidebar position and set width. The Portrait Smalltouch always displays in one column with sidebars stacked horizontally below the main content. Media query for Landscape Smalltouch will be min-width:321px and max-width:580px and for Portrait Smalltouch it will be max-width:320px.
Step 17 − Next, click Panels & Gpanels as shown in the following screen. Adaptive theme supports responsive Panels and Gpanel layouts. To use this capability, you can use the Panels module, Display Suite (with Panels) or Adaptive themes native Gpanels layouts.
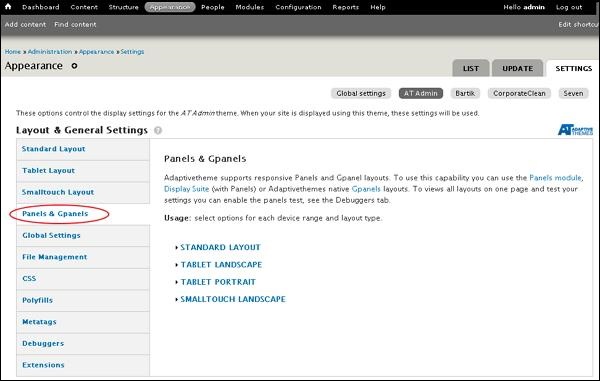
You can select options for each device range and layout their type. Let us see one by one.
-
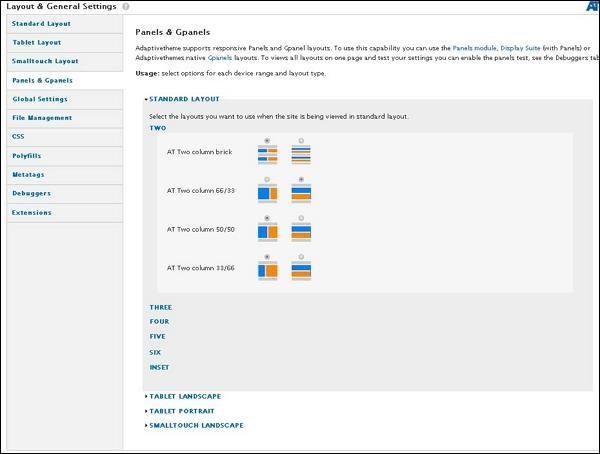
Under Standard layout you can select the layouts you want to use when the site is being viewed in standard layout. By clicking on TWO, THREE, FOUR, FIVE, SIX or INSET, you can select the columns arrangement as shown in the following screen.
-
Follow the same step for TABLET LANDSCAPE, TABLET PORTRAIT and SMALLTOUCH LANDSCAPE layouts.
Step 18 − Once done with all your configurations, click Save configurations as shown in the following screen.

Drupal - Front Page
In this chapter, let us study how to create Front Page in Drupal. If you have good content on your website and expect your visitor to see that particular content first, then that article must be on the front page. Drupal provides solution for this.
Following are the simple steps used for creating Drupal Front Page.
Step 1 − Click Content as shown in the following screen.

Step 2 − A list of articles and pages pop up on screen. Click edit link as shown in the following screen.
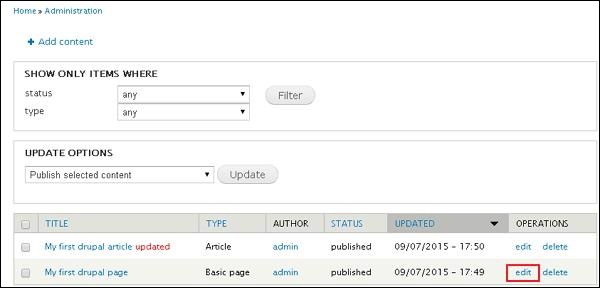
Step 3 − Then, click Publishing option and check mark all the boxes as shown in the following screen.

Following are the functions of the checkboxes on the page −
-
Published − Publish your page or article by marking the check box
-
Promoted to front page− Promote your page or article, to the front page of your website.
-
Sticky at top of lists− Fixes your page at top of lists on your site.
Click the Save button to save the changes.
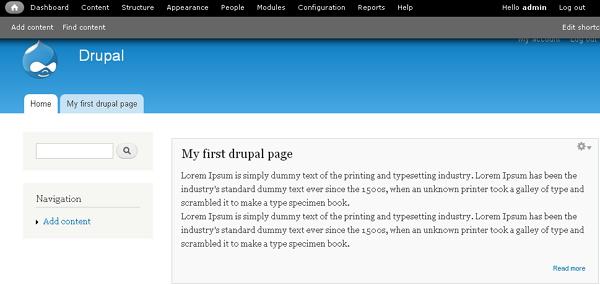
Step 4− You will see your page on the front page of your website similar to the following screen.
Drupal - Static Pages
In this chapter, we will study about how to create Static Pages in Drupal. Let's add some static pages named About Us and Services. The main purpuse for using a static pages is speed and steadiness. Static websites are more faster than a dynamic site.
Following are the simple steps to create static page.
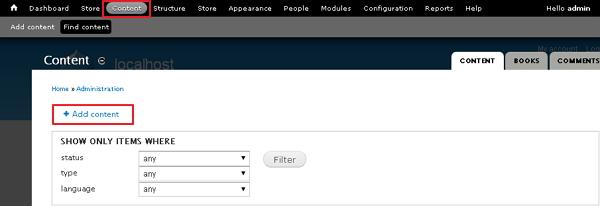
Step 1 − Click Content --> Add content link.
Step 2 − Click on Basic pages.

Step 3 − Create basic page will get displayed as shown in the following screen.

Following are the details of the fields present in the above screen.
-
Title − It specifies the title of the static page.
-
Body − It displays the body content of the page.
-
URL path settings − You can specify alternative URL by which content can be accessed.
Note − Don't add slash at the end or beginning of the URL alias or else it will not work.
You can see about-us URL path has been added under URL alias heading. The process is same for both About Us and Services static pages, only the content will be changed as per the demand.
You can click Publishing options and check the box of published option to publish your page.
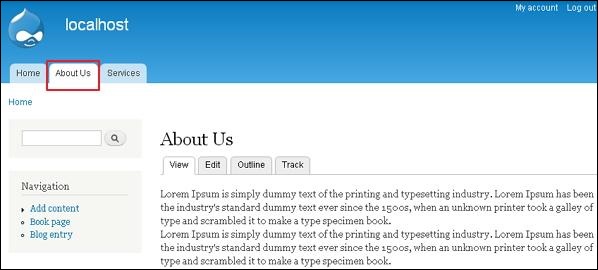
Step 4 − Click on About Us tab, you will see the created about us page as shown in the following screen.
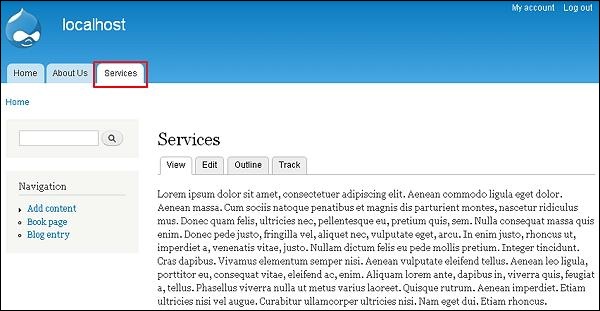
Step 5 − Click the Services tab, you will see the created services page as shown in the following screen.
Drupal - Create Blog
In this chapter, we will study how to Create Blogs in Drupal. Blog entries can be made public or private, for the site members, depending on which roles have access to view content.
Following are the simple steps used for creating Drupal Blogs.
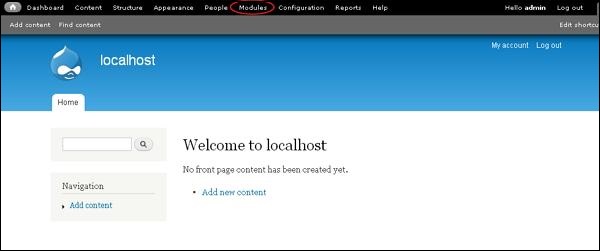
Step 1 − Click on the Modules as shown in the following screen.
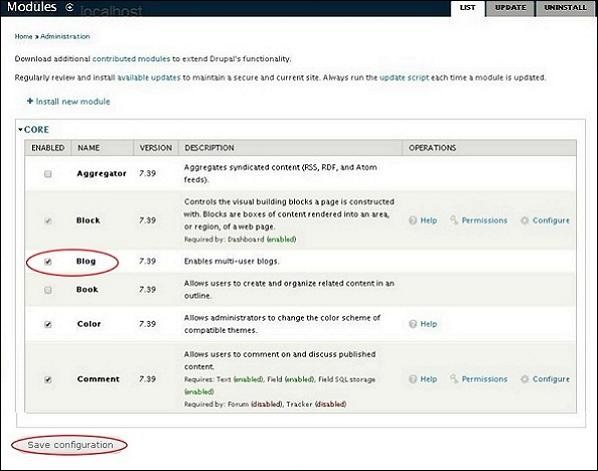
Step 2 − Next, Check the box of Blog to install it. Enable the Blog module and click Save configuration as shown in the following screen.
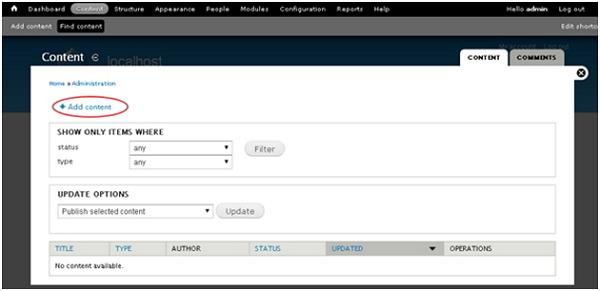
Step 3 − Now, click Content as shown in the following screen.

Step 4 − Click on Add content.
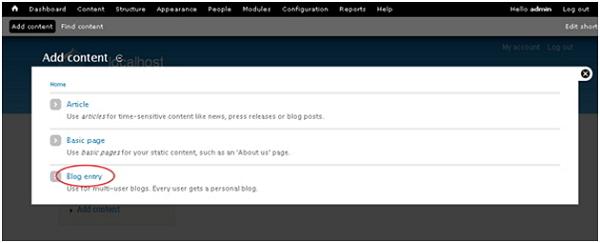
Step 5 − Click on Blog entry.
Step 6 − You can add the content to blog as shown in the following screen and click Save.
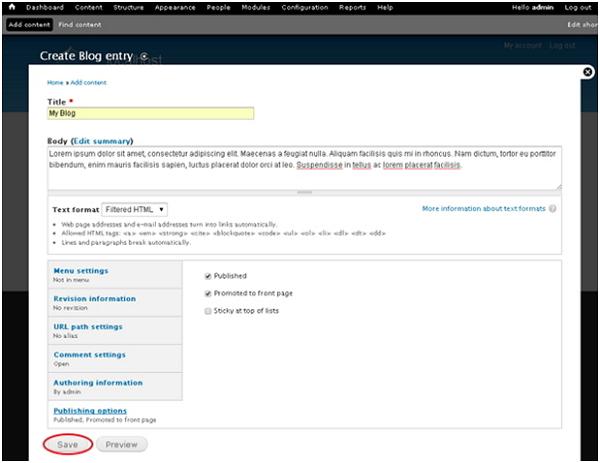
Following are the details about the fields present in the preceding screen.
-
Title − It displays the title of the blog.
-
Body − It displays the content of the body.
-
Publishing options − It allows you to publish your blog content on Front Page or you can stick at top of lists as per the demand.
Step 7 − Once you are done, you will see your post on home page.

Drupal - Create Articles
In this chapter, we will study about creating articles in Drupal. Creating articles help your visitors know about the company and your website in detail.
Following are the steps used to create articles in Drupal.
Step 1 − Click Add content in Drupal.

Step 2 − You will get the pop-up window as shown in the following screen. Select Article.

Step 3 − You will get the following screen.
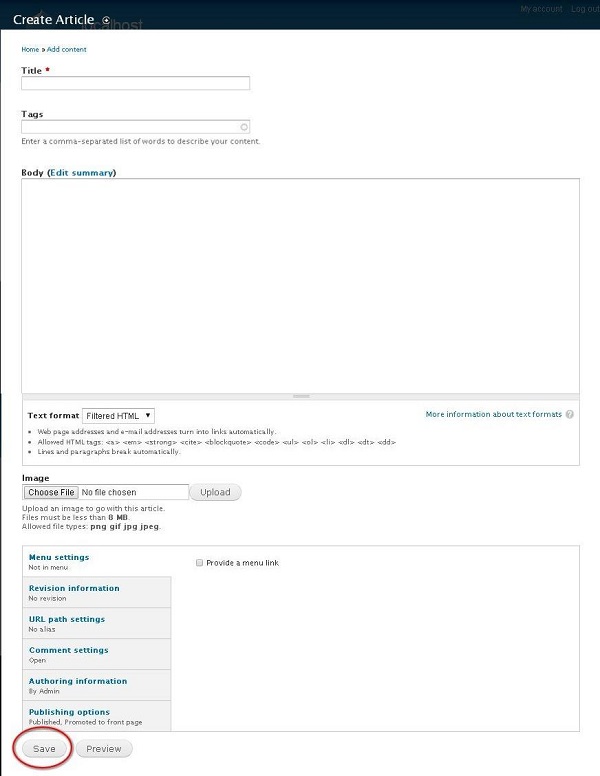
Below are the fields present in Create Article page.
-
Title − It specifies the title for new article.
-
Tags − Describes the content of your article. Tags contain those related words which are included into your articles.
-
Body − Enter the description.
-
Text format − It specifies the Text format such as Filtered HTML, Full HTML and Plain text.
-
Image − Upload images by choosing a particular file.

When you click choose file, a pop-up window appears, you can select an image from your local file, once you choose a file, click Upload. The image gets uploaded.
-
Menu settings − By clicking on Provide a menu link checkbox it shows all the related details of Menu such as Menu link title, Description, Parent item, and Weight.
-
Revision information − Provides revised information if any changes are made in the article.
-
URL path settings − Add URL alias to access the content of article to the users.
-
Comment settings − By selecting open or close, it allows others to write comment for the article.
-
Authoring information − Specifies the authored name and the date when article has been authored.
-
Publishing options − Allows options for articles to be Published, Promoted to front page and Sticky at top of lists for the users.
After filling all the details about the article, click the Save button.
Drupal - Create Pages
In this chapter, we will study about how to Create Pages in Drupal. It is very easy to create pages in Drupal.
Following are the simple steps used to create pages in Drupal.
Step 1 − Click Content in the top menu.

Step 2− Click on Add content as shown in the following screen.

Step 3− Click the Basic page option.

Step 4− Create Basic page will get displayed where you need to fill all the required details as shown in the following screen.
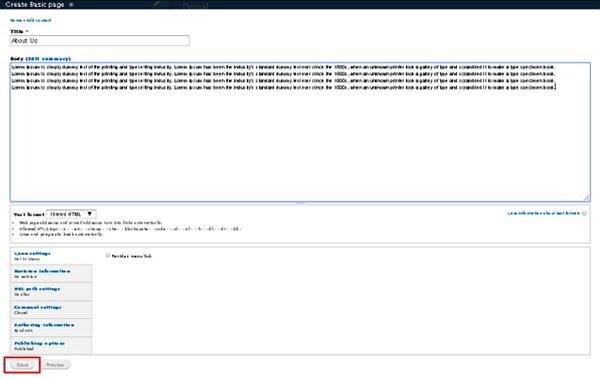
Following are the details of the fields present on Create Basic page.
-
Title − It specifies the title for new page.
-
Body − It specifies the description of the page.
-
Text format − It specifies the Text format for your page such as Filtered HTML, Full HTML, and Plain text.
-
Menu settings − By clicking on checkbox Provide a menu link, it shows the details of Menu such as Menu link title, Description, Parent item, and Weight.
-
Revision information − It specifies to provide revise information, if any changes are made in the pages.
-
URL path settings − It specifies to add URL alias to access the content of pages to the users.
-
Comment settings − By selecting open or close, it allows displaying a comment box for the page.
-
Authoring information − It specifies the authored name and the date when page has been authored.
-
Publishing options − It specifies that the page should be Published, Promoted to front page and Sticky at top of lists for the users.
Once you complete adding the content to the page. Click the Save button to create the page. Before saving the details, you can also preview the filled page using the Preview button.
Drupal - Create Content
In this chapter, let us study about Creating content. In Drupal, content type defines the style in which contents are collected and displayed. When you install Drupal, by default two content types will be fixed and they are Articles and Basic page. When you enable other core and contributed modules by visiting Modules you can also use other content types.
Following are the simple steps used for creating content.
Step 1 − Click Content as shown in the following screen.

Step 2 − Click on Add content as shown in the following screen.
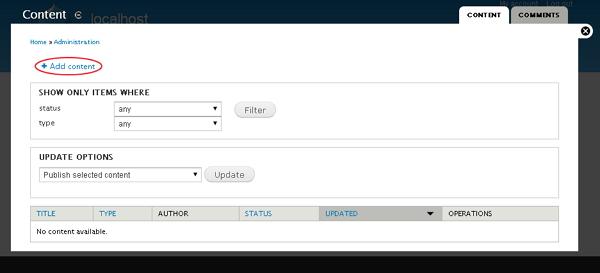
Step 3 − You can choose any of the content type. We shall take Basic page as we have already studied about Articles and Blog entry. Click Basic page as shown below in the following screen.

Step 4 − Next, you will see the screen as shown in the following screen. You can add content to the page and click the Save button to save the content.
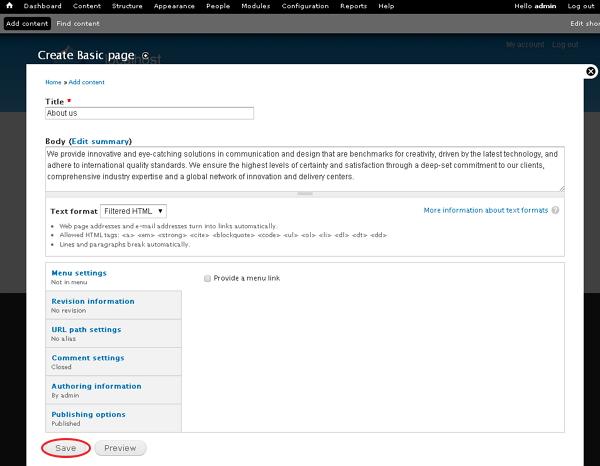
Following are the details about the fields present in the preceding screen.
-
Title − It specifies the title of the page.
-
Body − Write the content of your page.
-
Menu setting − It allows you to provide a menu link.
-
Revision Information It provides an explanation of the changes you are making.
-
URL path settings − It allows you to optionally define an alternative URL, by which your content can be accessed.
-
Comment Setting − It allows users to send their comments depending upon the permission you set that is Open or closed.
-
Authorizing information − It specifies the author information.
-
Publishing options − It permits you to promote your content to the front page and stick your content on top of the list on the front page.
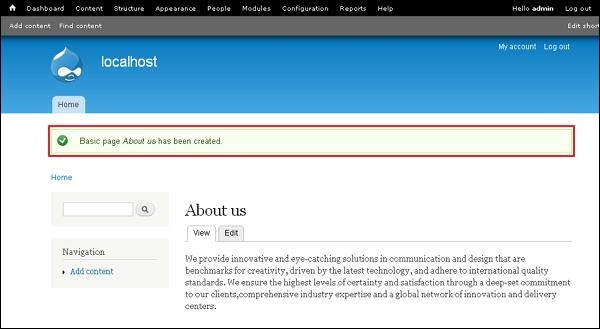
Step 5 − Finally, you can see your page will be created and displayed similar to the following screen.
Drupal - Modify Content
In this chapter, let us study how to Modify content in Drupal. You can modify any of the previously used content type's content such as Articles, Basic page and Blog entry.
Following are the simple steps used for modifying content.
Step 1 − Click the tab Content as shown in the following screen.

Step 2 − You will see the same screen as the following.
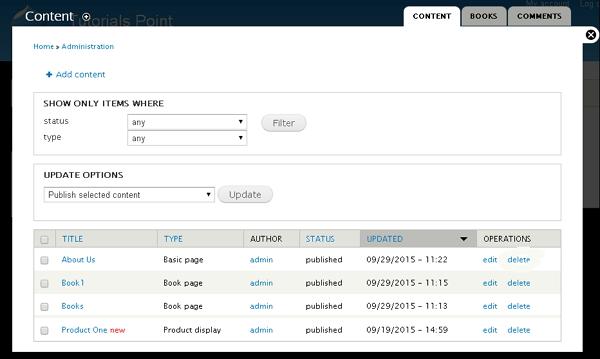
Step 3 − If you have lot of content you can use Filter to search the content that you want to modify. You can modify About us (About us page was created in the chapter Drupal - Create Content).
You can select the status of the content as shown in the following screen. Select published for About us status.

Following are the details of the fields present in the preceding screen.
-
Published − It displays all the published items.
-
Promoted − It displays the promoted items on your website.
-
Not promoted − It displays the items that not promoted on your website.
-
Sticky − It displays the sticky items on your website.
-
Not sticky − It displays the non-sticky items on your website.
You can select type of the content like Articles, Basic page or Blog entry. Select Basic page as About us type is Basic page, and click filter as shown in the following screen.

Step 4 − Now you can see the filtered content as shown in the following screen. To edit the content, click the edit link.

Step 5 − You can modify your content and click Save.
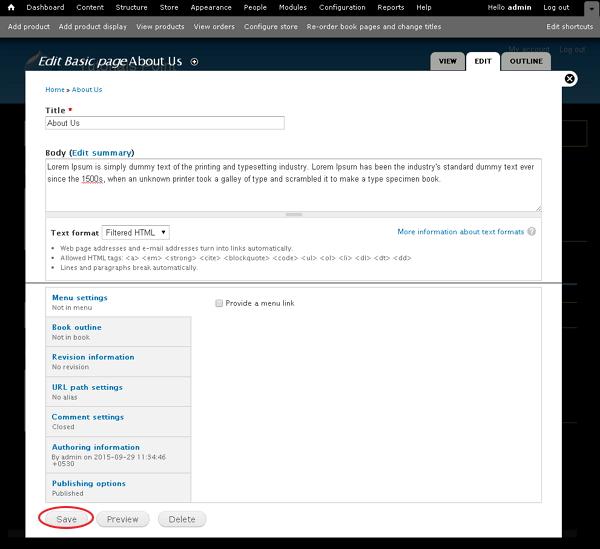
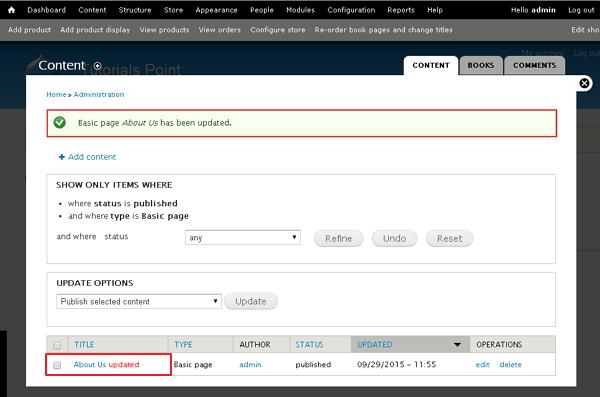
Step 6 − You will see the following screen with updated content.
Drupal - Delete Content
In this chapter, let us study about Deleting content. You can delete any of the previously written content such as Articles, Basic page and Blog entry.
Following are the simple steps used to delete content.
Step 1 − Click the Content.

Step 2 − You can delete About us (About us page was created in the chapter Drupal - Create Content), and click the delete tab as shown in the following screen.

Step 3 − Next, you will see the following screen. You need to confirm deletion of the content. Click the Delete button if you want to delete or Cancel button if you want to cancel the process.

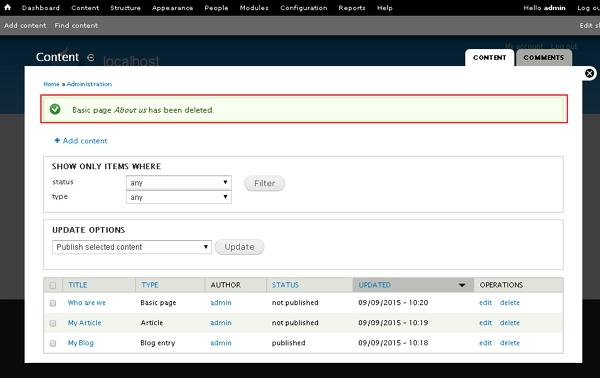
Step 4 − Immediately, you will see a confirmation message as your page has been deleted, as shown in the following screen.
Drupal - Publish Content
In this chapter, let us study how to Publish content. Every content is either published or unpublished. Published content is open for visitors to view while unpublished content cannot be viewed. We can make use of this feature to hide the content from public view without deleting it.
Following are the simple steps to enable or disable publishing options for content.
Step 1 − Click on the Content tab as shown in the following screen.

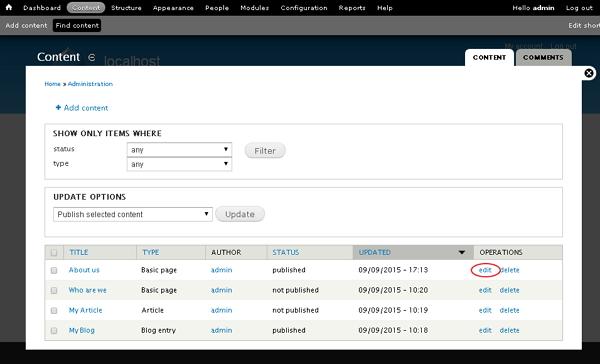
Step 2 − You can select any of the content. Let us choose About us (About us page was created in the chapter Drupal - Create Content), and click edit as shown in the following screen.
Step 3 − Next, click Publishing options as shown in the following screen.
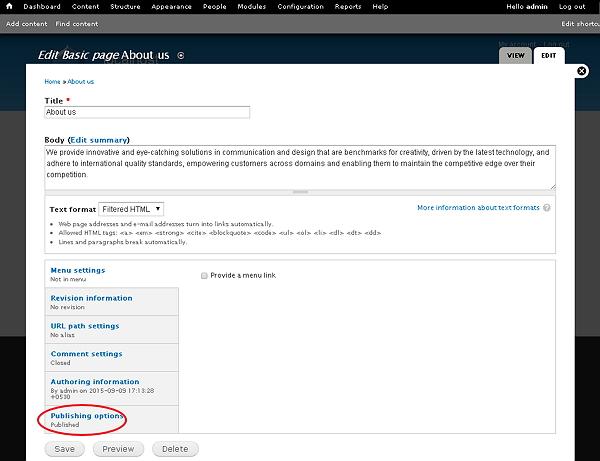
Step 4 − Check the box of Published option and click Save as shown in the following screen.
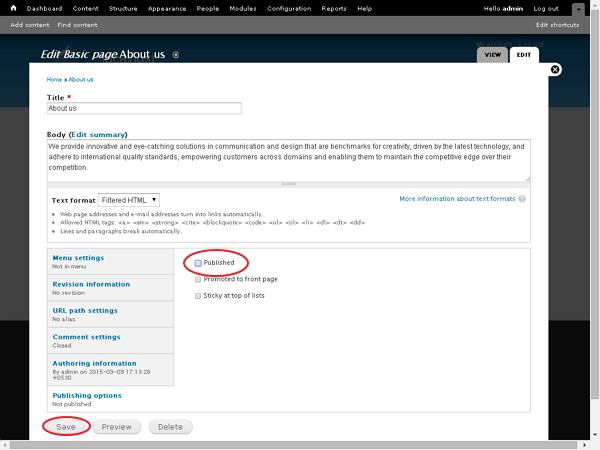
Following are the details of the fields present in the preceding screen.
-
Published − It specifies to publish your page.
-
Promoted to front page − It displays your page on front page of your website.
-
Sticky at top of lists − It displays your article or page, etc. at the top of the lists.
Step 5 − You can see the status of the content will be changed.

Drupal - Menu Management
In this chapter, we will study about Menu Management in Drupal. Menu Management is the important part to navigate through Drupal admin page. Following is the screen for Drupal Menu Management.

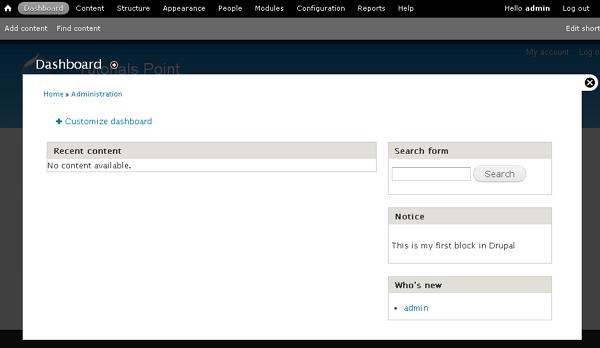
Dashboard
It displays the list of articles or pages which are created. It is the first screen that will get displayed when you log into administration area.
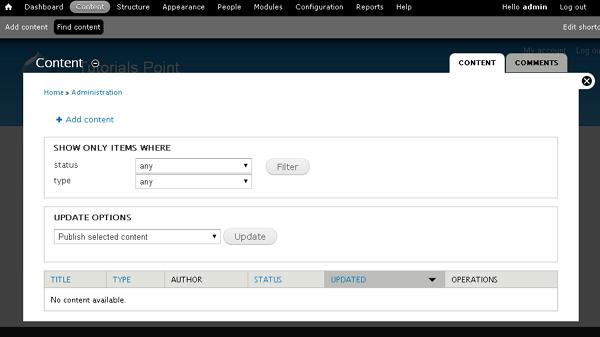
Content
This feature can help you in creating, managing and finding new pages. The table gets displayed with the detail of the articles, i.e. status, title, updated, author and operation (Edit and delete).
Structure
Structure includes the blocks, manage content types, add new menu links to the site and manage administrative tagging of content.

-
Block − Blocks are a container objects used to organize your content on your website. It can be displayed in the region on your page.
-
Content types − Content type defines the way the contents are collected and displayed.
-
Menus − Menus are used to set the URL links for your site.
-
Taxonomy − Taxonomy can be thought of classifying website content which display specific content based on taxonomy terms.
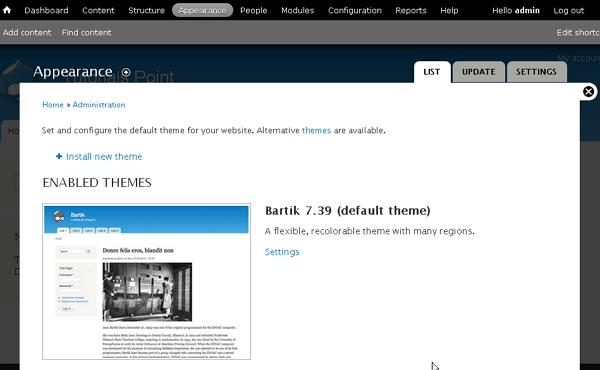
Appearance
A list of themes are displayed. You can install the theme, update the existing theme or switch the themes.
People
You can create a new user account or mange the existing user.

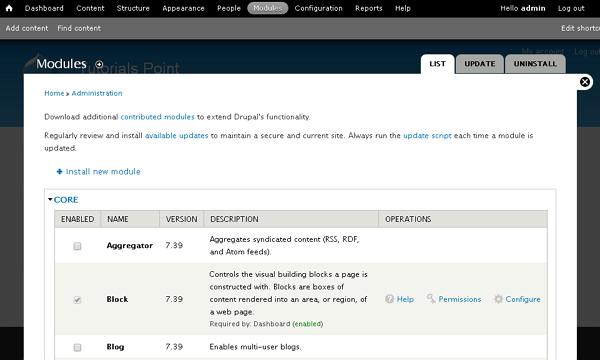
Modules
You can enable or disable the modules present in it or can install a new module.
Configuration
This is an important part in the Drupal backend. Any changes done in this configuration, will affect the entire website. You can do the user account setting, site information setting or any other general site setting.

Following are the details of the fields present in the preceding screen.
-
People − Manages the user settings and IP address setting.
-
System − Manages the basic site information, advanced actions and site maintenance task.
-
Content Authoring − Manages the content input by the users including HTML tags.
-
User Interface − Sets the shortcut for menu on the admin account page.
-
Media − Manages the media settings in Drupal sites.
-
Development − Manages the errors and page caching for users.
-
Search and Meta Data − Set the alternative URL for specific page and the search engine maintains an index of words found in site content.
-
Web Services − Displays the RSS feed from your site.
-
Regional and Language − Sets the website time zone and displays the date and time.
Reports
It displays the information of available updates, recent log messages, and site security.
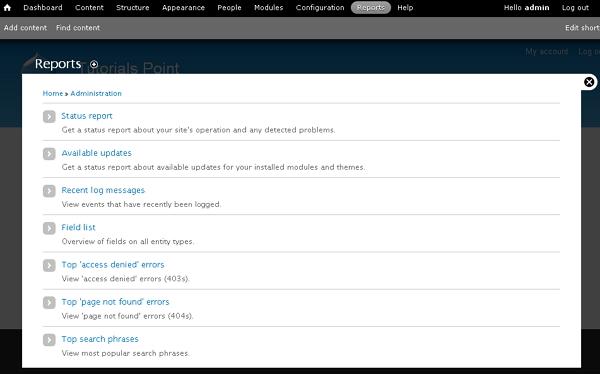
Following are the details of the fields present in the preceding screen.
-
Status report − Creates your Drupal site status report.
-
Available updates − Gives status update for you available installed modules and themes.
-
Recent log messages − Displays messages which are recently logged.
-
Field List − Displays the list of fields configured on your site.
-
Top 'access denied' errors − Displays access denied error message when user tries to access the unauthorized page.
-
Top 'Page not found' errors − Displays an error message as Page not found when there is no specified URL present in the Drupal site.
-
Top search phrases − Displays the most searched phrases on your Drupal site.
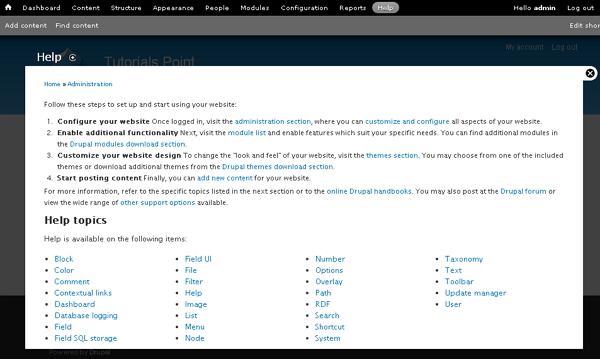
Help
It displays the help screen, where documentation pages of online modules are listed.
Drupal - Taxonomies
Taxonomy can be thought of classifying website content which display specific content based on taxonomy terms. Drupal taxonomy is made up of −
-
Term − It is used to manage or describe the content.
-
Vocabulary − It is set of terms.
Following are the steps to work with Drupal Taxonomy −
Step 1 − Go to Structure and click the Taxonomy option.
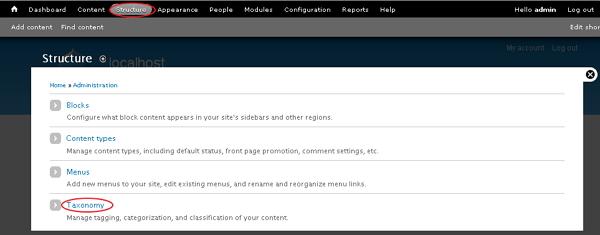
Step 2 − You can create a new vocabulary for Drupal taxonomy by clicking on Add vocabulary link.
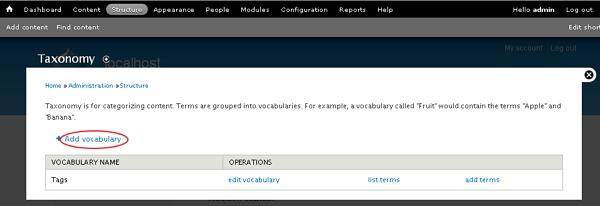
Step 3 − You will get a screen with Name field for adding name for your vocabulary which is mandatory and Description field is used for adding description for the vocabulary. Click the Save button.

Step 4 − Click add terms to add new terms to the created vocabulary as shown in the following screen.
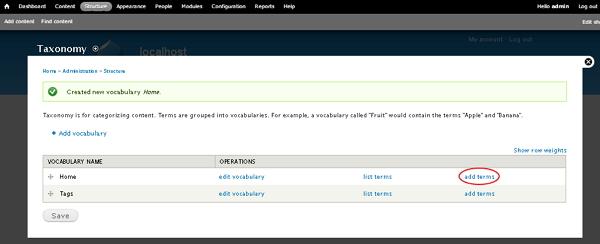
Step 5 − The screen shows some fields as seen in the following screen.
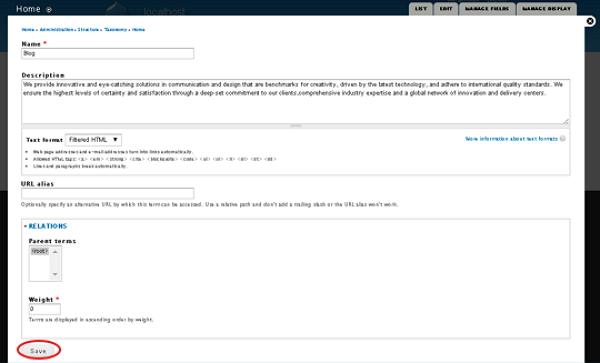
Following are the details of the fields present in the preceding screen.
-
Name− It specifies name of the term.
-
Description− It is used for adding description for the term.
-
Text format− It provides different types of formats by using dropdown menu.
-
URL alias− It optionally specifies an alternative URL by which this term can be accessed.
-
Relations
-
Parent Terms − In this field, you can set a term as the parent term.
-
Weight − Specifies weight for each term which will then display in ascending order by weight.
-
After filling all the fields, click the Save button.
Drupal - Comment
In this chapter, we will study about Comments in Drupal. You can enable or disable the comments on your website. You can control, who can comment on your website's content and who can manage those comments.
Following are the simple steps to configure comments in Drupal.
Step 1 − Go to Structure and click Content types as shown in the following screen.
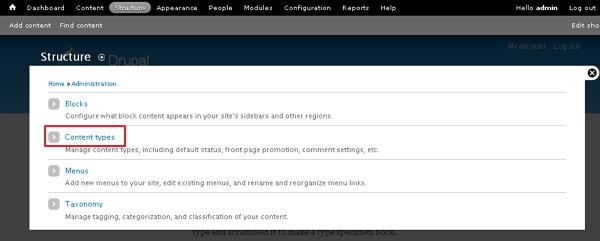
Step 2 − Click on Edit link that you would like to change the comment setting.

Step 3 − Click Comment settings category as shown in the following screen.
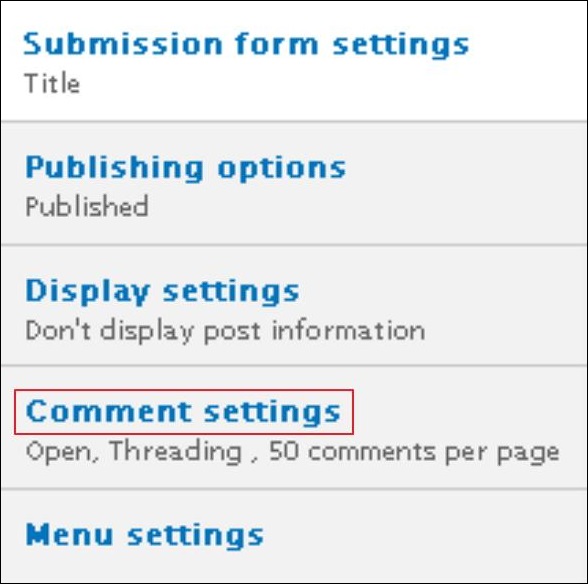
Step 4 − Select open from the drop-down menu under Default comment setting for new content. This will allow comments on your website.
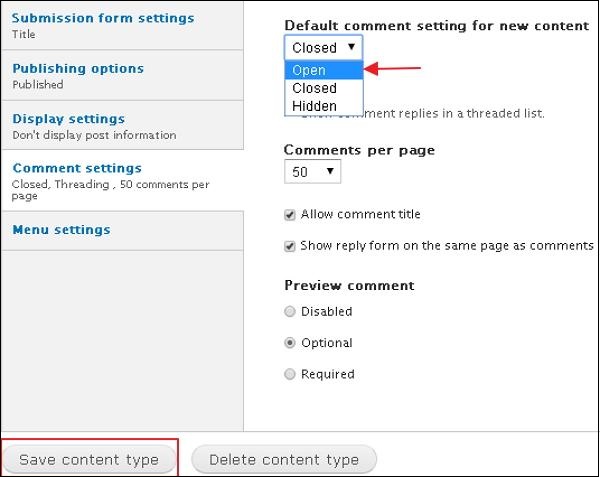
Click the Save Content type button to save your configuration settings.
Drupal - User Management
User Management manages the information of the user, which allows creating or deleting the user, changing passwords, time and roles.
Following are the simple steps to manage the users in Drupal.
Step 1 − Click People --> Permissions Tab.

In Permission tab, you can view two more tabs i.e. Permissions and Roles as shown in the preceding screen.
-
Permission
This section is related to posting content permission. It contains the following types of permission −
-
Block − Sets permission to view, create, enable and disable the blocks.
-
Comment − Sets permission to users to view, edit, post comment or skip comment approval.
-
Contextual links − Sets permission to use contextual link to perform action related to elements on a page.
-
Dashboard − Sets permission to allow users to view and make changes in the dashboard.
-
Filter − Permission to filter the amount of roles and permission on the site.
-
Image − Permission to create or modify the styles of images.
-
Menu − Allows permission to access menu items and create menu through the admin interface.
-
Node − Allows to manage the view, edit and delete permissions for content type.
-
Overlay − Sets permission to display administrative page as a layer over the current page.
-
Path − Sets permission to access path to all pages of Drupal site.
-
Search − Sets permission to use normal and advanced search.
-
Shortcut − Allows permission to set the shortcut toolbar on top of the page.
-
System − Permission is granted to administer site configuration, view the themes, site reports, etc.
-
Taxonomy − Permission to set the vocabularies and terms, and also to edit and delete terms in tags.
-
Toolbar − Allows permission to access the administration toolbar.
-
User − Sets permission to individual users without assigning any special role to provide an interface.
-
-
Roles
It allows to set permissions for group of users by defining there roles. Here you can create the roles and edit permissions for each user.
-
Anonymous user − Allows user to access your website without asking them for the username or password.
-
Authenticated user − Allows only those users to access your website, who are authenticated to use it.
-
Administrator − User who is responsible to manage the complete website and allow users to create or view by his permission.
-

Drupal - Optimization
In this chapter, we will learn how to optimize Drupal to improve its performance and speed. There are few steps through which we can improve the performance of the website.
Following are some of the ways to optimize the website.
Enable Page Caching
Enable Cache blocks and Cache pages for Anonymous Users. Page caching lets your contents store in different database cache tables. Page cache is stored in the HTML content. It optimizes the page load time for anonymous users.
Step 1 − Click Configuration from the menu bar.

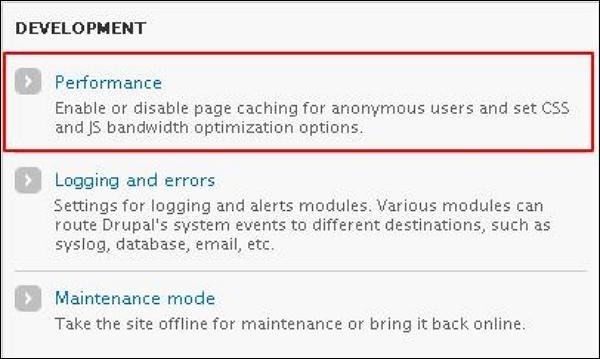
Step 2 − In Development section click Performance.
Step 3 − Enable Cache blocks and Cache pages for Anonymous Users by checking both the boxes. Then, click Save Configuration.
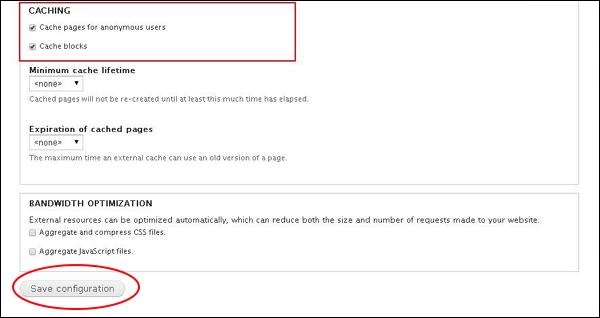
Compress CSS files
If you have many CSS files, it can lower your websites speed. Compress them by enabling Aggregate and Compress CSS files.

Enable this setting from AdministrationConfiguration→Development→Performance section. Drupal decreases the number and size of your CSS files.
Js Aggregation
Java files can also affect the performance and speed of your website. To compress this enable the Aggregate JavaScript files from the Administration→Configuration→Development→Performance in the bandwidth optimization section.

Moving Media Files and Static files to a CDN
This decreases the number of requests that a shared hosting handles. Use CDN (Content Delivery Network) that hosts your media files and static files. CDN acts as an external cache for your files and will store them in high performance servers so that it is optimized.
Optimize Images Size and Their Number
Do not have many images which consume more space as this leads to slow website. Always resize your images and have few that are related to your website.
Theme Optimization
Optimizing themes is a very important aspect. Media files like high quality images, videos, audios and flash can affect your website and slow down the speed resulting in low performance. Try reducing the size and number of media files or maybe you can avoid using flash.
Drupal - Site Backup
In this chapter, we will study about Site Backup in Drupal. It helps in backing up the files and the database file.
Backup Files in Drupal
Backup Database in Drupal
Backup Files in Drupal
To get the backup files of Drupal, you need to install FileZilla Client on your system.
Following are the simple steps for file backup in Drupal −
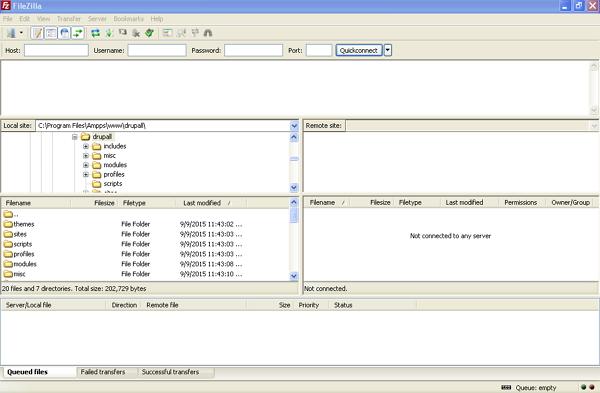
Step 1 − Open the FileZilla Client as shown in the following screen.
Step 2 − Enter the Host, Username, Password and Port as you have used to login to your cPanel.
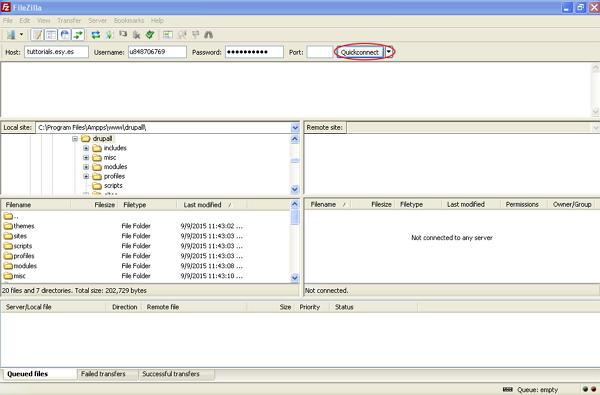
After filling all the fields, click Quickconnect button.
Step 3 − You will get all files and folder of your Drupal site on the right side as shown in the following screen.

Step 4 − Select all the files and folders and right click the mouse, click the Download option.
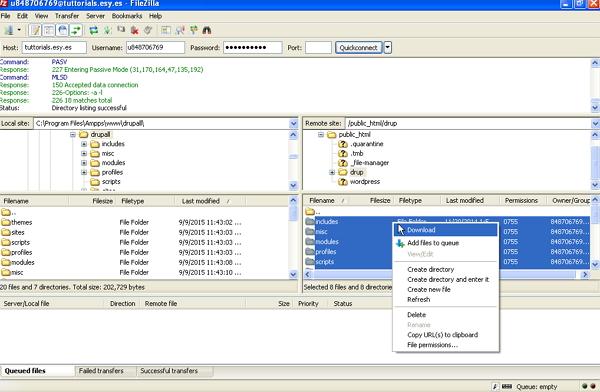
After downloading the Drupal files from cPanel, it will get saved on your system.
Backup Database in Drupal
Following are the simple steps for database backup in Drupal −
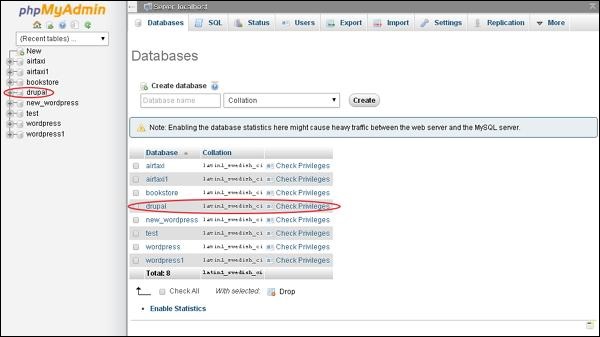
Step 1 − Type the path http://localhost/phpmyadmin in browser. You will get the following screen.
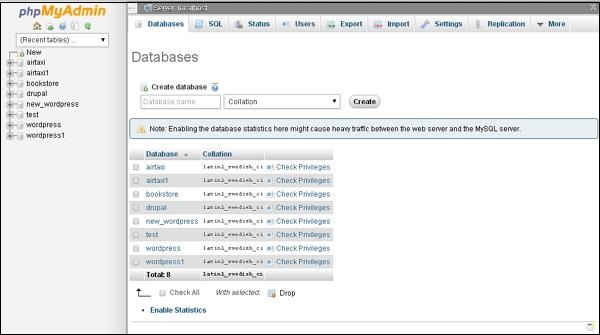
Step 2 − Click the database name drupal, which you have created for Drupal.
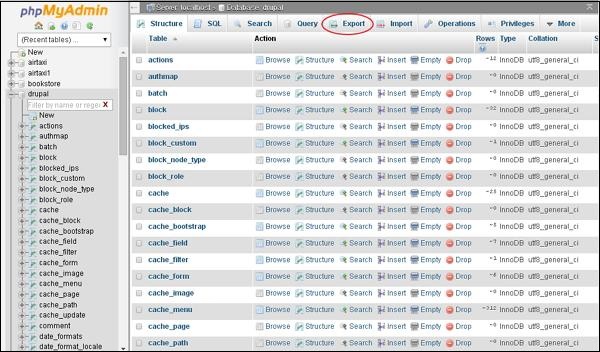
Step 3 − After clicking on database drupal, it will open the following page, click Export tab.
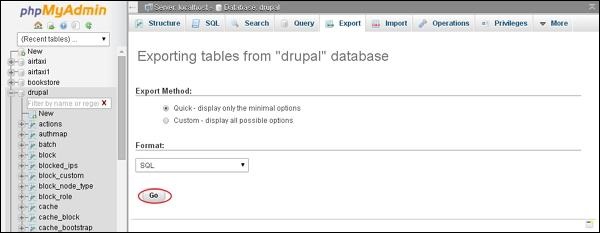
Step 4 − Next, you will find two methods to export the database i.e. Quick and Custom. Select any one of the methods and click the Go button.
After exporting the database file, it will get saved on your system.
Drupal - Site Upgrade
In this chapter, we will study how to upgrade the Drupal site. Upgrade is a process of enhancing the old version to the latest version. Here we will upgrade the Drupal to the latest version.
Below are simple steps to upgrade the site in Drupal.
Step 1 − Backup your Drupal files. You can study about this in detail in the chapter Drupal - Site Backup.
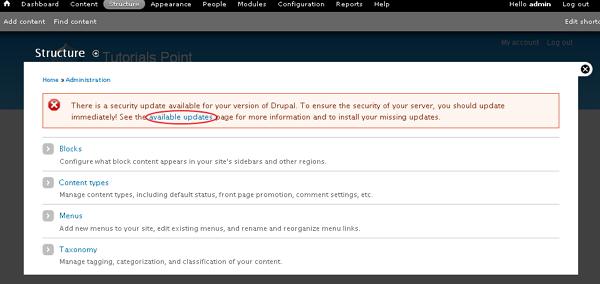
Step 2 − If there is any upgradation to be done on Drupal site, then a message gets displayed on your site as shown in the following screen.
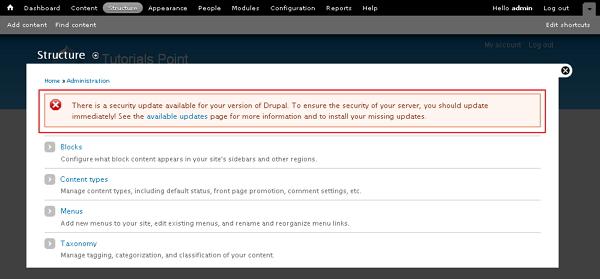
Step 3 − Click on the highlighted word available updates in the message.
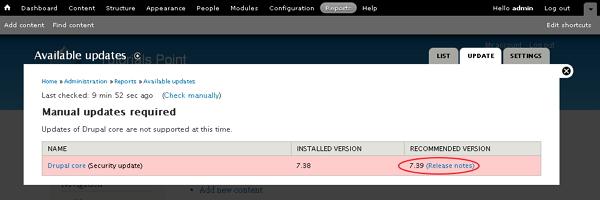
Step 4 − You can now view the Available Updates page, where it shows exactly what upgradation is to be done on the site. Here, it shows you the recommended version to update your site. Click Release notes.
Step 5 − It will take you to Drupal official site page where you can see the latest version tar.gz files available in Drupal. While writing this tutorial, the latest version was drupal - 7.39.tar.gz. Click drupal - 7.39.tar.gz.

The tar.gz files get downloaded on your system.
Step 6 − Extract the downloaded file, copy all the files and folder except the Sites folder available inside the latest downloaded folder. Later, paste these files into your existing Drupal folder.
Step 7 − Go to Reports --> Available updates or else you can refresh the page; here you will view a message as shown in the following screen.

Step 8 − Click on Reports --> Status report.
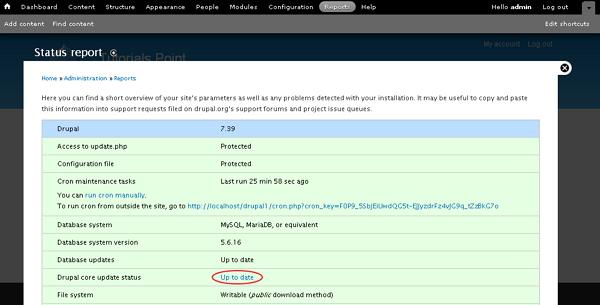
You can now see that your site is upgraded to latest version and it will show the status Up to date for Drupal core update status as shown in the preceding screen.
Drupal - Announcements
In this chapter, we will learn about Announcements in Drupal.
If you want to make any announcements on your website then you can do it through this feature. Declaration given to a visitor or user with the help of your website is announcements. It can be some important news, report, etc. It can be useful if you want to declare something important through your site that can be helpful for your visitors.
Following are the steps to create Announcements in Drupal.
Step 1 − First click Structure.

Step 2 − Click on Content Types.
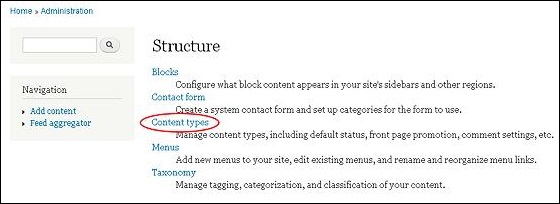
Step 3 − Then you must click Add Content type.

Step 4 − When you click Add content, the following page will get displayed on screen.

Step 5 − Enter the content that you want to announce in the Name section. After adding name, click Save content type.
Your new content gets displayed as shown in the following screen.

Step 6 − If you want to make changes you must click the Edit section, you will get the following page.
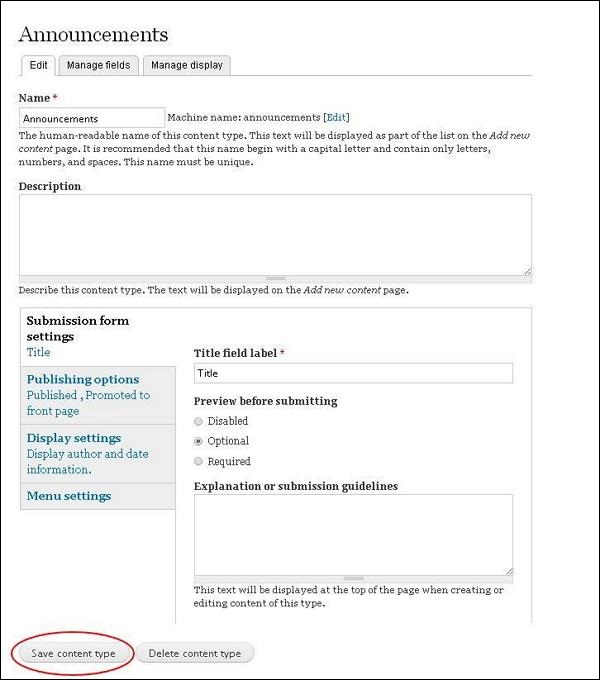
Step 7 − You can make the required changes, such as adding description and then click Save Content type. If you want to delete, then click Delete Content type.
You can manage the fields by clicking on Manage Fields and manage display by clicking on Manage Display.
Drupal - URL Alias
In this chapter, we will study about Drupal URL Alias. URL or Uniform Resource Locater Aliases is a page address on your web page, it changes the existing system path to new path alias.
Following are the simple steps to create URL Aliases in Drupal.
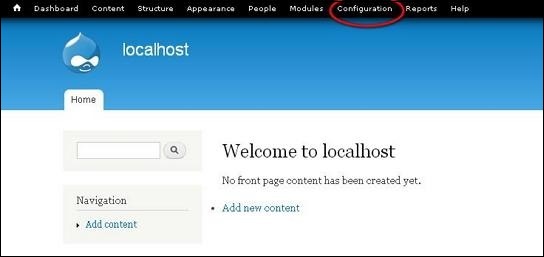
Step 1 − Click Configuration as shown in the following screen.
Step 2 − Click on URL aliases.

Step 3 − Then, click Add alias.
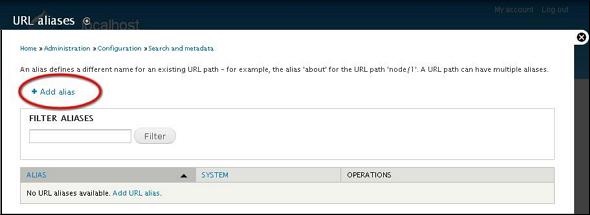
Step 4 − The Url aliases page will get displayed as shown in the following screen.
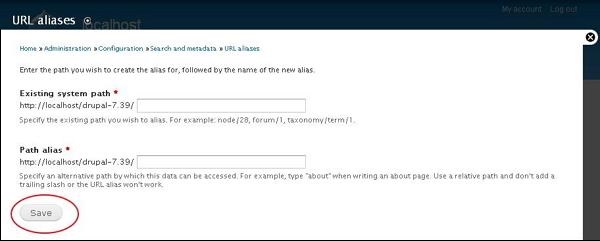
Following are the details about the fields present in URL aliases page.
-
Language − Specifies the language to be used in URL aliases.
-
Existing system path − Existing system path of an Article/Page in Drupal site.
-
Path alias − New path alias that replaces with the existing system path of an Article/Page.
Click the Save button.
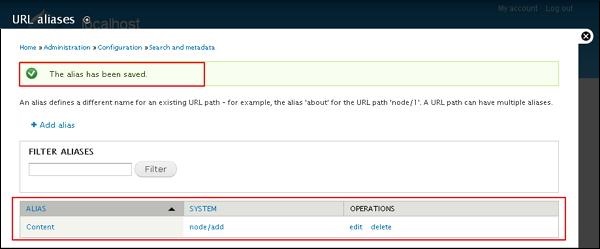
Step 5 − You can view your created URL aliases in the list as shown in the following screen.
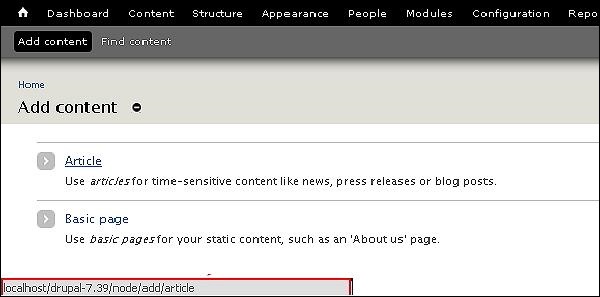
Step 6 − When you go back to Drupal Admin panel and hover over Article, it will display the newly added Path alias at the left bottom of the screen as shown in the following screen.
Drupal - Site Search
Drupal allows to search for specific content on your site. You can search for both users and words on the site. We will see how to set up site search in Drupal as specified in the following steps −
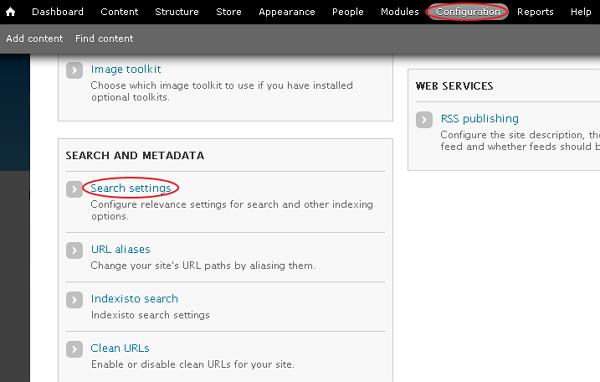
Step 1 − Go to Configuration and click the Search settings link under SEARCH AND METADATA section.
Step 2 − The search engine maintains an index of words found on your site's content. You can adjust the indexing behavior as shown in the following screen.
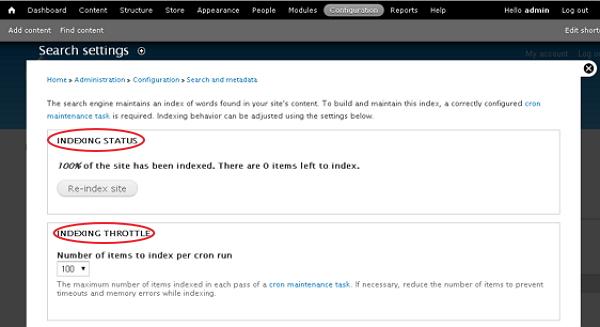
The Indexing Status section indexes the content of nodes on the site. When you click the Re-index site button, the previous content remains until cron runs and sets the number of items to index per cron run by, using the drop-down menu under the Indexing Throttle section.
Step 3 − Next it provides settings related to the indexing which will cause the site index to be rebuilt. It updates systematically to reflect the new settings. You can set minimum word length to index, i.e., the number of characters a word has to be indexed as shown in the following screen.
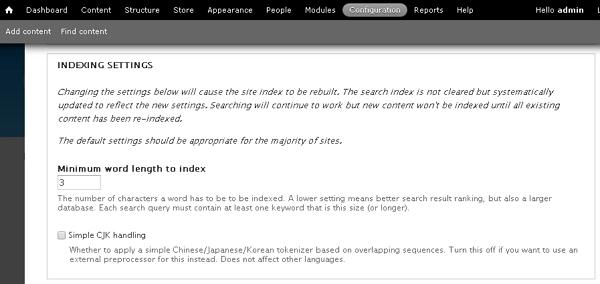
Step 4 − You can choose which search modules are active from the available modules as defined in the following screen.

You can search for both users and words (node) by checking the required modules and set the default search module as shown in the preceding screen.
Step 5 − The last section is Content Ranking which comes with Factor and Influence columns.
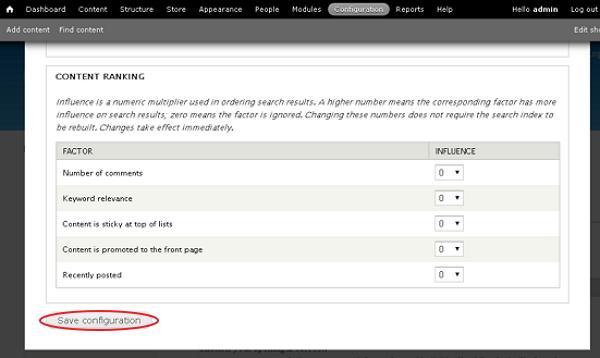
Influence is a numeric multiplier used in ordering search results. If you set higher number for a corresponding factor, it will have more influence on search results; zero means the factor is ignored. After you are done with settings, click the Save configuration button.
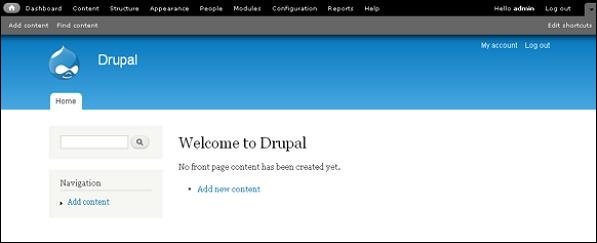
Step 6 − Now go to home page, search the content that matches for the keywords in your content in the search bar.
Drupal - Error Handling
In this chapter, we will study about Drupal error handling for managing error messages on Drupal site.
Error Handling is a process of detection and finding the resolutions for the errors. It can be programming application errors or communicable errors.
The following steps describe how to manage error messages in Drupa −
Step 1 − Go to Configuration and click Logging and errors.
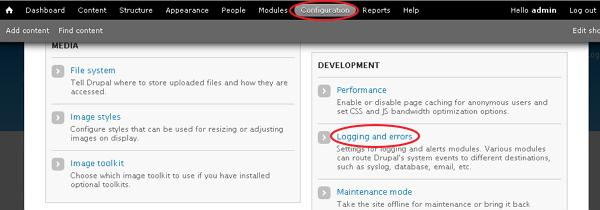
Step 2 − The Logging and errors page will get displayed as shown in the following screen.
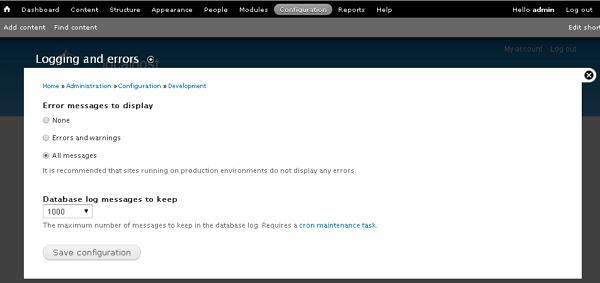
Following are the details of the fields as seen in the preceding screen −
-
Error messages to display − It specifies error messages to be displayed on the Drupal site.
-
None − This option doesn't display any error message.
-
Errors and warnings − This option displays only messages related to errors and warnings.
-
All messages − This option specifies all types of error messages such as errors, warnings, etc. to be displayed on the site.
-
-
Database log messages to keep − It indicates the maximum number of messages to be kept in the database log.
Drupal uses _drupal_exception_handler ($exception) function to handle the errors on the site. These errors will not be enclosed in a try/catch block. The script won't execute the function when an exception handler exits.
The code for _drupal_exception_handler is as follows −
function _drupal_exception_handler($exception) {
   require_once DRUPAL_ROOT . '/includes/errors.inc';
   try {
      // display the error message in the log and return the error messages to the user
      _drupal_log_error(_drupal_decode_exception($exception), TRUE);
   }
   catch (Exception $excp2) {
      // Another uncaught exception was thrown while handling the first one.
      // If we are displaying errors, then do so with no possibility of
         a further uncaught exception being thrown.

      if (error_displayable()) {
         print '<h1>Additional uncaught exception thrown while handling exception.</h1>';
         print '<h2>Original</h2> <p>'. _drupal_render_exception_safe($exception).'</p>';
         print '<h2>Additional</h2> <p>'. _drupal_render_exception_safe($excp2).'</p><hr/>';
      }
   }
}
The function must be used on every Drupal request. This function is present at the line 2328 in the file includes/bootstrap.inc.
There are two string references to _drupal_exception_handler such as_drupal_bootstrap_configuration() present in the bootstrap.inc file and_drupal_get_last_caller present in the errors.inc file. Both these files are present in the ‘includes’ folder.
Drupal - Multilingual Content
In this chapter, we will learn about multilingual content. That means your content can be written and will be displayed in different languages. For this you may either install a multilingual content module or an Internationalism module.
Following are the steps to install multilingual content module on Drupal.
Step 1 − Click Modules from the menu bar.

Step 2 − Check the Multilingual content box from the modules and click Configure.

Step 3 − The Multilingual settings page will get displayed.
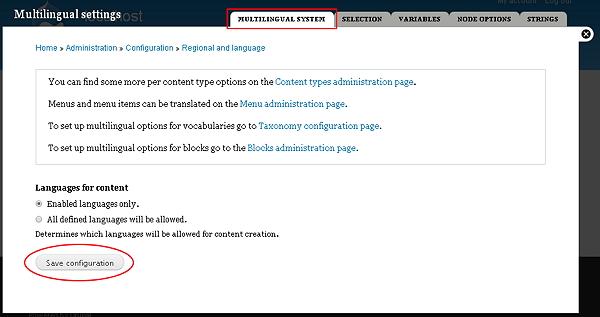
Languages for content −
-
Enabled language only − When you check this box, you can only view languages that are enabled.
-
All Defined languages will be allowed − Only the defined languages will be allowed.
Here, we have three different tabs where you can make the required changes.
-
Selection − You can select nodes and taxonomy according to language.
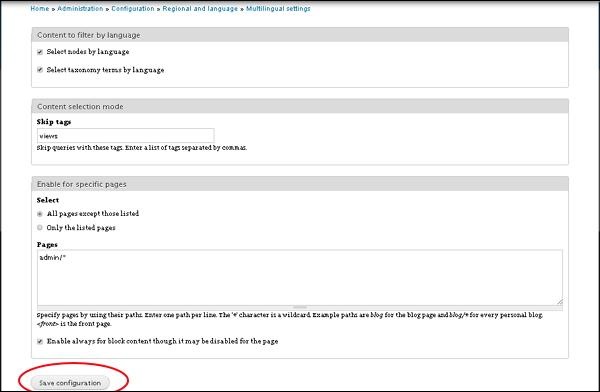
-
-
Select nodes by language − Check box if you want nodes by language.
-
Select taxonomy terms by language − If you want taxonomy terms by language then check this box.
-
Skip tags − Write those tags which you don't want to include.
-
Enable for specific pages − If you want to enable settings for specific pages then use this checkbox.
-
Click the save button, once completed.
-
Variables − Select variables to be set as shown in the following screen.
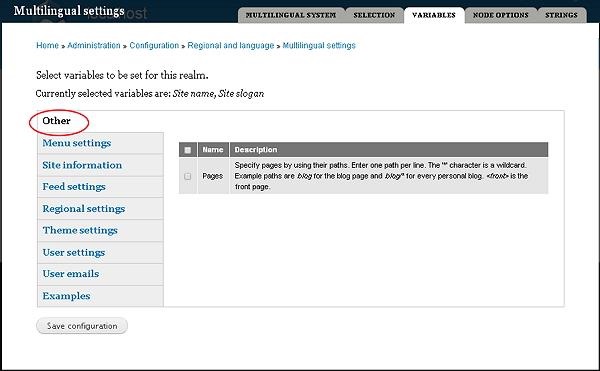
-
-
Menu Settings − Manages menu settings.
-
Site Information − Helps to make changes on site.
-
Feed settings − You can set your feed description.
-
Regional Settings − Changes time zone and day.
-
Theme Settings − Specifies managing themes.
-
User Settings − You can use this to set users.
-
User emails − Any issues related to user emails can be done.
-
Examples − You can give examples.
-
Click Save when you complete the settings.
-
Node Options − Help you set nodes.

You can hide content translations and change the language on this page. Later, click the Save configuration button.
- Strings − This option helps to change format of the page.

Change and translate strings using Translatable text formats settings. You can even change sources as you choose many languages. After completion, click Save button.
Drupal - Triggers & Actions
In this chapter, we will learn about Triggers and Actions in Drupal. First let's look into Triggers.
It can be defined as changes happening within your site. The actions can be carried out either after creating a new content or any page.
Triggers
Following are the steps that will help you use triggers in Drupal.
Step 1 − First click Modules from the menu bar.

Step 2 − When you click Modules, you get the following page.

Here enable Trigger module. Then click Save Configuration at the bottom of the page.
Step 3 − Go back to the Trigger module and click Configure on the right side of the page as shown in the following image.

Step 4 − When you click Configure, you get the following page.
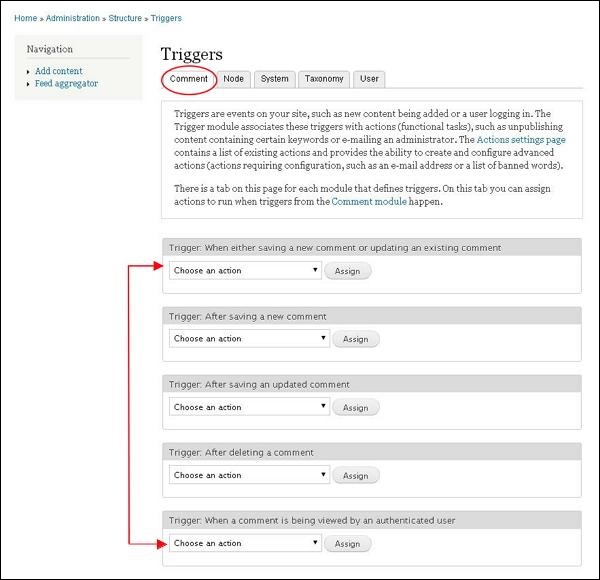
We have different tabs on the page that specify each trigger.
Comment Module − You can assign action to only those triggers relating to comment module.
Node Module − You can assign action to those triggers relating to Node module.

System Module − You can assign action to only those triggers relating to System module.
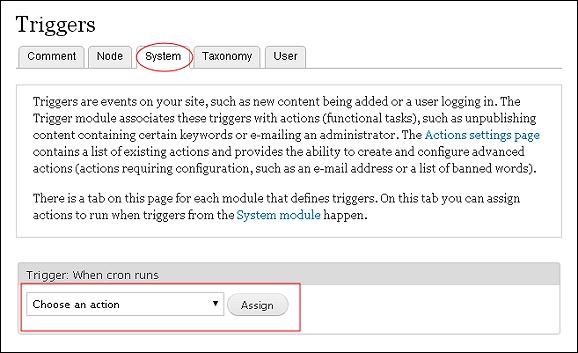
Taxonomy Module − You can trigger actions to the Taxonomy module.

User Module − At last we have the user module, here actions must be assigned in User module.
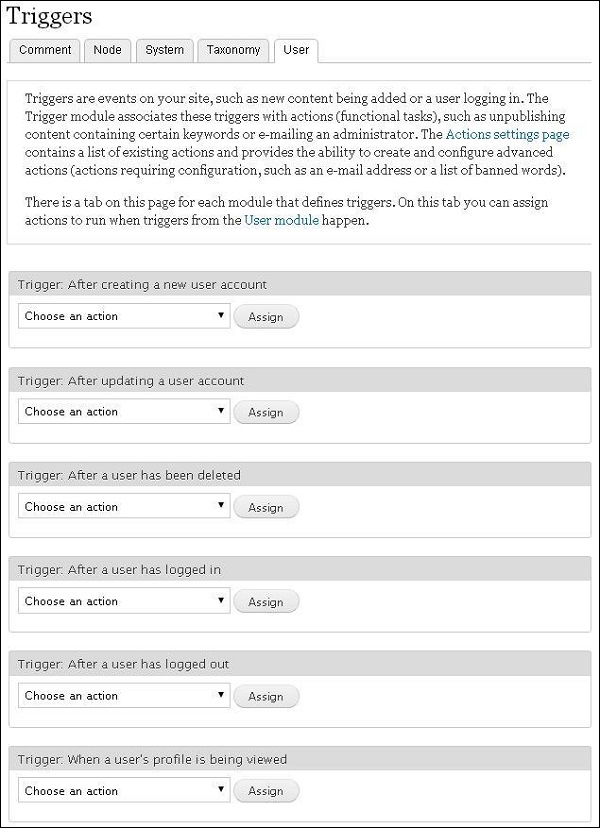
Actions
Tasks carried on a particular system object are called actions.
Step 1 − Click Configuration from the menu bar.

Step 2 − Click on Actions from the system section.
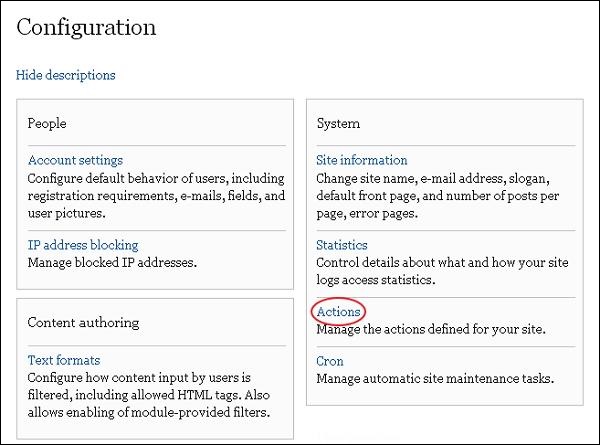
Step 3 − When you click Actions, you get the following page.
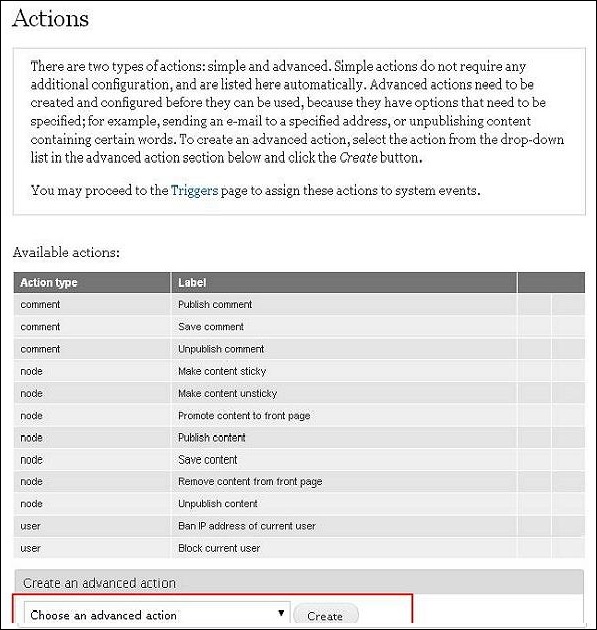
Step 4 − Select any one action from the dropdown and click Create.

Step 5 − When you choose an option and click Create, The following page appears.

Following are the option fields present on the page −
-
Label − Give a name to your action
-
Recipient − Enter your email address
-
Subject − Enter a subject you want to add to the action
-
Message − Enter the message you want to send to the visitor when clicked on any action.
After filling all the details, click Save.
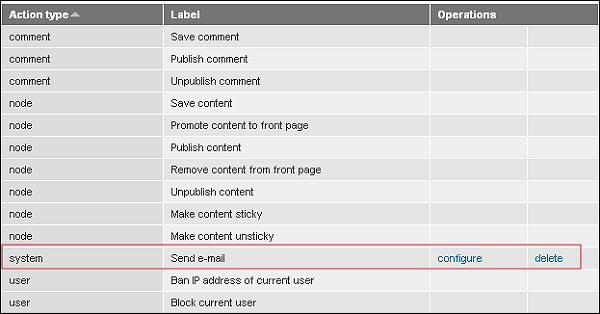
Step(6) − You can see that your action is added to the list.
Drupal - Social Networking
In this chapter, let us study about Social Networking in Drupal. Social media is becoming very important these days, Drupal has many social media modules for this purpose. Let us take ShareThis module as our example, you can choose any other of your choice.
Following are the simple steps used to install ShareThis module.
Step 1 − Click ShareThis to visit ShareThis module page and click the Version as shown in the following screen.

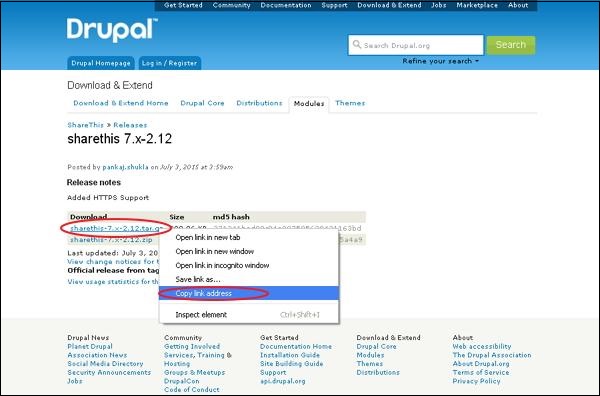
Step 2 − Copy the link address of the module as shown in the following screen.
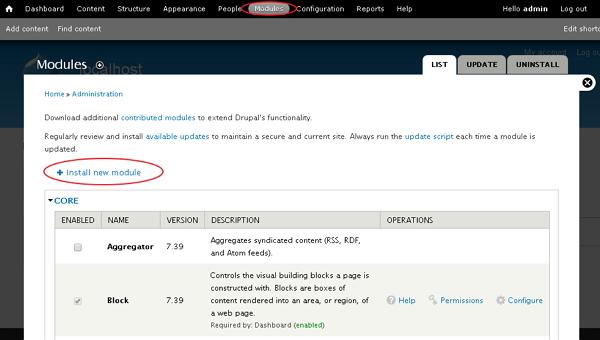
Step 3 − Next, go to Modules and click Install new module as shown in the following screen.
Step 4 − Now, paste the link address that you copied in step(2) and click Install as shown in the following screen.
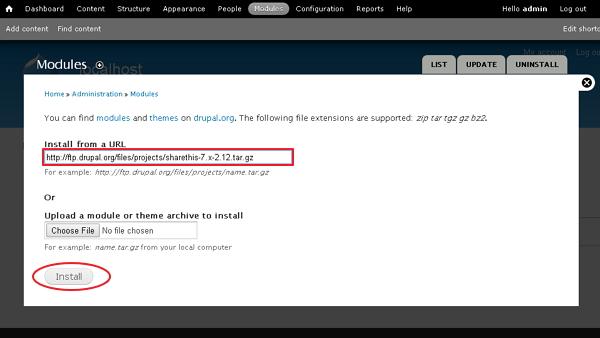
Step 5 − You will see the following screen. Click Enable newly added modules.

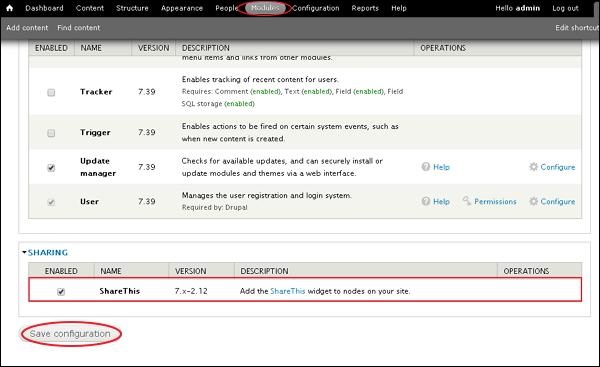
Step 6 − Next, go to Modules. Enable the module and click Save configuration as shown in the following screen.
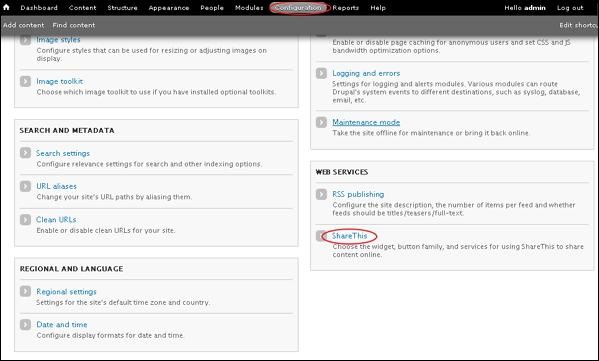
Step 7 − Go to Configuration, under WEB SERVICES and click ShareThis as shown in the following screen.
Step 8 − The following screen pops up.
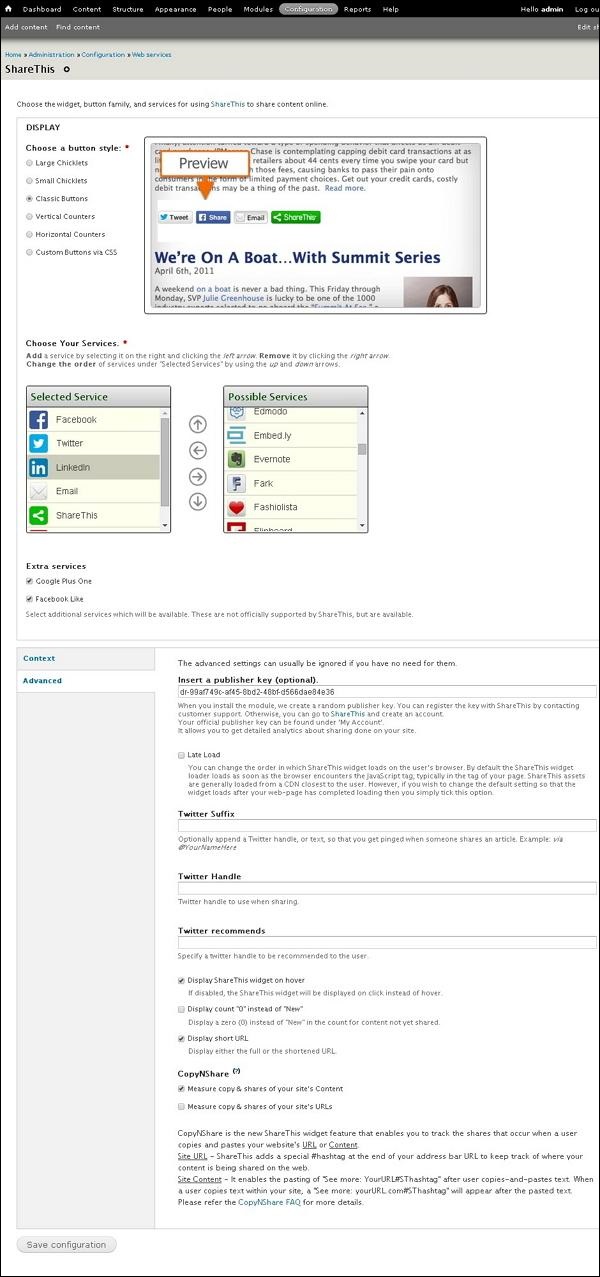
Step 9 − You can click any of the button style, under the Display section to share your content online as shown in the following screen.

Step 10 − Click any of the services you want to remove. You can also use Extra services like Google Plus One and Facebook Like by checking them as shown in the following screen.
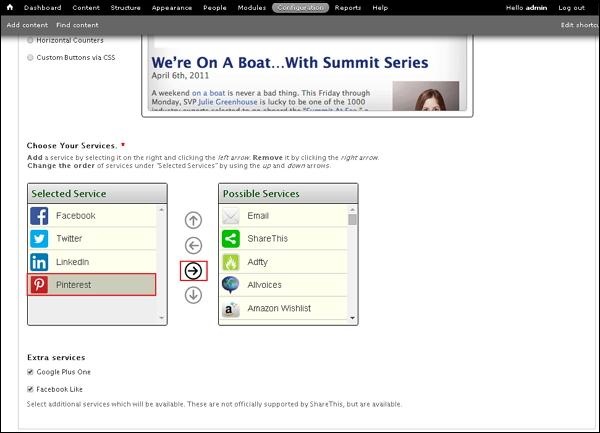
You can choose services from the Possible Services section and you can also remove or re-order services from Selected Service section.
Step 11 − Next, click Context as shown in the following screen to configure where the ShareThis widget should appear.
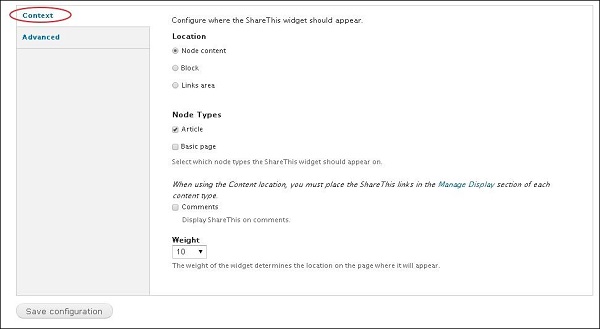
Following the details of the fields present on the screen.
-
Under Location you can choose any of Node content or Block or Links area.
-
Under Node Types you can select Article and Basic page, if you want ShareThis widget to appear on it.
-
If you select Comments you can display ShareThis on comments as well.
-
The Weight of the widget determines the location on the page where it will appear.
Step 12 − Next, select Advanced as shown in the following screen.
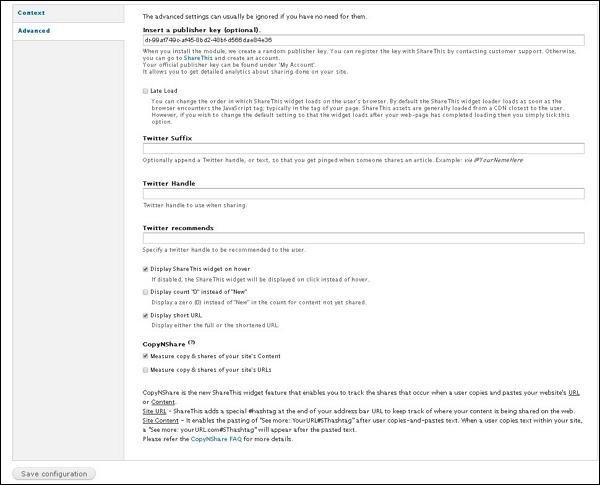
Following are the details of the fields present on the preceding screen.
-
When you install the module, a random publisher key will be created.
-
Twitter Suffix will optionally append a Twitter handle, or text, so that you get a ping when someone shares an article.
-
Twitter Handle will be used when sharing on twitter.
-
Twitter recommends will specify a twitter handle to be recommended to the user while sharing.
-
If Display ShareThis widget on hover is disabled, ShareThis widget will be displayed on click instead of hover.
-
If Display count "0" instead of "New" is checked, zero is displayed instead of New in the count for content not yet shared.
-
Display short URL will display either the full or the shortened URL.
-
CopyNShare will measure copy and shares of your site's content or URLs as checked respectively.
Step 13 − After checking all the details, click Save configuration as shown in the following screen.

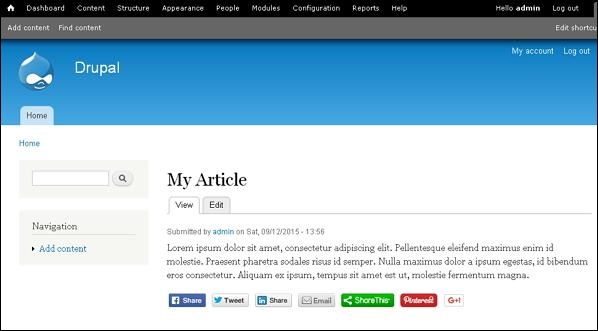
Step 14 − Now you can see the social media buttons appearing on the Article page.
Drupal - Internationalization
In this chapter, we will learn about Internationalization in Drupal. Internationalization is a module which lets you create multilingual sites. This way you can display your website in different languages.
Following are the steps for Internationalization −
Step 1 − Click Module from the menu bar.

Step 2 − To get the Internationalization module you must first download and install it in Drupal. Then you must enable the Internationalization module, and click Save Configuration.
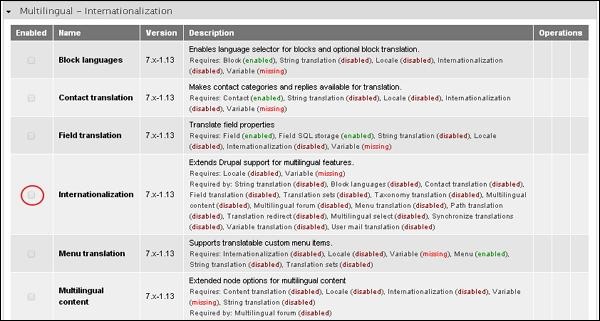
Step 3 − Next, you can see a Configure setting on the right side of the page for Internationalization module as shown in the following screen.

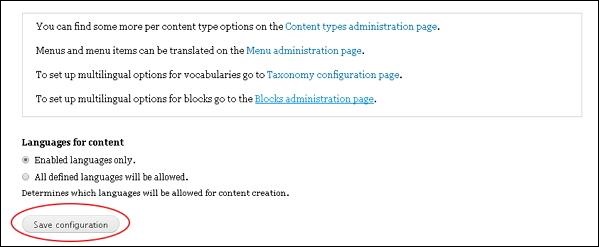
Step 4 − Click Configure and you get the following page.

In Languages for content −
-
Enabled language only − When you check this box, you can only view those languages that are enabled.
-
All Defined languages will be allowed − Only the defined languages will be allowed, when you check this box.
You can see some tabs on the top right corner of the page −
-
Multilingual Settings − You can study about multilingual settings in detail in the chapter Drupal - Multilingual Content
-
Selection − You can select nodes and taxonomy according to language.
-
Variables − Select variables to be set.
-
Node Options − Helps you set nodes.
-
Strings − Helps to change the format of the page.
Once you are done with the changes, click Save Configuration.
Drupal - Extension
In this chapter, we will learn about Drupal Extensions. To extend the functionality of the site, different extensions can be installed.
Following are the steps to install Extension module in Drupal.
Step 1 − Click on Modules from the menu bar.

Step 2 − Click on Install new module.
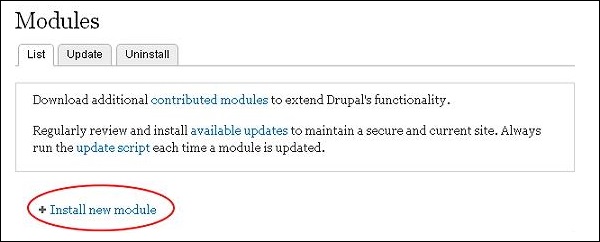
Step 3 − The following page gets displayed. Here, enter the module URL in the box as shown in the following image and click Install.

Step 4 − The module starts getting installed as shown in the following screen.

Step 5 − Once installation is complete, you get the following screen. Here, click Enable newly added modules link.

Step 6 − Next, a Module page gets displayed where your module has been installed, now you can enable the module.

Drupal - Default Modules
In this chapter, we will study about Default Modules in Drupal. After installing Drupal, you will see total 44 default modules. You can see all these modules in Core section. By default 29 modules are enabled after installation.
Step 1 − Click Modules, you will see the list of modules in CORE section as shown in the following screen.

Following is the list of default modules installed in Durpal7. These are the core modules required by Drupal and it cannot be disabled.
-
Block − Controls the constructed page with visual building blocks. Blocks are boxes of content provided into an area or region of a web page.
-
Color − Permits administrators to modify the color scheme of compatible themes.
-
Comment − Permits users to comment and discuss about the published content.
-
Contextual links − Provides contextual links to execute actions associated with elements on a page.
-
Dashboard − Offers a dashboard page in the administrative interface for forming administrative projects and tracking information within your website.
-
Database logging − Logs and records system events to the database.
-
Field − Field API allows adding fields to entities like nodes and users.
-
Field SQL storage − It sets to store field data in an SQL database.
-
Field UI − User interface for the Field API.
-
File − Specifies a file field type.
-
Filter − Filters content and exhibits in order.
-
Help − Manages the display of online help.
-
Image − Allows image handling tools.
-
List − Specifies list field types. Creates choice lists with this selection.
-
Menu − Permits administrators to customize the site navigation menu as per the choice.
-
Node − Allows content to be submitted to the site and displayed on pages.
-
Number − It sets the numeric field types.
-
Options − It specifies the choice, check box and radio button widgets for text and numeric fields.
-
Overlay − It specifies the Drupal administration interface in an overlay.
-
Path − Permits users to rename URLs.
-
RDF − It improves your content with metadata to allow other applications (e.g. search engines, aggregators) to its relationships and attributes in understand in a better manner.
-
Search − Permits site-wide keyword searching.
-
Shortcut − Permits users to manage customizable lists of shortcut links.
-
System − Handles general site configuration for administrators.
-
Taxonomy − Enables the categorization of content.
-
Text − Defines simple text field types.
-
Toolbar − Provides a toolbar that shows the top-level administration menu items and links from other modules.
-
Update manager − Checks for available updates and can securely install or update modules and themes via a web interface.
-
User − Manages the user registration and login system.
Drupal - Pane Module
In this chapter, we will learn about using Pane Module in Drupal. Pane module is used to translate the custom panel's pane with optional title that will be stored as variables and it can be translate or edit quickly.
Following are the steps to add Pane Module.
Step 1 − Download the latest file of Pane module from the link and install in your Drupal site.
Step 2 − Enable the one you want to use and click Save Configuration at the bottom of the page.
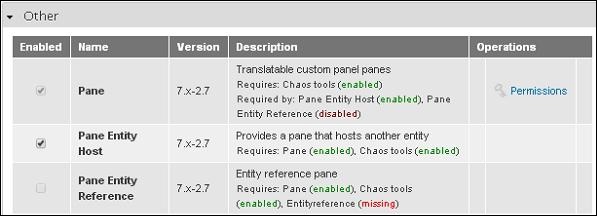
Step 3 − Click Structure from the menu bar.

Step 4 − Click on Panes.
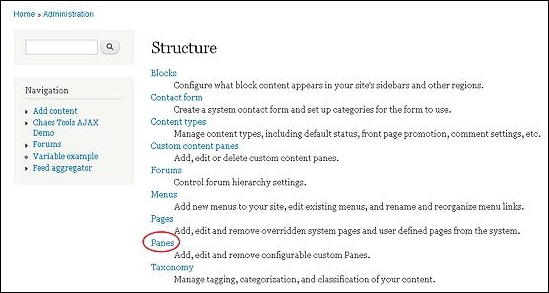
Step 5 − Then click Add pane to add a new pane.

Step 6 − The Panes page gets displayed as shown in the following screen.
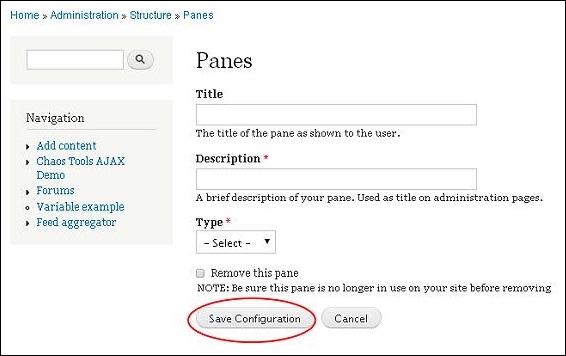
It contains the following fields.
-
Title − Enter your pane title in this box.
-
Description − Describe your pane in a line or a sentence.
-
Type − Select type accordingly, it may be either Text or Entity Host.
After filling the details, click Save Configuration.
Step 7 − Your Pane module gets displayed as shown in the following image. If you want to make any changes in the pane, then click Edit.

Step 8 − The Pane page gets displayed.
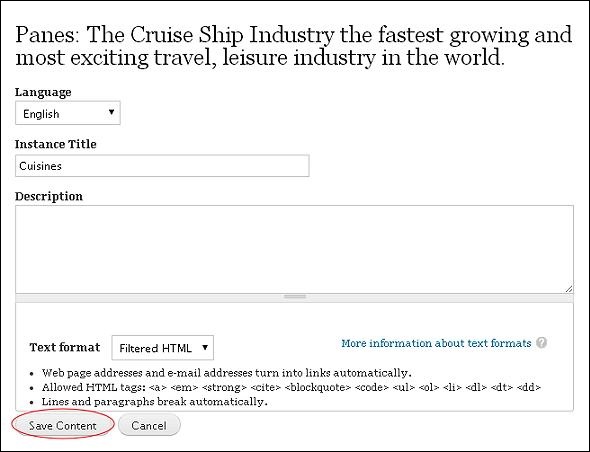
Make the required changes and click Save Content.
Drupal - Book Module
In this chapter, we will study about Book Module in Drupal. Books have an in-built hierarchical navigation, which means that you can organize them to read in a special order. The book content type also allows you to make your website content easier to print by site visitors.
Following are the simple steps to configure Book module in Drupal.
Step 1 − Enable the Book in Modules and click Save configuration.

Step 2 − Click on Content and check the boxes, select the content type that you want to enable for books.
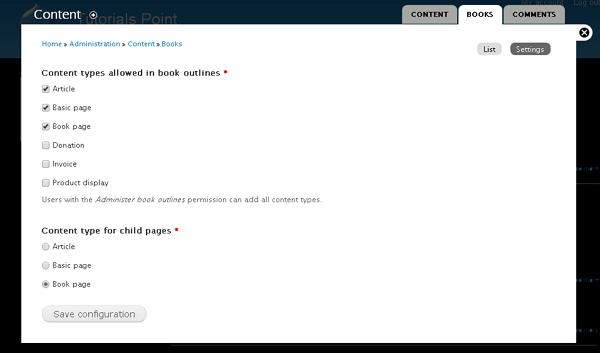
Click Save configuration to save your content type.
Step 3 − Click Create content -> Book page or on Shortcut bar Book page as shown in the following screen.
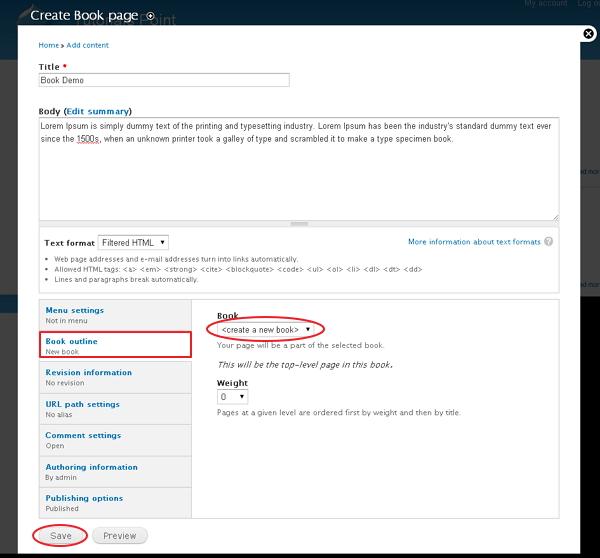
Spread out the section under Book outline and select create a new book. You can set the weight to 0.
Click the Save button and your top level page is created.
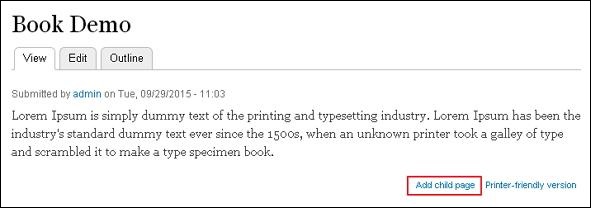
Step 4 − Once your book has been created, you can create child pages by clicking the Add child link at the bottom of the book page.
Step 5 − Further, click Content management -> Books -> List as shown in the following screen. Click on edit order and titles under Operations column.

Step 6 − You will see the screen as shown in the following screen. This page allows you to move your book pages around to fit your needs. Press and hold on the four pronged arrow and move it to the position to rearrange your pages. You can also drag the page to the right to make it a child page.

Drupal - Aggregator Module
In this chapter, we will study about Aggregator Module in Drupal. Aggregator Module takes the content from other websites but does not generate any feeds. It is also known as a feed reader. It gathers and displays texts and images from other sites and blogs.
Following are the steps to enable Aggregator Module.
Step 1 − Click Modules from the menu bar.

Step 2 − A list of different modules gets displayed. Enable the Aggregator module and click Save Configuration as shown in the following screen.

Step 3 − Now, go back to the aggregator module and click Configure option on the right side.
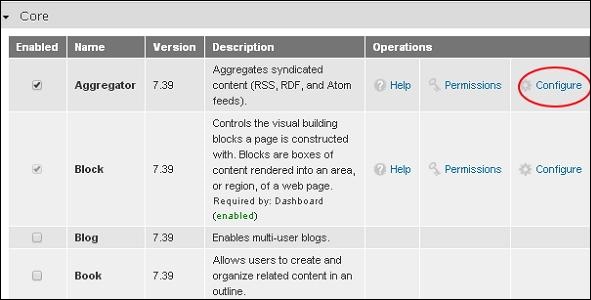
Step 4 − A Feed aggregator page gets displayed.
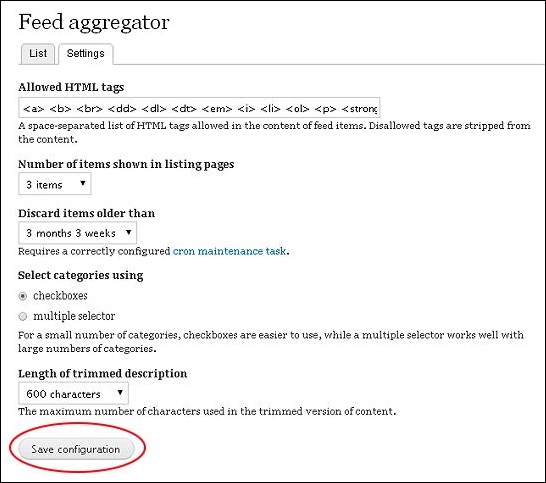
Following are the settings present on this page.
-
Allowed HTML tags − This specifies that you can get only those HTML tags which are included in the given text box as you can see in the image. If you remove any of them you won't find that particular tag in your content.
-
Number of items shown in listing pages − Select the number of items you want to be displayed on your pages.
-
Discard items older than − You can remove items that are older by using this option.
-
Select categories using − You can select categories accordingly, either by clicking on Check boxes radio button or multiple selectors.
-
Length of trimmed description − Select the length of your descriptions.
Once you are done with all the settings, click Save Configuration.
Drupal - Contact Module
In this chapter, we will study about creating contact form in Drupal. Contact form is used to submit the information of user in Drupal.
Following are the steps to add Contact module.
Step 1 − Click Modules menu.

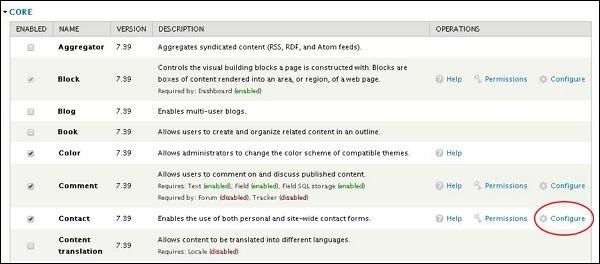
Step 2 − A list of different modules gets displayed. Enable the Contact module and click Save Configuration as shown in the following screen.

Step 3 − Go back to the contact module and click the Configure tab as shown in the following screen.
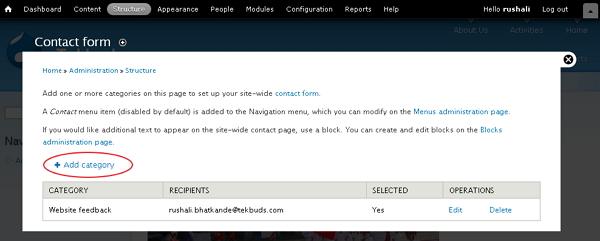
Step 4 − Now you can view the information of all the categories and you can also add extra contacts. Click Add Category.
Step 5 − The contact form gets displayed as shown in the following screen.
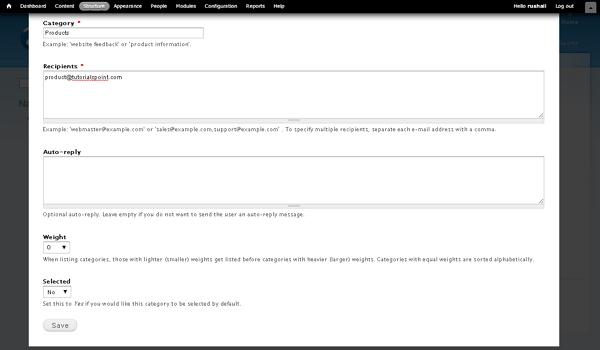
It contains the following fields.
-
Category − Specify the name of the category for feedback form.
-
Recipients − Specify the e-mail address where you wish to receive mails.
-
Auto-reply − Sends the automatic reply message to the user.
-
Weight − Sets the list in order.
-
Selected − Selecting Yes option, it sets the category as default.
After filling all information about the contact, click the Save button to save your contact form information.
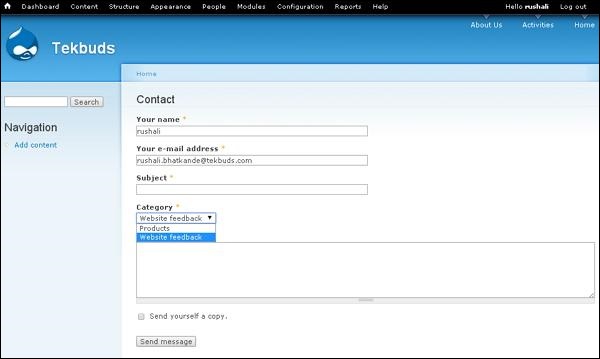
Step 6 − You can see the created contact form in the list as shown in the following screen. To view the contact form, click Contact form tab.

Step 7 − The category which you have added will get displayed in the category field as shown in the following screen.
Drupal - Form Module
In this chapter, we will learn about Form module in Drupal. This module lets you create a form in Drupal based on the website for your users.
Following are the steps to install Form Module in Drupal.
Step 1 − Download the latest file of Form Builder module from the link and install in your Drupal site.
Step 2 − Enable Form Builder module from the module page.

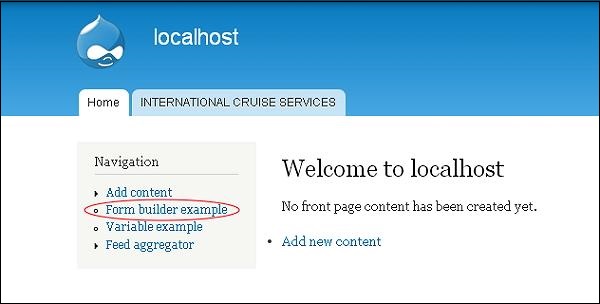
Step 3 − Click Form Builder example from the dashboard.
Step 4 − A Form builder example page gets displayed as shown in the following screen.
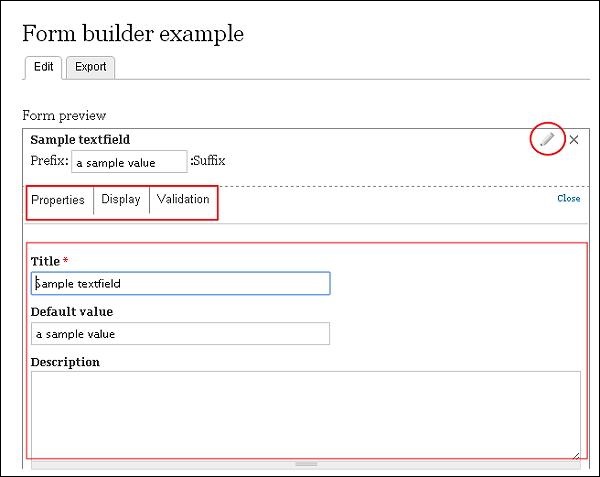
Here you can add, edit or remove the details manually.
Sample Text Field (Properties)
-
Title − Enter the title name for your form.
-
Default value − Sets the default value.
-
Description − Enter description related to the title in that box.
Sample Text Field (Display)
-
Prefix − Enter the prefix text.
-
Suffix − Here you must put the suffix text.
-
Size − Input size accordingly.
Sample Text Field (Validation)

-
Required − Check the box, when you want to validate the text field.
Sample Checkboxes (Properties)
-
Title − Enter your title name for your form.
-
Description − Enter description related to the title in that box.
Sample Checkboxes (Options)

-
Options − Add items, mark as default and input the values.
-
Customize Keys − Enable this setting if you want to save any one value.
Sample Checkboxes (Validation)

-
Required − Check the box when you want to validate the field.
Sample Text Area (Properties)
-
Title − Enter the title name for your form.
-
Default value − Set the default value.
-
Description − Enter description related to the title in that box.
Sample Text Area (Display)
-
Rows − Enter rows.
-
Columns − Enter columns.
Sample Text Area (Validation)

-
Required − Check the box when you want to validate the field.
Sample Radios (Properties)
-
Title − Enter the title name for your form.
-
Description − Enter description related to the title in that box.
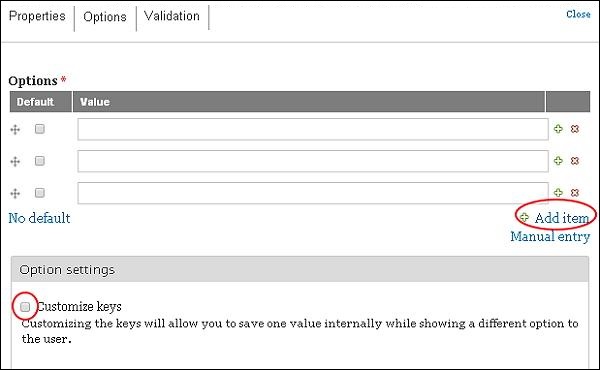
Sample Radios (Options)
-
Options − Add items, mark as default and input the values.
-
Customize Keys − Enable this setting if you want to save any one value.
Sample Radios (Validation)

-
Required − Check the box when you want to validate the field.
Sample Select (Properties)
-
Title − Enter the title name for your form.
-
Description − Enter description related to the title in that box.
Sample Select (Options)

-
Customize Keys − Enable this setting if you want to save any one value.
-
Allow Multiple values − This will help users choose multiple items in your lists.
Drupal - Poll Module
In this chapter, we will study how to create a Poll module in Drupal. This module helps you create polls for your website. You can ask questions, give any number of answers and your visitors can vote.
Following are the steps to create a Poll Module.
Step 1 − Click Module from the menu bar.

Step 2 − Enable the Poll module and then click Save Configuration.
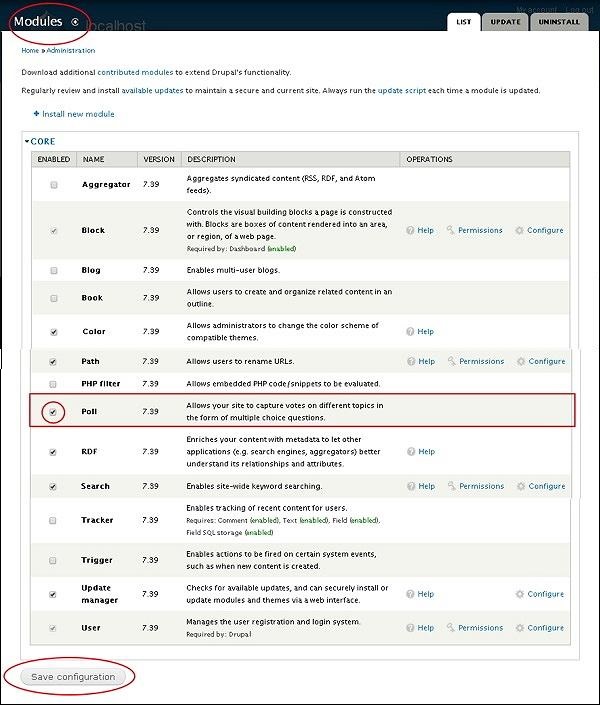
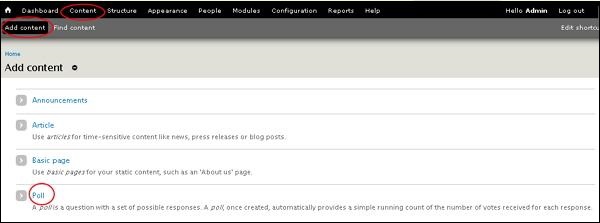
Step 3 − Click Content → Add Content. Click Poll as shown in the following screen.
Step 4 − A Create Poll page gets displayed where you can create a Poll.
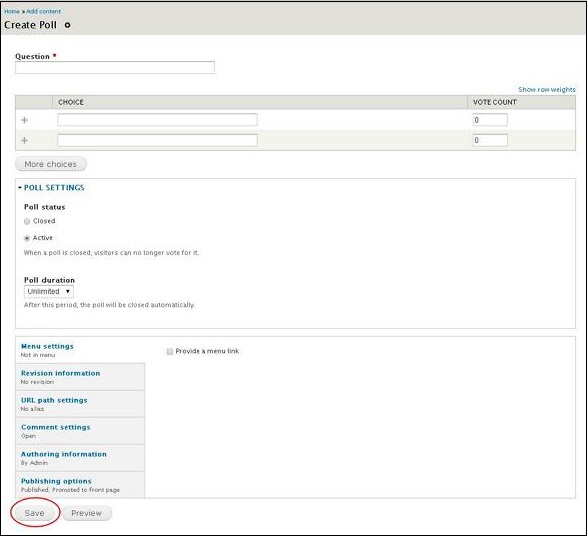
It contains the following fields.
-
Question − Add a question you want to add in the poll.
-
Poll Status − If you click Closed, then visitors cannot vote. And if you click Active then visitors are enabled to vote.
-
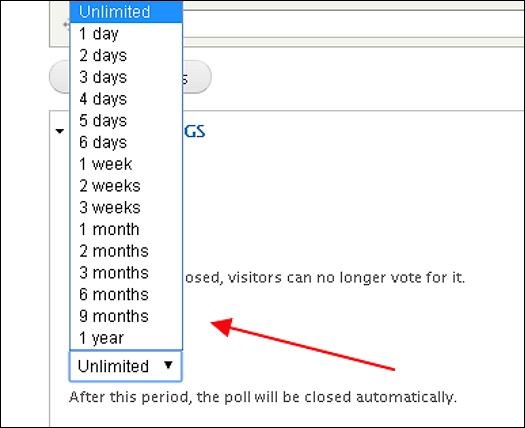
Poll Duration − Select a particular time period till you want your poll to exist. After the time period is completed the Poll closes by itself.
After you complete updating settings, click the Save button.
Drupal - Site Security
In this chapter, we will study how to secure the Drupal site. This chapter specifies security configuration suggestions for site administrators and alerts the administrator how to secure the site.
There are many contributed modules which help you with security configuration in which Security Review module automates testing the mistakes that makes your site insecure.
-
You can report a security issue directly with Drupal core, contrib or Drupal.org by sending an e-mail regarding the issue. The security team will help in resolving your issue with the help of project maintainer.
-
Secure your file permissions and ownership by configuring the server file system, as the web server (e.g. Apache) should not have access to edit or write the files. It should be read only files, which gets executed later.
-
The security risk levels are based on NIST Common Misuse Scoring System (NISTIR 7864), so that the organization can verify how to manage the problem. Below are the points that will help you understand the security risk level by assigning the number between 0 to 25 −
-
0 to 4 − Not Critical.
-
5 to 9 − Less Critical.
-
10 to 14 − Moderately Critical.
-
15 to 19 − Critical
-
20 to 25 − Highly Critical.
-
-
While accepting the sensitive information like credit card number, the PCI (Payment Card Industry) defines a number of Data Security Standards. Though this is not Drupal specific, it is important for each Drupal developer to be aware of this. To know more about the PCI issues, you can refer this link Drupal PCI Compliance White Paper.
-
The users are allowed to be deleted or even for the users to delete themselves in Drupal site which can lead to an unexpected situation sometimes.
-
Enable HTTPS, which is more secure to send sensitive information to a website such as−
-
Credit cards
-
Sensitive cookies such as PHP session cookies
-
Passwords and Usernames
-
Identifiable information (Social Security number, State ID numbers, etc)
-
Confidential content
-
-
Enhance your security using contributed modules. Some standard module categories are −
-
Security category
-
User access / authentication
-
Spam prevention modules
-
-
You can disable the roles and permissions of the user by installing the Secure Permission module.
-
The security operation can be improved in the login operation by installing the Login Security module.
-
The site administrator can secure its site by making it private and by restricting the site to limited access for the users by the role. Due to this process, your site will not be reachable to search engines and other crawlers (to create an index of data in www).
Drupal - Setup Shopping Cart
Basically cart is a process of collecting items or services and uses checkout to collect payment. In this article, we will see how to set up a shopping cart for Drupal site by using Commerce Kickstart module.
Commerce Kickstart is a good way to work with Drupal - E-Commerce which comes with different types of features to create user-friendly web store making it easier to launch and administer. You can download the Drupal Commerce Kickstart from here.
Step 1 − Download the latest file of Commerce Kickstart module from the above link and install it on your system. After installing the module, you will get the following screen.
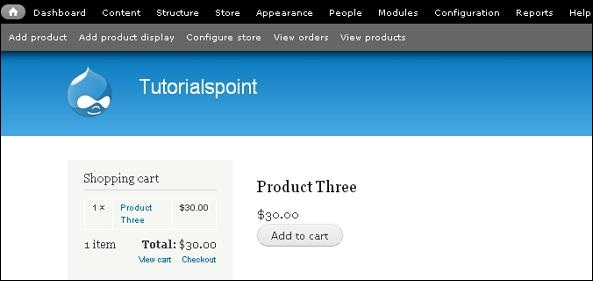
Step 2 − Before adding products in your cart, you need to create products in the store. Click Add Product --> Create Product.

Step 3 − You can create product as shown in the following screen.
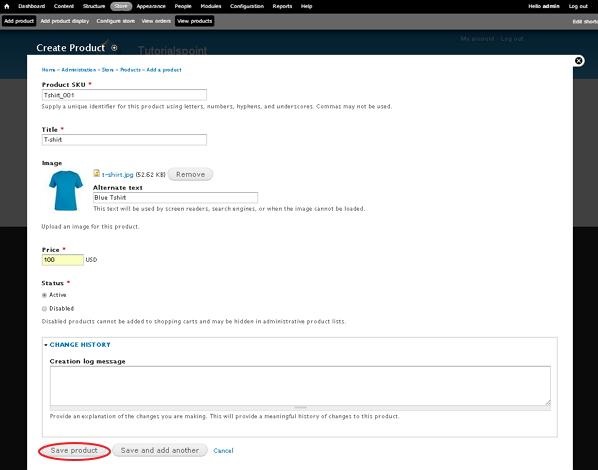
Following are the details of the fields present on the page.
-
Product SKU − Unique identifier for the product is given here.
-
Title − This specifies the title of the product.
-
Image − Here you can upload image and give alternate text for your product which will be used by screen readers, search engines, when the image cannot be loaded.
-
Price − It contains price of the product.
-
Status − Set this field to Active option, so that it can be added to shopping cart. If it is set to Disabled option, products cannot be added to shopping carts and may be hidden in administrative product lists.
-
Change History − It provides history of changes made to the product.
After you are done with all settings, click the Save product button.
Step 4 − You will see the created product in the table.
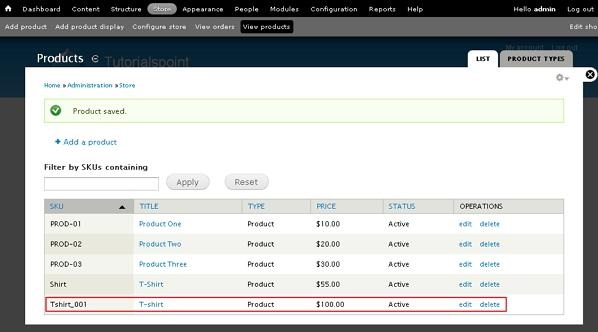
Step 5 − To display your product in the cart, click Add product display.
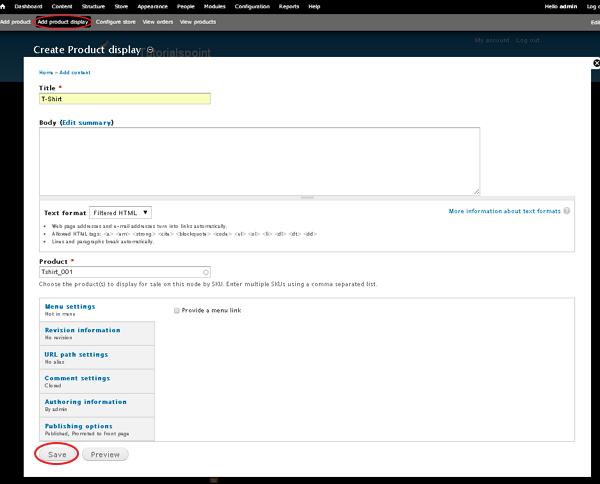
In this window, Title field contains title of the product, you can add summary for the product in the Body field. Product field uses product SKU to display for the sale. After you are done with the settings, click the Save button.
Step 6 − You will see the product displayed on the home page as shown in the following screen.
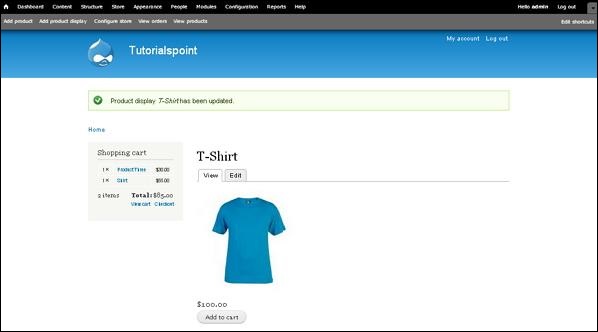
Step 7 − Click the Add to cart button to add the created product in the cart.
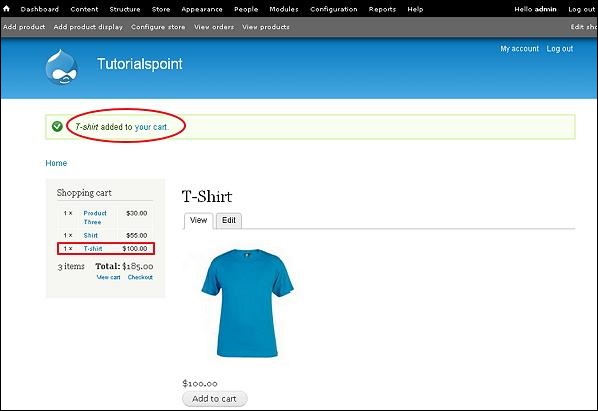
It will display the successful message after adding product to the cart. You can see the product name along with price in the Shopping cart block.
Step 8 − Now click the View cart link to see the added product in the shopping cart.
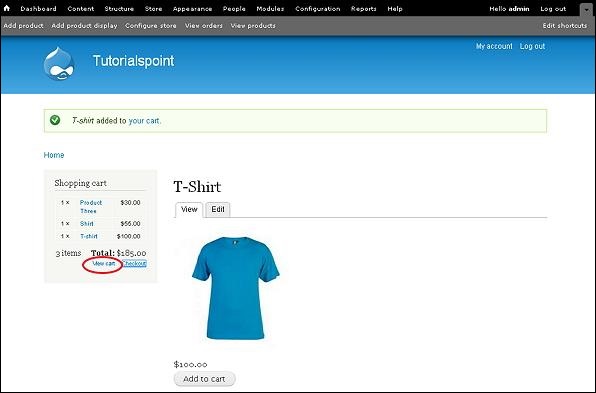
Step 9 − You will see the shopping cart table along with the products as shown in the following screen.
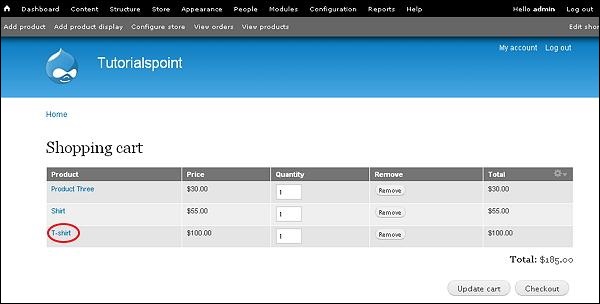
Drupal - Create Products
In this chapter, we'll study about Creating Products in Drupal site. Products are the items that are offered for sale.
Following are the simple steps used for Creating Product.
Step 1 − Click Add Product.

Step 2 − Click on Create Product.

Step 3 − Now you have to create a product by filling the product information as shown in the following screen.

It contains the following fields −
-
Product SKU − Enter the unique identifying number for the product.
-
Title − Enter the title of the product.
-
Image − Upload image and give alternate text for your product which will be used by screen readers, search engines, or when the image cannot be loaded.
-
Price − Enter the price of the product.
-
Status − Set this field to Active option, so that it can be added to shopping cart. If it is set to Disabled option, products cannot be added to shopping carts and may be hidden in administrative product lists.
-
Change History − It provides history of changes made to the product.
After filling the fields, click Save Configuration.
Step(4) − Now you can see that your product is added, click Add product display as shown in the following screen.

Step(5) − The Create Product display page will get displayed as shown in the following screen.
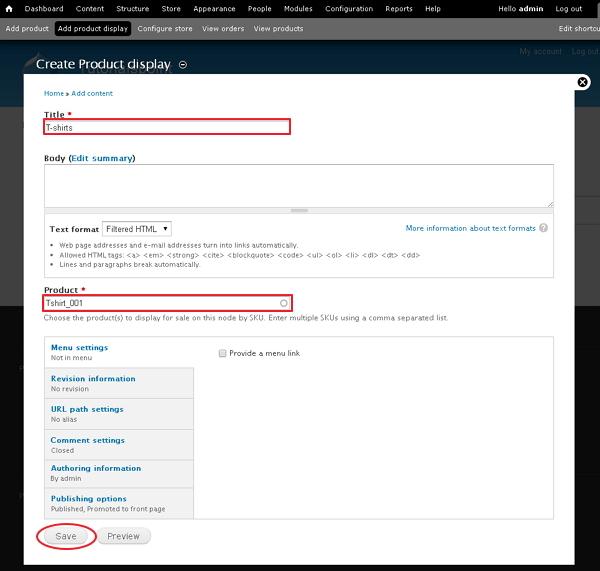
It contains below fields −
-
Title − Add title of the product.
-
Body − Here you can add summary for the product.
-
Product − Choose the products to display for sale on this node by SKU. You can also enter multiple SKU's using a comma separated list.
Step(6) − You can see your product displayed on the front page.
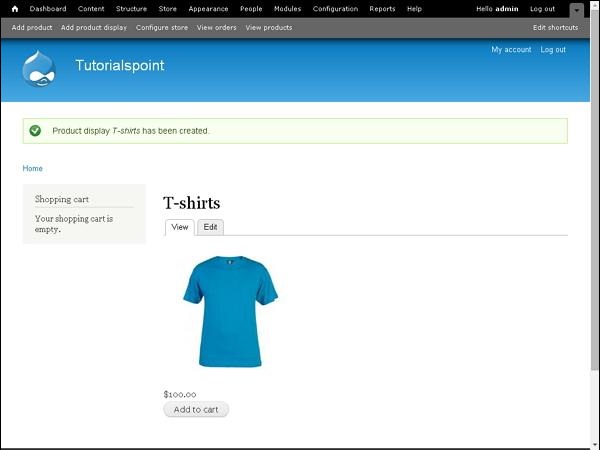
Drupal - Create Categories
In this chapter, we will study how to Create Categories in Drupal. Taxonomy can be considered as categories or tags. Drupal taxonomy is built up of vocabularies and terms. A vocabulary is a set of terms and terms are just another word for categories.
Following are the simple steps to create categories in Drupal.
Step 1 − Go to Structure and click Taxonomy in the category as shown in the following screen.
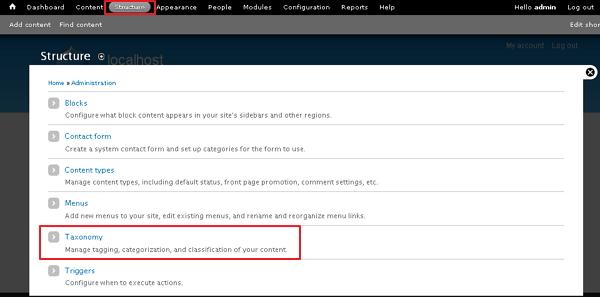
Step 2 − Click on Add vocabulary link.
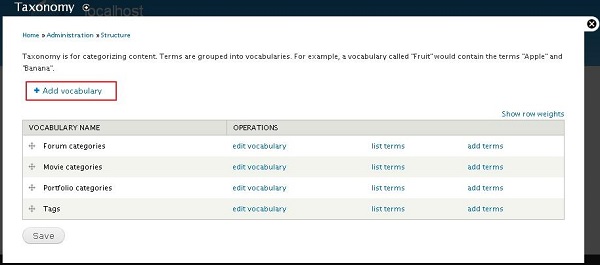
Step 3 − Enter your new vocabulary (category) Name and Description as shown in the following screen.

Click the Save button and your category is created.
Step 4 − You will see your new category is added to the list. Further you can click add terms link to add some terms to it.

Step 5 − You can add some sub categories to it. Enter the required details and click the Save button as shown in the following screen.

Step 6 − Choose your parent category from the list and click list terms link to view your sub categories list.

Following are the details about the fields present in the preceding screen.
-
Edit vocabulary − You can edit your category name and description.
-
List terms − It displays your subcategory list.
-
Add terms − You can add your subcategories through this link.
Step 7 − You will see the subcategories list. Here, you can edit your subcategory by clicking on the edit link as shown in the following screen.
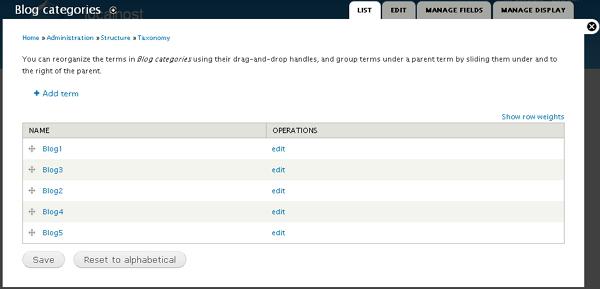
Step 8 − Next, you can also rearrange your subcategories by dragging them as per the demand. After rearranging, click the Save button.
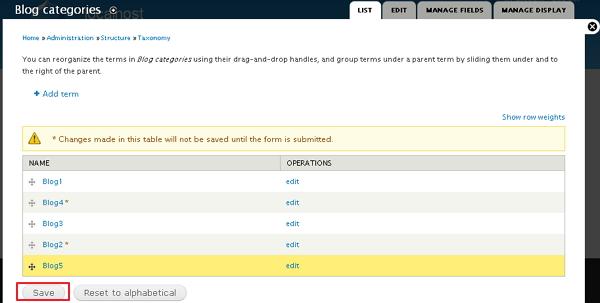
Drupal - Setup Taxes
In general, tax is a financial charge upon a taxpayer or is a source of public revenue. Sales tax is a basic type of tax levied on the sale of certain goods and services.
You can specify the tax rate for the products as defined in the following steps −
Step 1 − Go to Store and click Configuration.

Step 2 − Click on the Taxes link which manages tax rates and types.
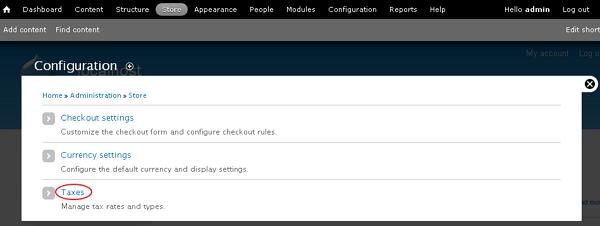
Step 3 − Click Add a tax rate link to add tax for the product.
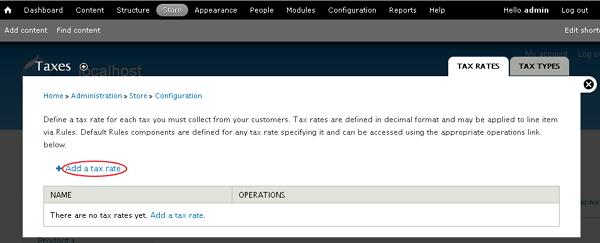
Step 4 − It will open the taxes window for adding tax rate to the product as shown in the following screen.
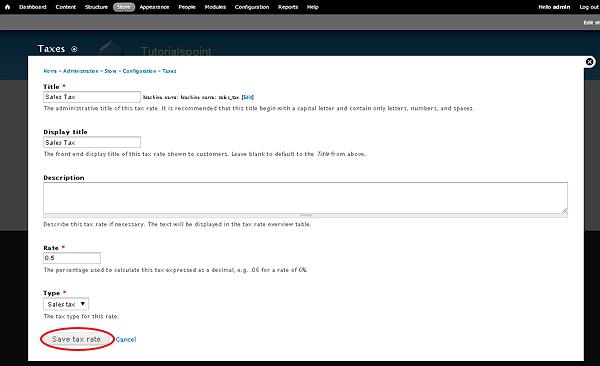
It contains some fields such as −
-
Title − It is title of the tax rate.
-
Display title − It is the front-end display title of the tax rate shown to customers.
-
Description − It is used to describe the tax rate.
-
Rate − It is a percentage used to calculate the tax which is expressed as a decimal.
-
Type − It selects the tax type for the tax rate using drop-down menu.
After filling all the fields, click the Save tax rate button.
Step 5 − You will see the created tax rate name which is used for the product as shown in the following screen.
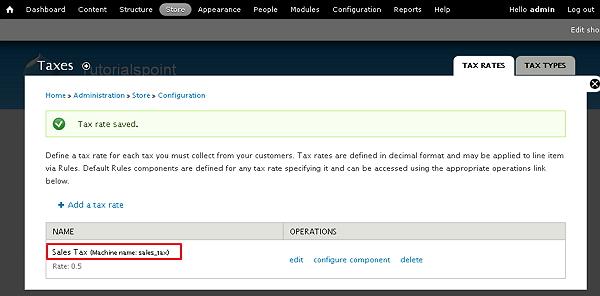
Step 6 − Go to Home page and click the View cart link to see the products in shopping cart.
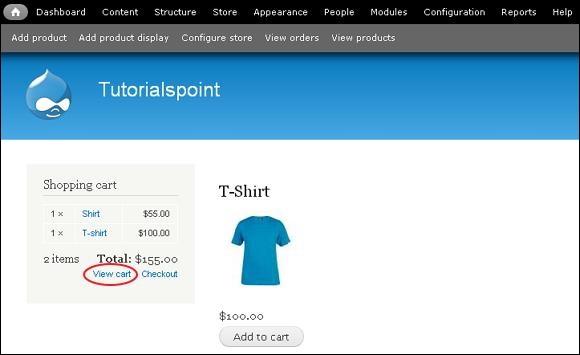
Step 7 − Click the Checkout button to see the tax rate added for the products.
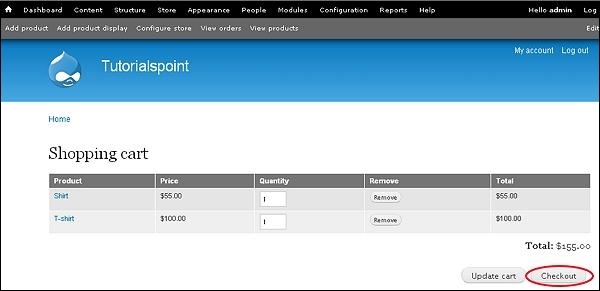
Step 8 − You can see the tax rate added along with the Subtotal as shown in the following screen.

Drupal - Setup Discounts
In general, discount is a amount or percentage deducted from the normal selling price of the product. It is the way of offering products for sale at a low or reduced price.
You can specify the discount for the products as defined in the below steps−
Step 1 − Go to Store and click Configuration.

Step 2 − Click on the Taxes link which manages tax rates and types.
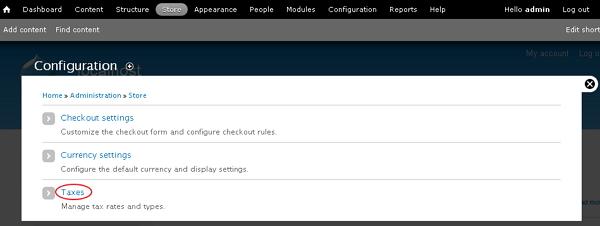
Step 3 − Go to TAX TYPES tab and click the Add a tax type link.
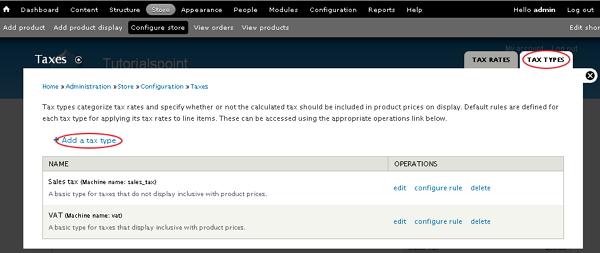
Step 4 − Tax types categorize tax rates and specify whether or not the calculated tax should be included in product prices on display.
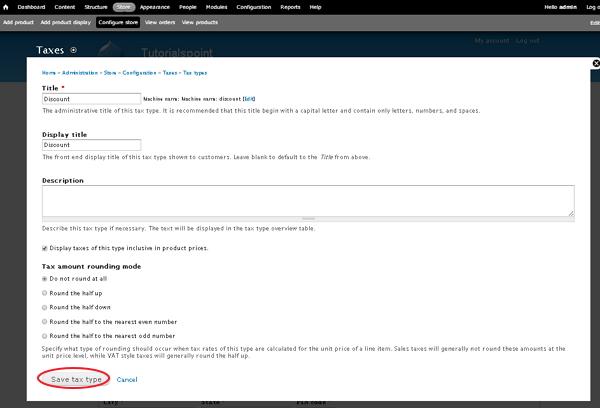
It contains some fields such as −
-
Title − It specifies the title of tax type.
-
Display title − It is the front-end display of the title of tax type shown to customers.
-
Description − It describes the tax type if necessary.
-
Tax amount rounding mode − Specifies what type of rounding should occur when tax rates of tax type are calculated for the unit price of a line item.
After filling all the details, click the Save tax type button.
Step 5 − Go to TAX RATES tab and click the Add a tax rate link.

Step 6 − It will open the taxes window for adding tax rate to the product as shown in the following screen.

It contains some fields such as −
-
Title − It is the title of the tax rate.
-
Display title − It is the front-end display title of the tax rate shown to customers.
-
Description − It is used to describe the tax rate.
-
Rate − It is a percentage used to calculate the tax which is expressed as a decimal.
-
Type − It selects the tax type for the tax rate using drop-down menu.
After filling the details, click the Save tax rate button.
Step 7 − Once tax rate is saved, click the Home link.

Step 8 − On the home page, click the Checkout link to see the shopping cart contents.
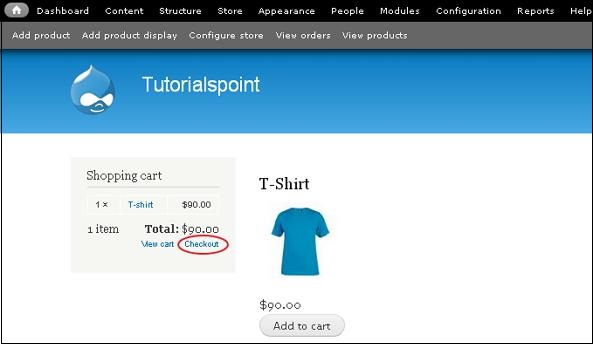
Step 9 − On the checkout page, you will see the discount for the product which is included in product price.

Drupal - Receive Donations
In this chapter, we will learn how to Receive Donation in Drupal. Donation is some amount of gift given by an organization or individual to a non-profit organization or private foundation.
Following are the steps to receive donation in Drupal.
Step 1 − Download the latest file of Commerce Custom Line Items module and install in your Drupal site.
Step 2 − Enable the Commerce Custom Line Items and Others in Modules and click Save configuration.

Step 3 − Next, go to Store --> Configuration
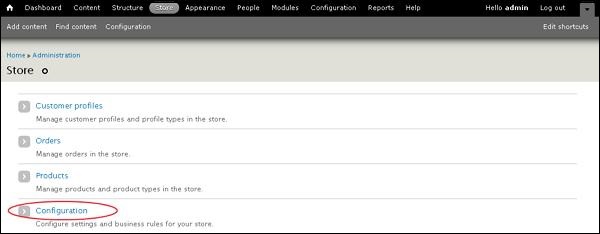
Step 4 − Click on Line item types.
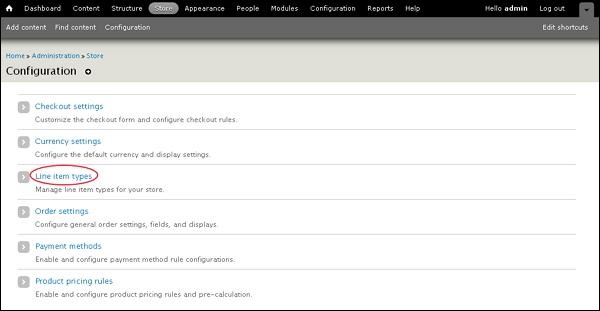
Step 5 − Then, click Add line item types to add items.
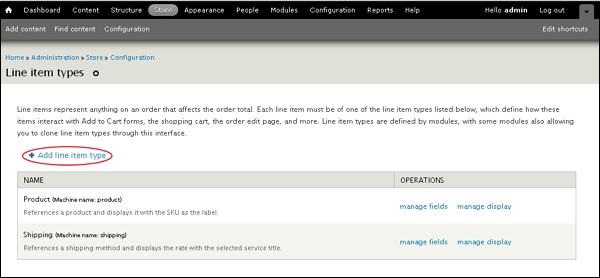
Step 6 − Now, Add line item type page will get displayed as shown in the following screen.
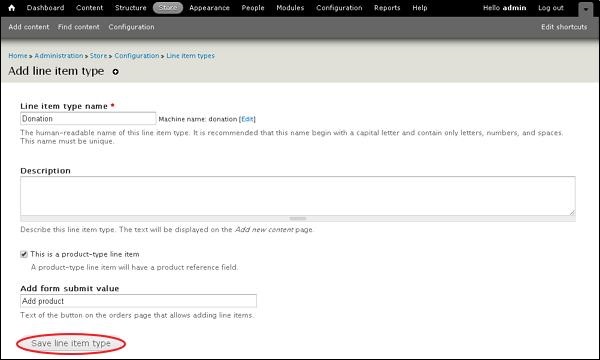
It contains fields such as −
-
Line item type name − Enter the name of the line item type.
-
Description − Enter a brief description about the line item type.
-
Add form submit value − Enter the text of the button on the order page which allows adding line items.
Step 7 − You can view the created donation item in the list. Click manage fields.
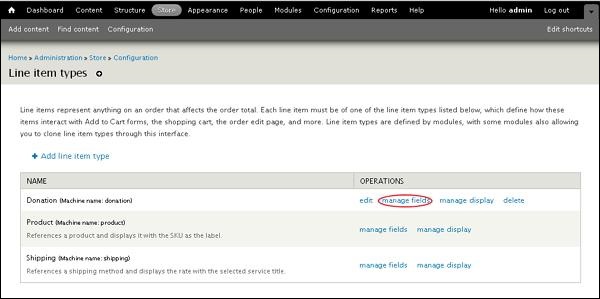
Step 8 − Add a new field as Donation Amount, Select Integer for type of data from the dropdown.
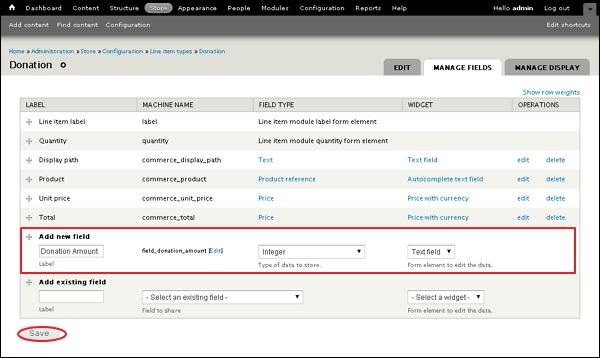
Click the Save button.
Step 9 − Now, after clicking on save, the page redirects to the field setting page as shown in the following screen. Click the Save field settings button.

Step 10 − The page is redirected to the Donation Amount page.
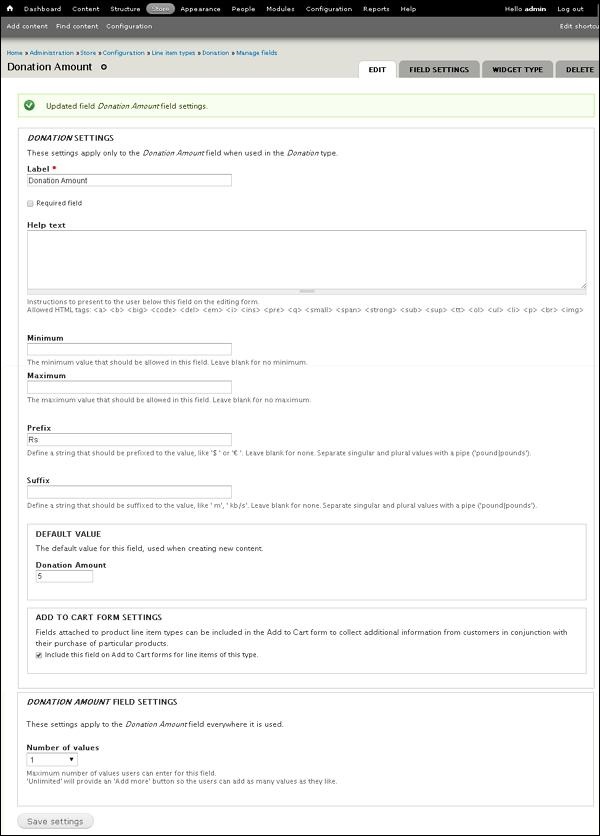
It contains fields such as −
-
Label − Donation type identifier.
-
Help text − Enter instructions to present to the user.
-
Minimum − Enter the minimum value that should be allowed.
-
Maximum − Enter the maximum value that should be allowed.
-
Prefix − Enter the string that should be prefixed to the value.
-
Suffix − Enter the string that should be suffixed to the value.
-
Default Value − Enter the default donation amount.
-
Add to Cart Form Settings − Includes the product line item types in the ‘add to cart form’ to collect information.
-
Donation Amount Field settings − Number of values user can enter for this field.
After filling the page, click the Save settings button.
Step 11 − Next, you can view the created Donation Amount field in the list.

Create Product for donation
Following are the steps to create product for donation.
Step 1 − Click on Store --> Products

Step 2 − Click Add a product to add product.

Step 3 − Next, it will open a Create Product screen as shown in the following screen.
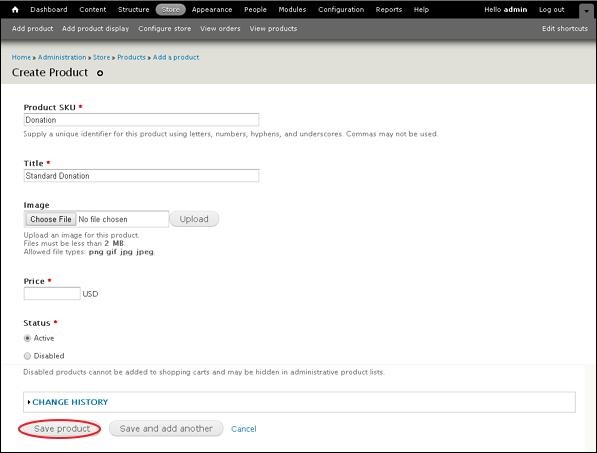
It contain fields such as −
-
Product SKU − It is a unique identifier for the product.
-
Title − It is title for the specified product.
-
Image − Add image for the product.
-
Price − Enter the amount of the product.
-
Status − Set this field to Active option, so that it can be added to shopping cart. If it set to Disabled option, products cannot be added to shopping carts and may be hidden in administrative product lists.
After filling all the details, click the Save product button.
Step 4 − Now you can see the newly created product as shown in the following screen.
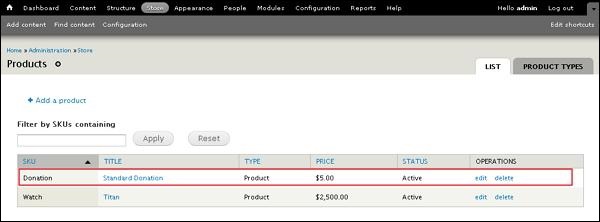
Step 5 − Go to Structure --> Content Types. The following page will get displayed, click Add content type.

Step 6 − Add a name as Donation and click Save and add fields.
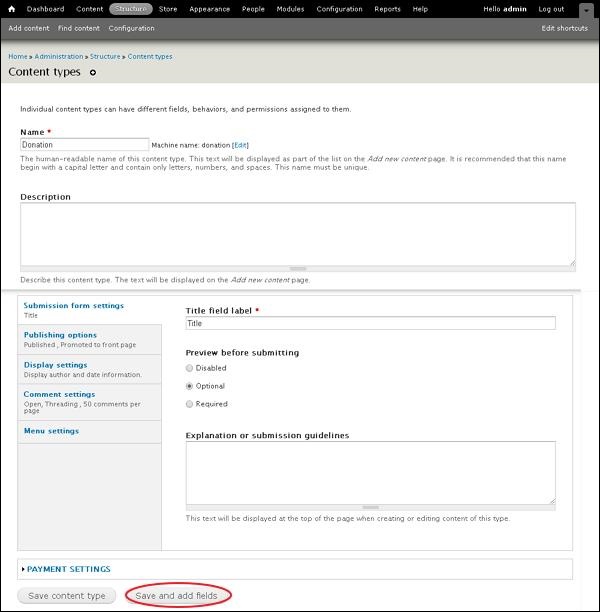
Step 7 − It will open the Manage Fields tab as shown in the following screen.

Add fields into Add existing field section as Product and select Product reference from the dropdown and click the Save button.
Step 8 − Now, Product page will get displayed, click the Save settings button.
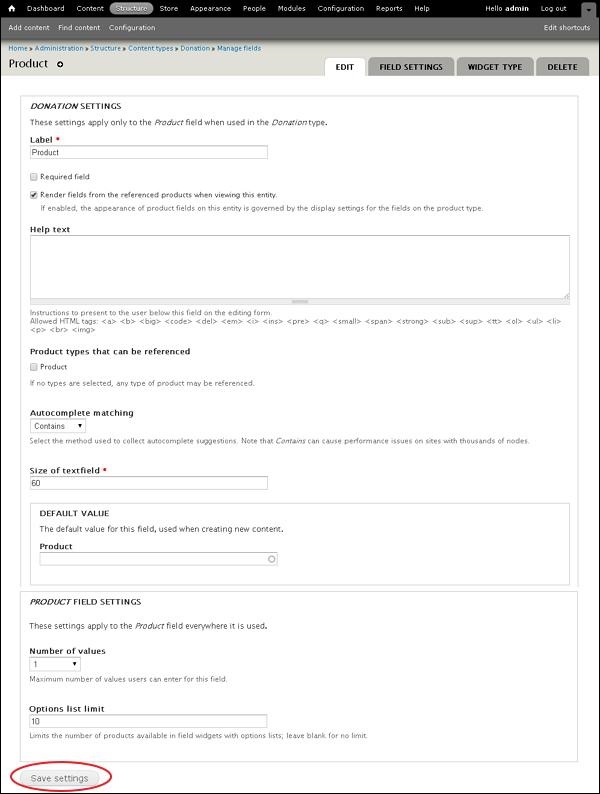
Step 9 − You can view the created Product field in the list.
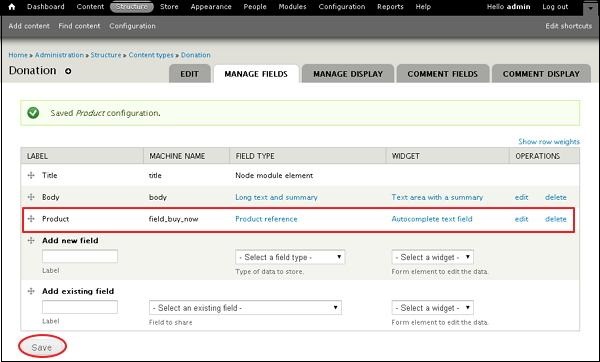
Step 10 − Now, click the Manage Display tab. Click the symbol present on the right side of the field Product, and the following screen will get displayed.
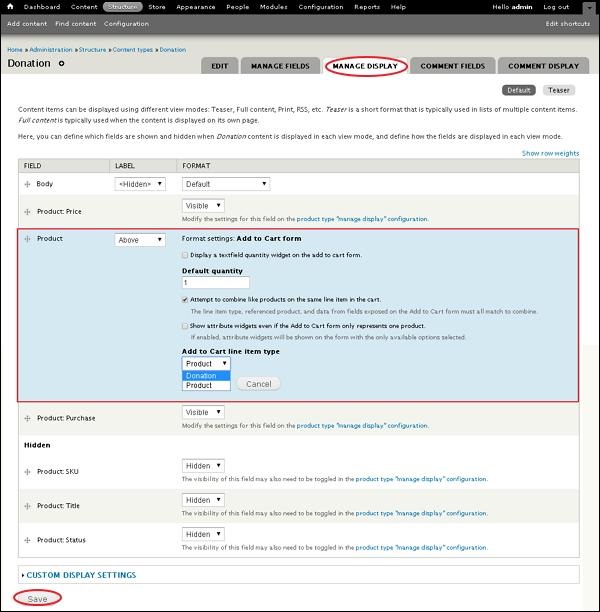
Here, Select as Donation from the dropdown in Add to Cart line item type. Later click the Update button and then on Save button.
Step 11 − Next, click Content --> Add Content to add donation information.
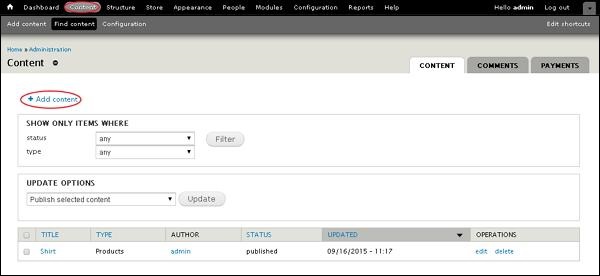
Step 12 − Click on Donation.

Step 13 − Enter your Donation information and click the Save button.

Step 14 − The page of donation will get displayed as shown in the following screen.
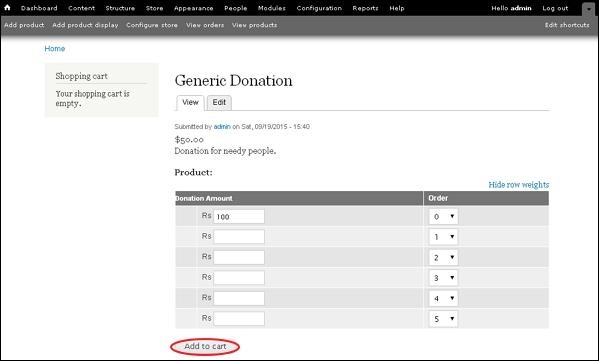
Here, you can fill the amount according to your wish and click the Add to cart button.
Step 15 − Now, you can view the donation amounts in the block present on the right side of the page. Click View Cart.
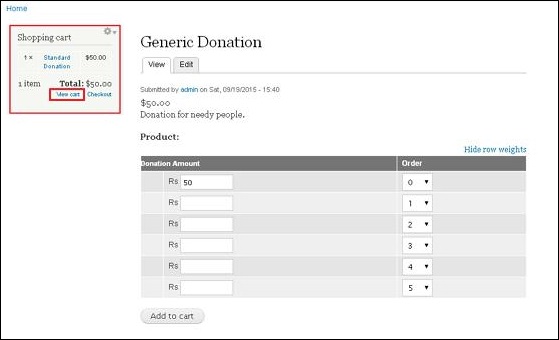
Step 16 − You can view the Shopping cart donation amount and click the Checkout button.
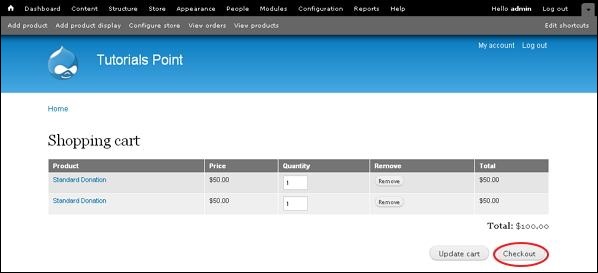
Step 17 − Now, you can enter the information of billing and click Continue to next step.

Step 18 − The next step is the review order page, where you can review the order information and click Continue to next step.
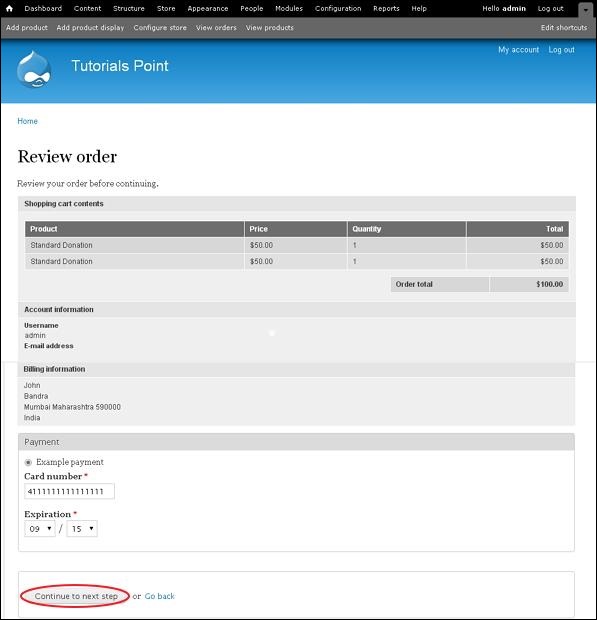
Step 19 − A message will get displayed as Checkout complete as shown in the following screen.
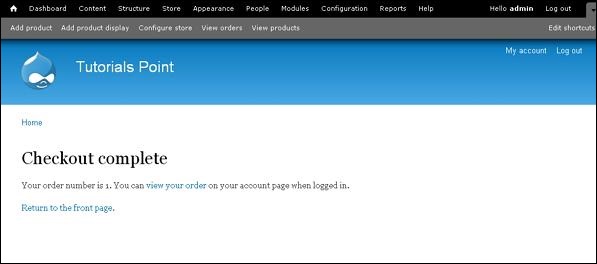
Drupal - Setup Shipping
In this chapter, let us study about setting up Shipping options in Drupal. In general, Shipping refers to transport of goods from one location to another. In order to set up Shipping you have to install Commerce Flat Rate and Commerce Shipping modules. In this chapter, let us create Free Shipping for orders greater than $100 and Paid Shipping for orders less than $100.
Following are the simple steps to set up Shipping.
Step 1 − Go to Store and click Configuration as shown in the following screen.
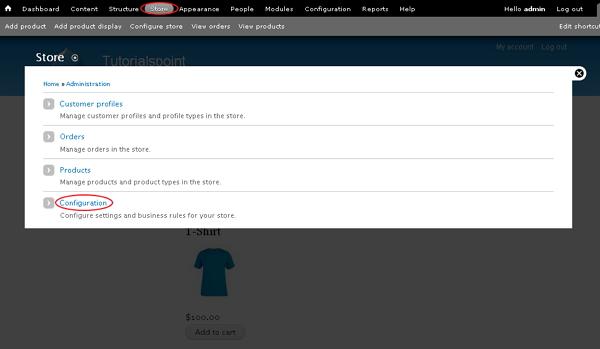
Step 2 − Click on Shipping.
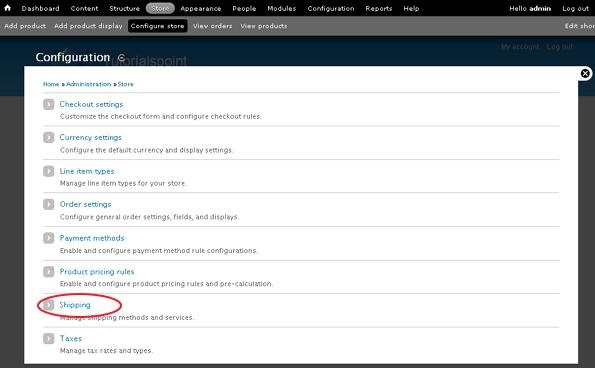
Step 3 − Click Add a flat rate service as shown in the following screen.
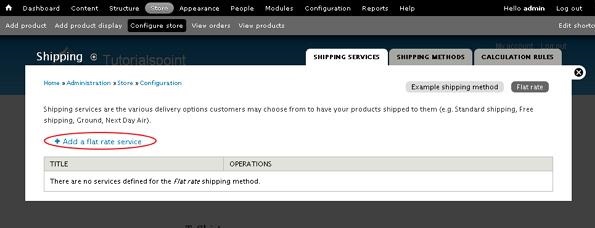
Step 4 − The Shipping page will get displayed as shown in the following screen.
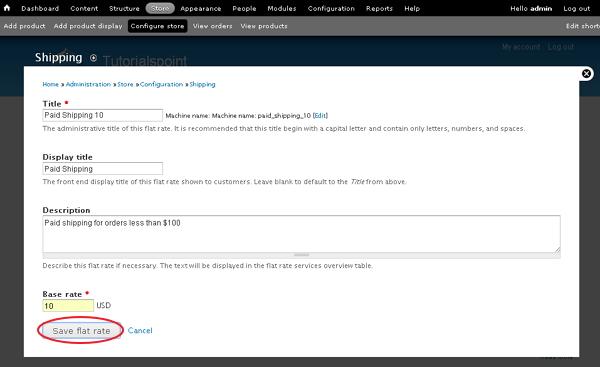
It contains the following fields −
-
Title − Provide a title which will be the administrative title of this flat rate.
-
Display title − Enter title that will be displayed on front-end of the flat rate shown to customers.
-
Description − Enter brief description about the flat rate.
-
Base rate − Provide a value for the flat rate.
Later, click the Save button.
Step 5 − Next, you have to configure the component by clicking configure component as shown in the following screen.
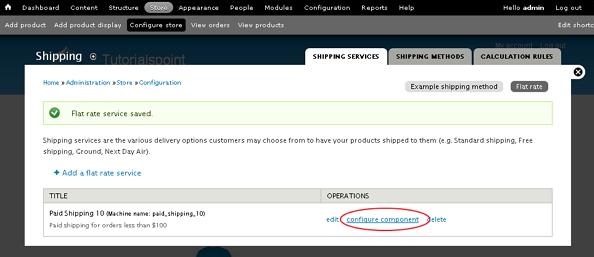
Step 6 − Click Add condition.

Step 7 − Choose Data comparison from dropdown and click Continue.
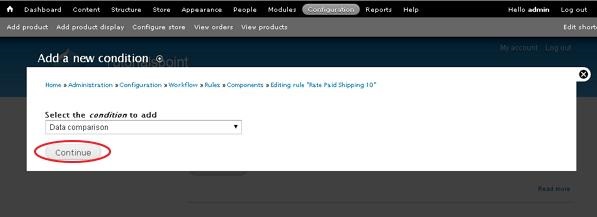
Step 8 − For Data selector field, choose commerce-order...(Order) from the dropdown as shown in the following screen.

Step 9 − Then, choose commerce-order:commerce-order-total:... (Order total) from the dropdown as shown in the following screen.

Step 10 − Choose commerce-order:commerce-order-total:amount (Amount) from the dropdown and click Continue as shown in the following screen.

Step 11 − Next, under OPERATOR section, you have to select is lower than value from the dropdown and click Switch to the direct input mode as shown below.
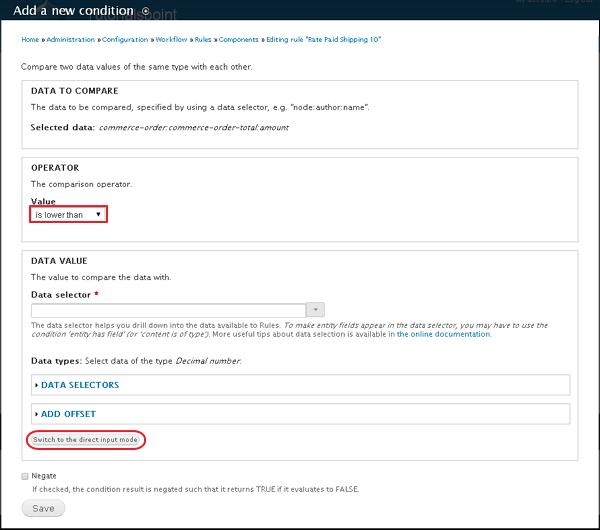
Step 12 − Under DATA VALUE section, provide the value (usually the value given here is in cents (i.e. $100 = 10000 cents)). Later, click the Save button.
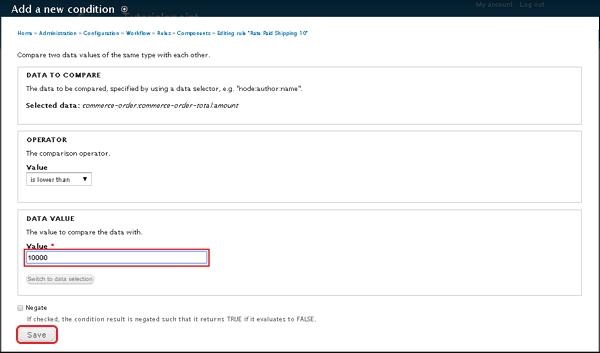
Step 13 − Click Save changes as shown in the following screen.
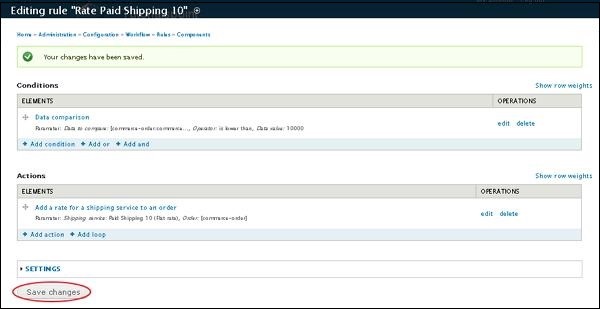
Step 14 − For Free Shipping you have to create another Flat rate service (as we did in Step(3 and 4)) and provide zero(0) for Base rate as shown in the following screen.
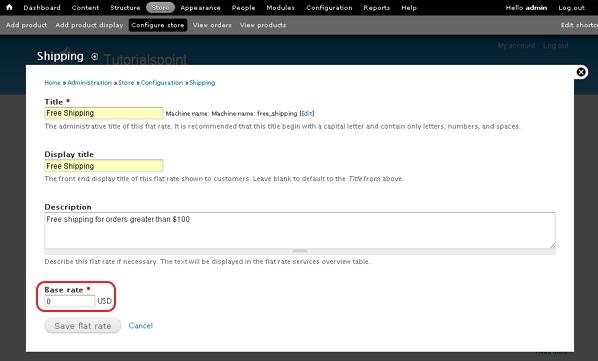
Step 15 − Configure the component for Free Shipping (follow the same steps from 5 to 10 for free shipping as well), choose ‘is greater than’ and provide 10000 (i.e. 10000 cents) value as shown in the following screen and click the Save button.
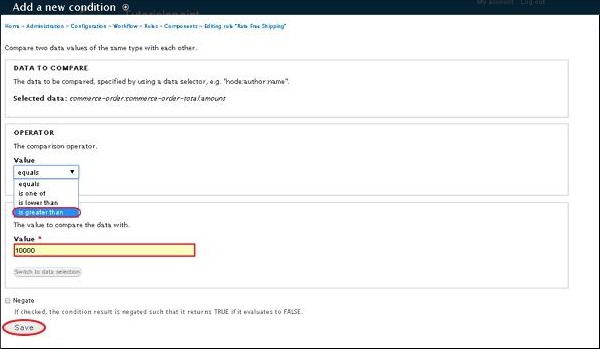
Step 16 − Add a product to the cart which is less than $100 and click the Check out tab.
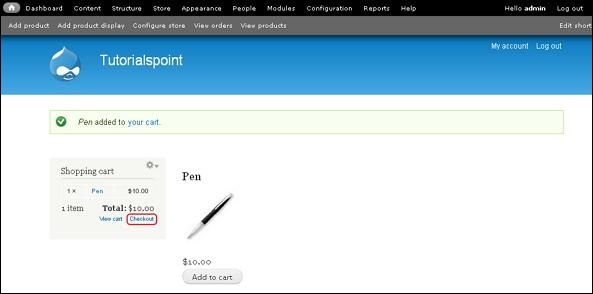
Step 17 − Next, fill up Shipping information, Billing information and click Continue to next step as shown in the following screen.

Step 18 − Now you can see the Paid Shipping option displayed as shown in the following screen.
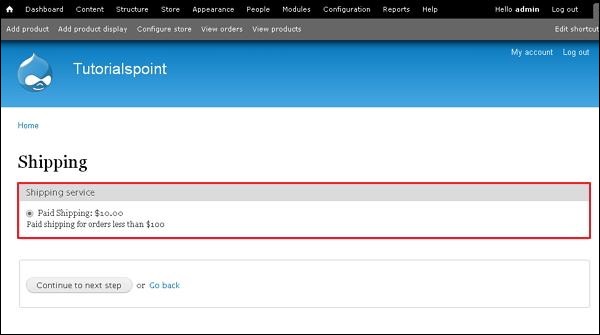
Step 19 − You can add some more products, so that Order total exceeds $100.
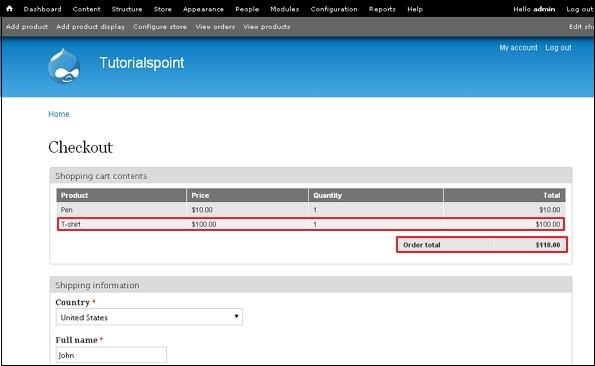
Step 20 − Finally, you can see that Free Shipping option is displayed after it exceeds the $100.
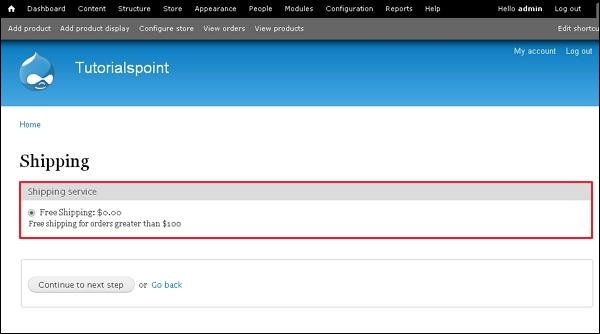
Drupal - Setup Payments
In this chapter, we will study how to set up Payments in Drupal. Payment is a process of paying money in exchange of goods, services or both to a company or a person.
Following are the steps to set up payments in Drupal.
Step 1 − Download the latest file of Basic Payment module and PayPal Payment module from the link and install in your Drupal site.
Step 2 − Next, Enable the Basic Payment and PayPal Payment in Modules and click Save configuration.
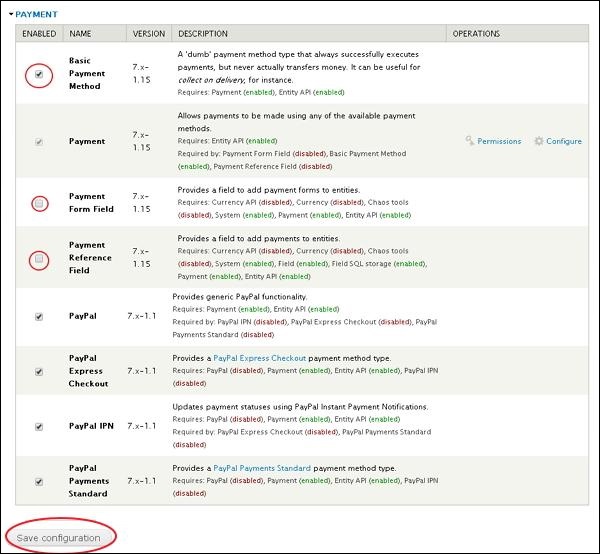
Step 3 − Click Configuration --> Payment as shown in the following screen.

Step 4 − Click Payment methods.
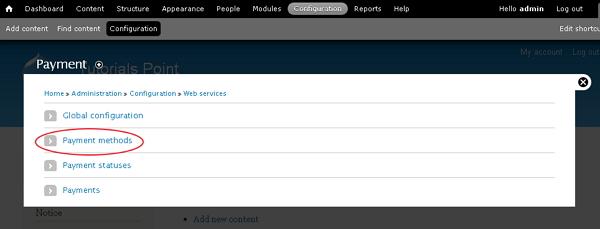
Step 5 − Then, click Add payment method.

Step 6 − Click PayPal Payments Standard.
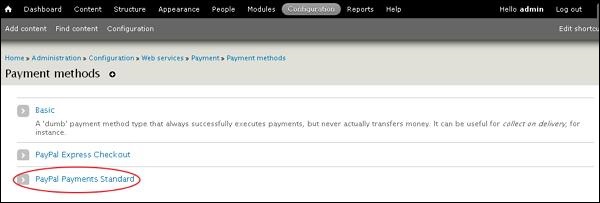
Step 7 − You have to fill the form for PayPal payments.

It contains the following fields −
-
Title(specific) − Enter the specific title name.
-
Title(generic) − Enter the generic title name.
-
Owner − Enter the name of the owner.
-
PayPal account email address − Enter your email address.
-
Server − Select the server from either of the one i.e. Production or Sandbox.
-
Capture − Select either of the one capture method i.e. Manual or Automatic.
Step 8 − You can view the above created PayPal in the following list.

Step 9 − Next, go to Structure --> Content Types. The following page will get displayed, click Add content type.
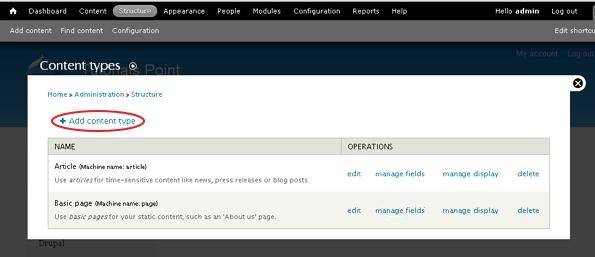
Step 10 − Create a content type name as Products and save it.
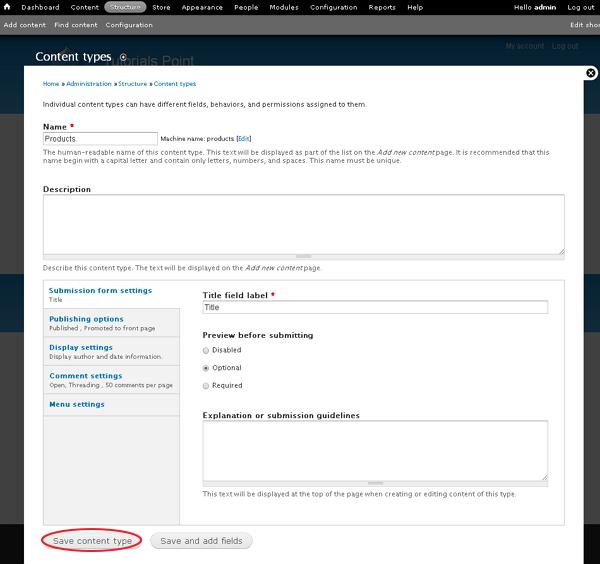
Step 11 − You can view the created Products content in the list. Click manage fields.
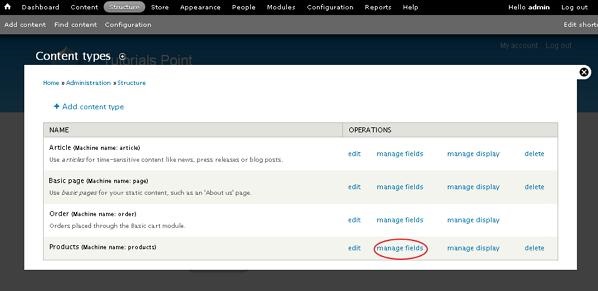
Step 12 − Add a new field as Buy Now, Select Payment form for type of data from the dropdown.
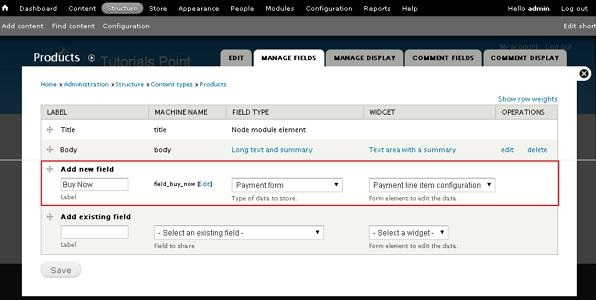
Click the Save button.
Step 13 − Now, you can view the created Buy Now field in the list.

Step 14 − Go to Content, click Add content.
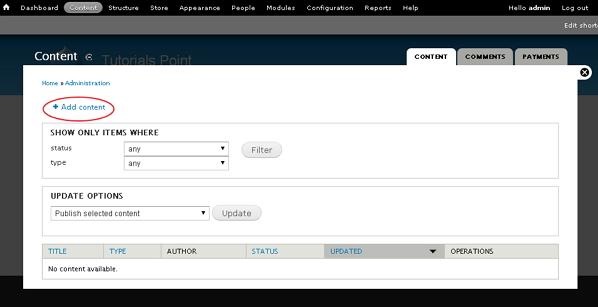
Step 15 − Click Products.

Step 16 − Enter your product information inside the fields as shown in the following screen and click the Save button.
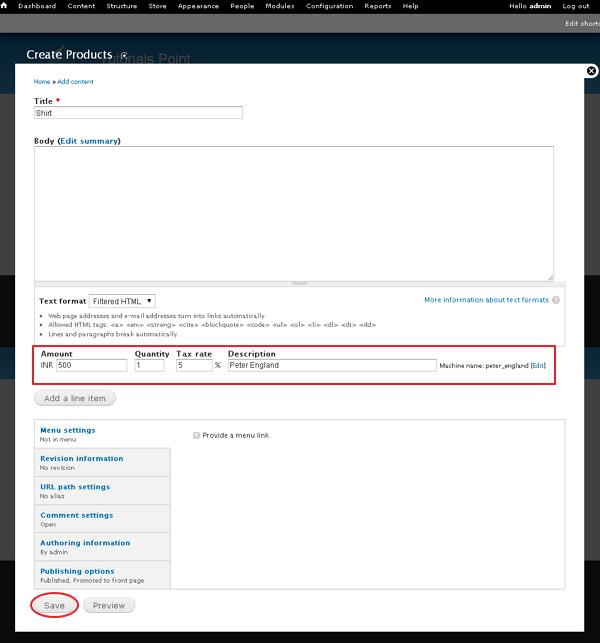
Step 17 − You can now view your content on your site as shown in the following screen. Click Pay button.
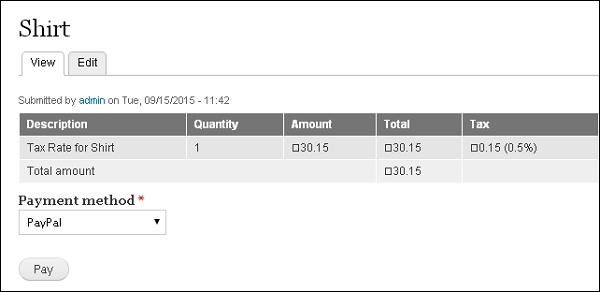
Step 18 − You will be redirected to the offsite payment server to authorize the payment.

Later, it will direct you to the PayPal site for future payments process.
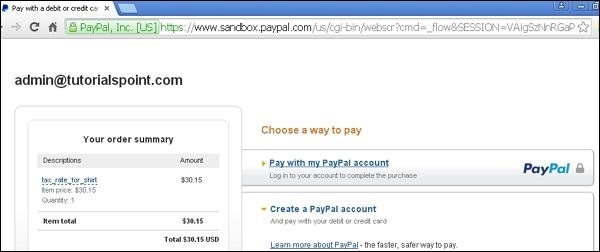
Step 19 − Once the payment process is complete, you can view the details of the payment as shown in the following screen.
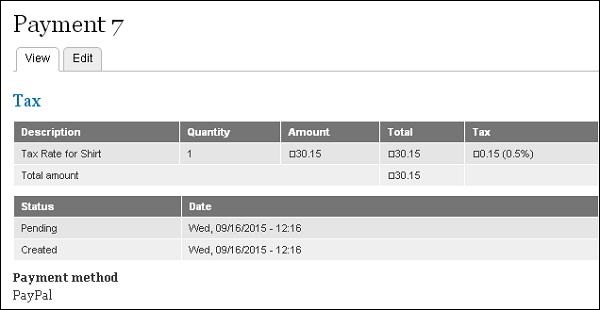
Step 20 − Go to Content --> Payments tab. Here, you can view the payment status of your product.
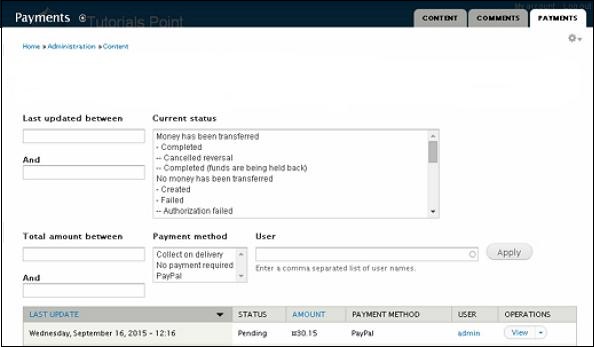
Drupal - Invoice Generation
In this chapter, we'll study how to generate invoice in Drupal. Invoice is a document with a statement of amount and cost, unique invoice number and tax information.
Following are the steps to generate invoice in Drupal.
Step 1 − Download the latest file of Invoice module and install in your Drupal site.
Step 2 − Enable the Invoice in Modules and click Save configuration.
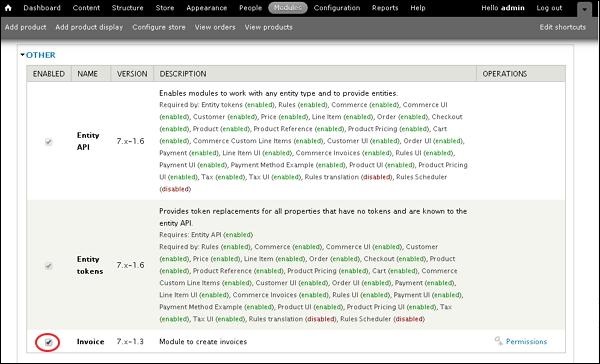
Step 3 − Go to Store --> Invoices.

Step 4 − Click Add Invoice.

Step 5 − You can view the Add Invoice page.
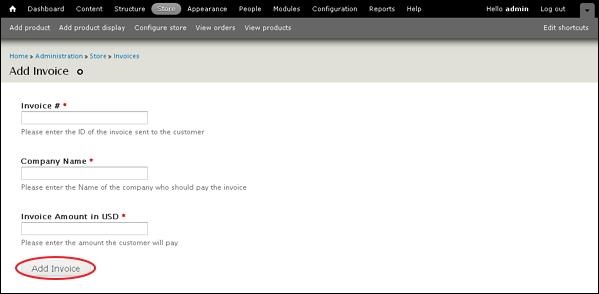
-
Invoice # − Enter the invoice id number sent to the customer.
-
Company Name − Enter the company name who should pay the invoice.
-
Invoice Amount in USD − Enter the amount that customer has to pay.
After filling the invoice details, click Add Invoice.
Step 6 − Go to Store --> Invoice --> Manage Invoices. Here, you can view your pending and paid invoices.

Copy the link given in the detail column and it'll redirect you to the checkout page.
Step 7 − You can also pay by navigating to the given link localhost<Your Site Name>user/invoices/pay, it'll redirect you to Pay Invoice page as shown in the following screen.
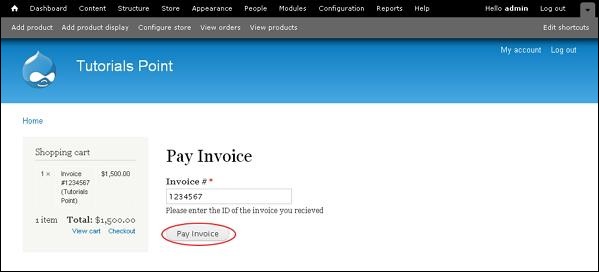
Here, you have to enter the invoice number and click Pay Invoice button. It will then redirect you to the Checkout page as shown in the following screen. You can enter the information for billing and click Continue to next step button.

Step 8 − You can review the product information and also the invoice number and company name. Click on Continue to next step button.
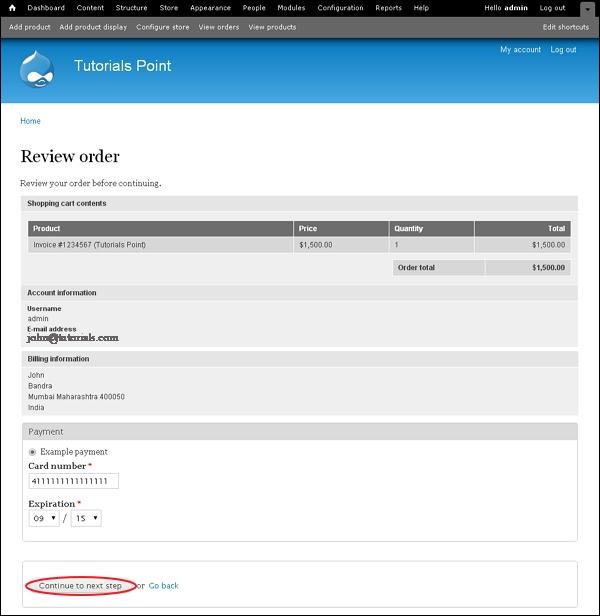
Step 9 − A final message will get displayed as Checkout complete as shown in the following screen.
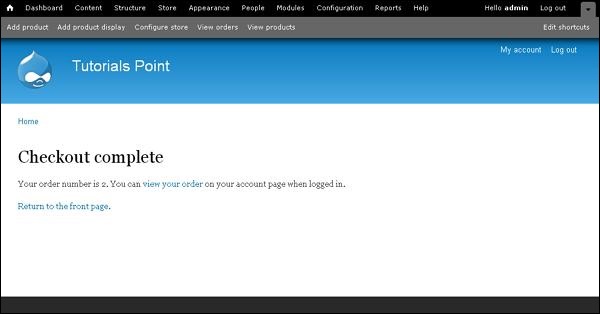
Drupal - Email Notifications
In this chapter, we will learn how to send E-mail Notifications to the owner or creator, when a new comment is posted to the article. E-mail Notification is an alert that a new mail has arrived in your mail box.
Following are the simple steps to set up e-mail notification in Drupal.
Step 1 − Click Configuration menu on Drupal.

Step 2 − Next, click Rules link in the WORKFLOW section as shown in the following screen.

Step 3 − Click Add new rule link.

Step 4 − Next, the Rules page will get displayed as shown in the following screen.

It contains the following fields −
-
Name − Enter the name.
-
Tags − Enter the tags
-
React on Event − Select the event where the notification should arrive.
-
Restrict by Type − Select the type where you need to filter the values or events.
After filling all the fields, click the Save button to save the rule.
Step 5 − Now, Editing reaction rule "Comment Notification" page gets displayed. Click Add action link in Actions section as shown in the following screen.
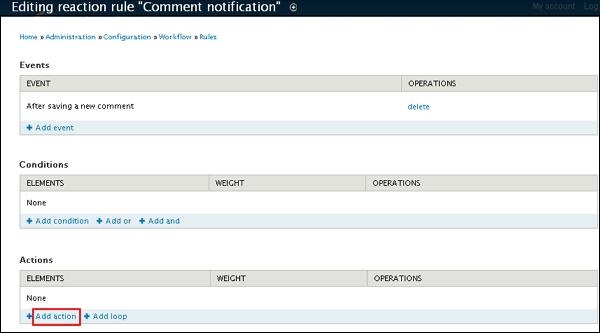
Step 6 − Add a new action page gets displayed. Select Send mail option in System section from the dropdown menu.

Step 7 − Next, a page will get displayed as shown in the following screen.
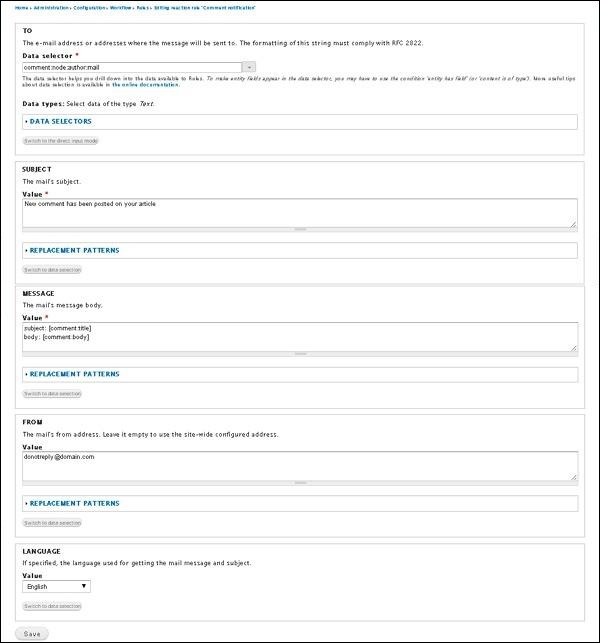
Following are the details about the fields present in the preceding screen.
-
Data selector − Select comment→node→author→mail from the dropdown menu.
-
Subject − Enter the mail subject in the Value text box.
-
REPLACEMENT PATTERNS − This data selection input mode may help you find more complex replacement patterns. You can select the TOKEN type and replace it as per demand.
-
MESSAGE − Enter mail's message body content in the message Value text box.
-
FROM − It displays the mail address from which mails will be sent to the receiver.
-
LANGUAGE − It specifies the language used for getting the mail message and subject. You can choose the language from the dropdown menu.
Click the Save button to save the notification.
Step 8 − You will see the following screen, after you save your notification.
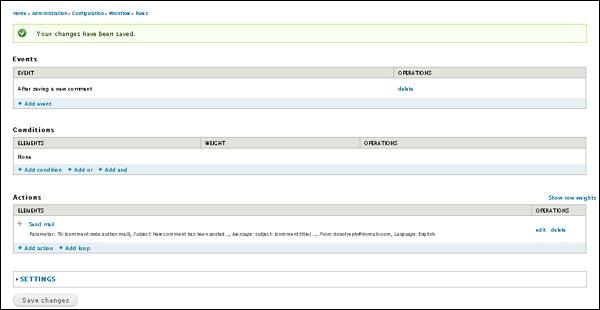
Drupal - Order History
Order history is dependent on the ordered products by the user after checkout. It includes history of the product which includes order number, user name, order status etc.
You can view the order history of the product by using the following steps −
Step 1 − Go to Store and click the Orders link.

Step 2 − You will get the screen of the ordered products list.
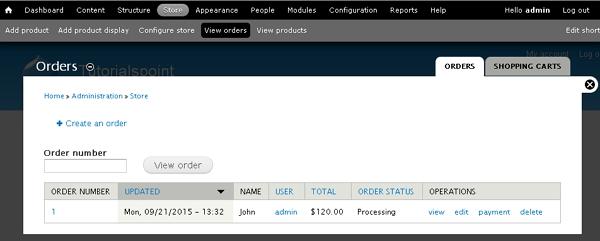
It contains fields such as −
-
Order Number − It is the order number of product.
-
Updated − It specifies when the product has been updated last.
-
Name − It is the name of the user who has ordered the product.
-
User − It is the account name of the user. It may be authenticated by user or admin.
-
Total − It specifies total amount of the ordered product.
-
Order Status − Defines the order status such as processing or pending or completed or cancelled.
-
Operations − Here you can perform some operations on the product such as −
-
View option displays the billing information and shipping information.
-
Edit option allows to edit the price, shipping information, billing information etc.
-
Delete option deletes the product order and payment option specifies paid amount for the product, date of expiry, etc..
-


