RichFaces Tutorial
RichFaces is an open source component library for JSF technology. It is developed and designed by JBoss. RichFaces provides reusable markups and AJAX capabilities to a JSF developer without having any prior knowledge of front end. RichFaces was developed over JSF 2, hence it follows the same life cycle of JSF. The in-built AJAX support and customizable look and feel features has enabled a new horizon for Enterprise Java application.
Advantages and Disadvantages
Following are a few advantages of using RichFaces.
AJAX support − RichFaces eliminates the old boilerplate AJAX, JavaScript codes to include markups in the webpages. Using RichFaces, a developer can include markups on-the-fly without having any prior knowledge of AJAX.
Component Development Kit (CDK) − As described earlier, the developer need not concentrate on the markups used in the application, all they need to include is RichFaces tags to use those functionalities. This automatic creation of markups will be done by a runtime environment called CDK.
Resource handling − RichFaces provides additional support to create different binary files such as image, excel, spreadsheet, etc.
Skinning − Skinning is a modern approach that has been introduced in JSF, which makes it very easy to control the look and feel of the application. Specially-centralized color management using different other customizable parameters make it very handy for a developer.
Following are a few disadvantages of using RichFaces.
Resource − This being a fairly new technology, getting good quality resource is a huge problem for rich face developer.
Complex − Transition through different phases and creation of dynamic markups is the entire responsibility of CDK. Understanding internal processing of CDK is a bit complex and confusing for a traditional front-end developer.
RichFaces – Environment Setup
In this chapter, you will set up our development environment and configure your system such that you can proceed with RichFaces development.
Technical Requirements
As per the technical requirement you will learn how to configure JDK, Application server, or any IDE of your choice.
System Requirements
You can use any running system, there is no any restriction on memory, RAM and operating system.
JDK Installation
Before proceeding further, you must have JDK configured on your system. Please refer to the official website of oracle to download and install JDK 7 or an above version. You might have to set the environment variable for Java such that it can work properly. To verify your installation in Windows operating system, hit “java –version” in the command prompt and as an output it will show you the Java version installed in your system.
IDE Installation
There are numbers of IDE available on the Internet. You can use any as you choose. For this tutorial, let us use NetBeans 8.2. You can find the download link of different IDE in the following table.
| IDE Name | Installation Link |
|---|---|
| NetBeans | https://netbeans.org/downloads/ |
| Eclipse | www.eclipse.org/downloads/ |
| Intellij | www.jetbrains.com/idea/download/#section=windows |
It is always recommended to use a recent software version to drag out maximum facility from it. For this tutorial, we will be using NetBeans IDE 8.2 along with JDK 8.
Server Requirements
As an application server, you will be using Tomcat. In this chapter, you will configure the tomcat server in the system. If you are installing the latest version of NetBeans, then you can directly install Apache Tomcat along with NetBeans IDE. If you are not doing so, please download the latest version of Tomcat from the official website of the TOMCAT. Keep the extracted Tomcat files in your C drive or program files. These files will be used in the next phase.
Client Requirements
RichFaces is a UI component. Thus, like every UI component, the internet browser will act as a client for your application. You can use any modern internet browser such as IE, Safari, Chrome, etc.
Development Requirements
Downloading required jars: Please visit the official website of JBOSS and download the latest stable release of the JBoss jar files. Extract the files. You will need the following jars in order to develop RichFaces Application.
- richfaces-a4j-4.5.17.Final.jar
- richfaces-core-4.5.17.Final.jar
- richfaces-rich-4.5.17.Final.jar
- cssparser-0.9.18.jar
- guava-19.0.jar
- sac-1.3.jar
Creating a Project
In this section, let us create a demo application that will be used later to learn more about RichFaces. Before proceeding further, it is highly recommended that you download and install all required software and jar files mentioned earlier.
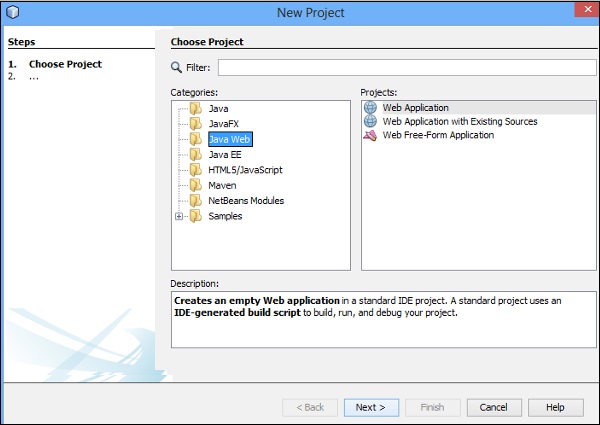
Step 1 − Open NetBeans IDE. Go to File → New Project. You will be redirected to the following screenshot.
Step 2 − Select “Java Web” and “Web Application” in “Categories” and “Projects” tab respectively and hit “Next”.
Step 3 − In the next tab, you have to provide a project name. Here, let us name it as “RichFaceTutorial”. Then, hit “Next”. You will be redirected to the following screenshot. where you will be setting up server details.
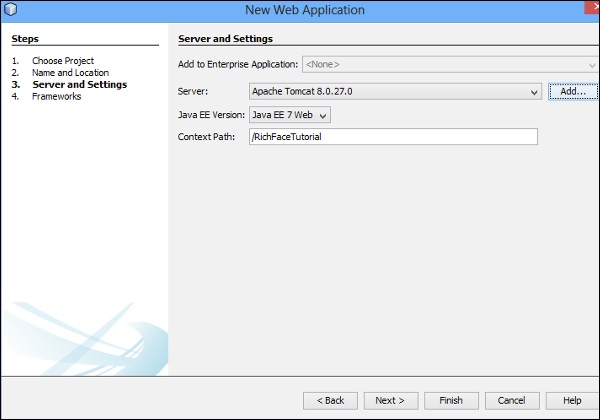
Step 4 − Select “Apache Tomcat” from the dropdown and hit “Add”. Once you hit “Add”, you will be redirected to a separate screen, where you need to configure your server. To configure the server, you will need the server files downloaded in the previous section.
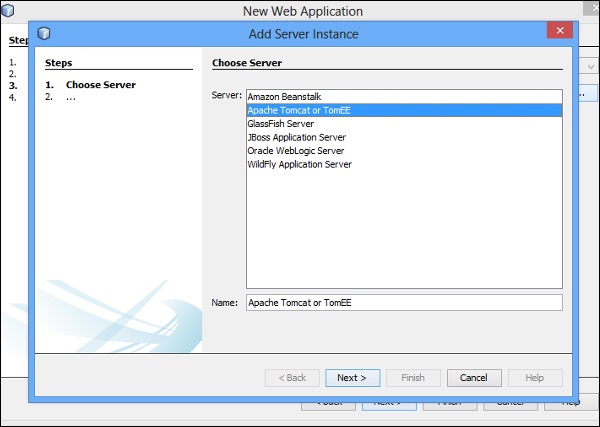
Step 5 − Select “Apache Tomcat or TomEE” from the list as shown in the above screenshot and hit “Next”. You will be redirected to the following screen.
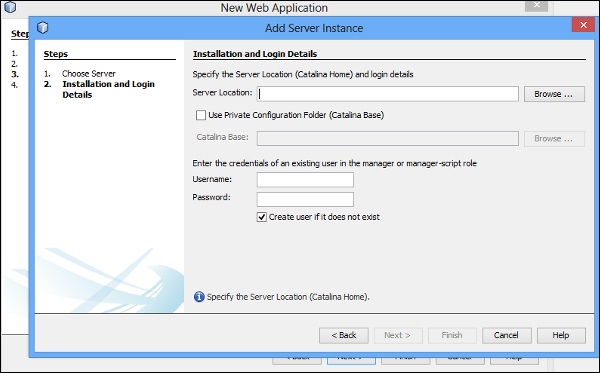
Step 6 − In the Server location, you need to provide the downloaded Tomcat files location. Hit “Browse” and navigate to the required folder path and hit “Finish”. Once your server is added successfully, you will be redirected to the first screen. Hit “Next” and you will get a chance to select the different frameworks to add into the application as shown in the following screenshot.
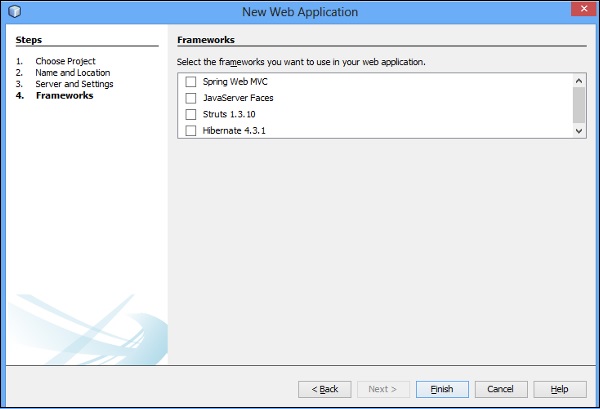
Step 7 − Select “JavaServer Faces” and in “JavaServer Faces Configuration” you have to select “RichFaces” and hit “Finish”.
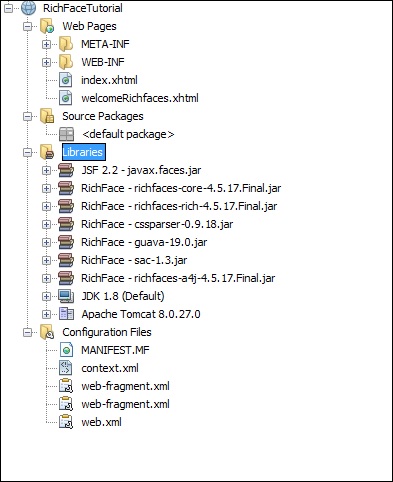
If you do not get “RichFaces” as an option, you can add the required jars file from the build path. After this step, your application is ready to deploy on the application server. Following is the project directory structure of the application after completing all the above-mentioned steps.
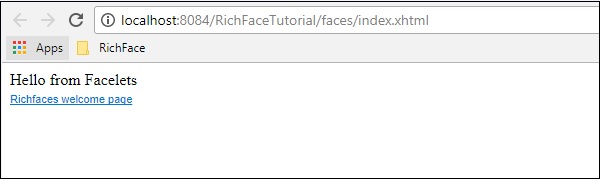
Step 8 − Go ahead and left-click the “index.xhtml ” file and run the file. You will see the following output in the browser.
In real-life application, you might have to generate the required war file and deploy in the application server, as all the pages will be interlinked.
However, for this tutorial we will be running the application page wise as we need to show different features of different tags.
RichFaces – Architecture
According to Red Hat official document, there are a total five components that work internally to provide rich user experience. Following are the five components.
-
AJAX Filter − AJAX filter is used to differentiate between different types of request coming from the client browser. To include this component into the application, you need to register RichFaces Filter in your application’s web.xml file. AJAX Filter acts differently in different phases of JSF applications.
-
AJAX Action Components − Action components are responsible to send the client requests from the browser to the AJAX Engine, from where it will process the request and render the required view as a response.
-
AJAX Containers − AJAX container is conceptually similar to the spring container. It is basically recognizing a specific area of the client browser to process the AJAX request.
-
Skinnability − Skin and theme together is referred to as Skinnability. This module acts independently to provide extensive support to the look and feel of the entire.
-
RichFaces JavaScript Engine − JavaScript Engine runs on the client side that sends updates to the AJAX engine in order to prepare the response. This engine works automatically, hence we need not write any extra line of code to control it.
Following is the architectural diagram of the RichFaces application in MVC paradigm.
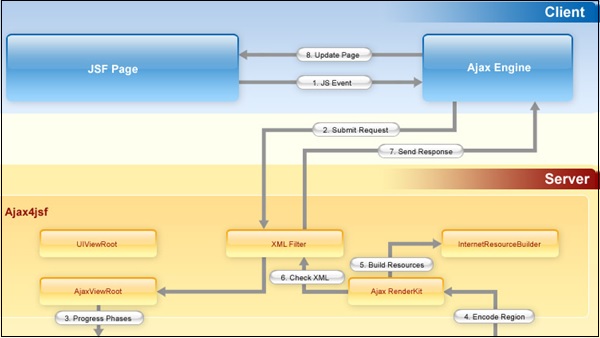
In the above image, the user’s activity will be processed as a “JS Event”. Later, the “JS Event” will be transmitted to the “XML Filter”, which is nothing but a component of AJAX Filter. “XML Filter” is responsible for generating and processing user requests. All other components are internal to the different jar files. We need to use appropriate tags library in order to use those functionalities.
RichFaces – Basic Concepts
In this chapter, we will see some basic concepts of RichFaces and we will learn how RichFaces deal with the processing of AJAX requests and many other functionalities.
Processing AJAX Request
As mentioned earlier, RichFaces provides rich UI components that enables AJAX functionalities in the web application even without implementing any AJAX codes. All these AJAX capabilities are introduced via a4:j tag library. <a4j:commandLink> , <a4j:commandButton>, <a4j:support>, and <a4j:poll> are the four tags that help the developer include AJAX functionalities into the web application. We will learn more about tag libraries in a subsequent chapter.
Partial Tree Processing
In a conventional AJAX application, all the input fields will be processed as different nodes of a tree, however, in RichFaces we have an option of partially submitting the tree nodes and validating the required fields.
Let us consider an example to understand more about this. Suppose, there are a total of five elements in HTML – “Name”, ”Employee Id”, ”Employee salary”, ”Employee Address”, and “Employee Department”. Now you want to validate or process only Employee id, which can be possible using RichFaces but not possible using AJAX. You need to submit the entire form to the server. RichFaces provides an execute attribute that can identify a specific component and process the same. Following are the different levels of execute attributes available.
-
@all − This attribute will process all your data.
-
@none − This can be used when you don’t want to process any of the data.
-
@this − This will process the requesting component only.
-
@form − This will process the entire form that contains the requesting component.
-
@region − This will process a specific region of a webpage.
Partial View Updates
Like input fields, RichFaces provides similar options to update different views. Developers can customize the view according to their choice. Like the execute attribute, there is a render attribute that works similar to the execute attribute. All these attributes work based on the ID identifier of a webpage.
Following are the different levels of render attributes available.
-
@all − This will update the entire component.
-
@none − This will not update any of your components.
-
@this − This will update only the requesting component.
-
@from − This will update the form that contains the requesting data.
-
@region − This will update a specific region of the webpage.
Other a4j Tags
Till now, we have discussed the conceptual properties about RichFaces application. In this section, we will learn about them in detail with hands-on examples.
<a4j:AJAX>
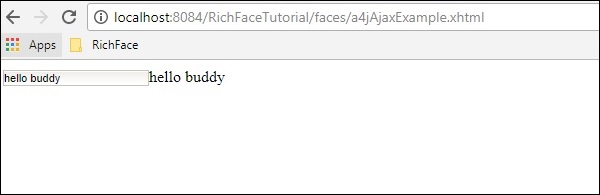
This is one of the core components that RichFaces offers. This is nothing but an extending part of JSF2.0 f:AJAX tag. This tag triggers an AJAX request whenever a JS event occurs in the webpages. Following example describes more about this tag. Create a “xhtml ”page under the webpage folder and name it as “a4jAJAXExample.xhtml”. Then, paste the following piece of code.
<!DOCTYPE html>
<html xmlns = "http://www.w3.org/1999/xhtml"
   xmlns:h = "http://xmlns.jcp.org/jsf/html"
   xmlns:a4j = "http://richfaces.org/a4j">

   <h:head>
      <title>a4j:AJAX Tag Example</title>
   </h:head>

   <h:body>
      <h:form id = "form">
         <h:inputText value = "#{managedBean.message}">
            <a4j:AJAX render = "ShowMessage" />
         </h:inputText>

         <h:outputText value = "#{managedBean.message}" id = "ShowMessage"
            style = "animation-duration"/>
      </h:form>
   </h:body>

</html>
We also need to create a managed bean in order to hold the inputs from the webpage. Go ahead and create a java class under the source package directory. Following is the managedbean.java class code.
import javax.faces.bean.ManagedBean;
import javax.faces.bean.RequestScoped;

@ManagedBean
@RequestScoped

public class managedBean {
   String message;
   public String getMessage() {
      return message;
   }
   public void setMessage(String message) {
      this.message = message;
   }
}
Save both the files and run, which will yield the following output in the browser.
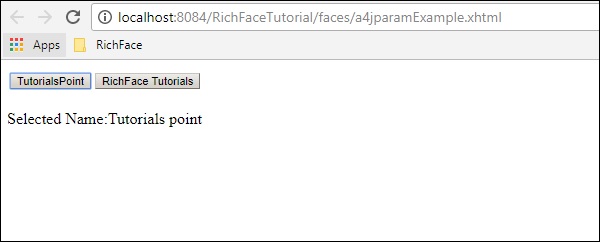
<a4j:param>
a4j:param is an extension of f:param tag. It is used to assign a value to a property or an instance variable. This tag is capable of assigning the value to the instance variable permanently. Following is the “a4jparamExample.html” code.
<?xml version = "1.0" encoding = "UTF-8"?>
<!DOCTYPE html>
<html xmlns = "http://www.w3.org/1999/xhtml"
   xmlns:h = "http://xmlns.jcp.org/jsf/html"
   xmlns:a4j = "http://richfaces.org/a4j">

   <h:head>
      <title>Param tag example</title>
      <meta name = "viewport" content = "width = device-width, initial-scale = 1.0"/>
   </h:head>

   <h:body>
      <h:form id = "form">
         <h:panelGrid columns = "2">
            <a4j:commandButton value = "yoursite" render = "rep">
               <a4j:param value = "Tutorials point" assignTo = "#{managedBean.message}" />
            </a4j:commandButton>

            <a4j:commandButton value = "RichFace Tutorials" render = "rep">
               <a4j:param value = "RichFace Tutorials" assignTo = "#{managedBean.message}" />
            </a4j:commandButton>
         </h:panelGrid>
         <br />

         <h:outputText id = "rep" value = "Selected Name:#{managedBean.message}" />
      </h:form>
   </h:body>

</html>
Following is the corresponding managed bean class code.
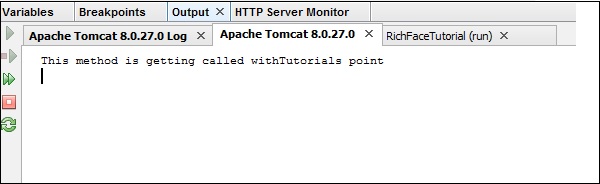
import javax.faces.bean.ManagedBean;
import javax.faces.bean.RequestScoped;

@ManagedBean
@RequestScoped

public class managedBean {
   String message;
   public String getMessage() {
      return message;
   }
   public void setMessage(String message) {
      System.out.println("This method is getting called with"+message);

      // we have added this line in order to check how the AJAX call
      // happens to the class methods without any direct communication
      this.message = message;
   }
}
Go ahead and run the file. Following is the output in the browser.
Now, in the server console you will see the following output, which proves that xhtml file is communicating with the managed bean in order to set the instance variable at run time.
<a4j:commandButton>
We have already used the command button tag in our previous example. It is used to create a button inside a xhtml page, which will generate and communicate with the AJAX engine to process the specific request. It takes an input and processes the same and renders an output in the web browser.
In the previous example, we have created two buttons – “TutorialsPoint” and “RichFace Tutorials”. Our command button tag internally communicates with the managed bean and sets the required instance variables. It is also responsible for rendering the value.
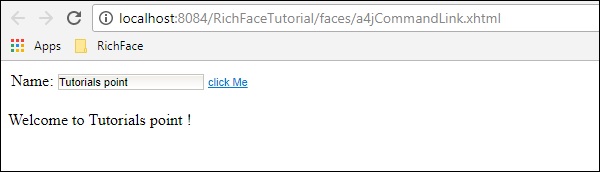
<a4j:commandLink>
Command link works like <h:commandlink> component of JSF 2.0. The command button generates submit-based AJAX request, whenever the command link works on the JS click event. This is the only difference we have in the command button and the command link. Following example will help you understand the tag lib better. Create “a4jCommandLink.xhtml” file and paste the following code in it.
<?xml version = "1.0" encoding = "UTF-8"?>
<!DOCTYPE html>
<html xmlns = "http://www.w3.org/1999/xhtml"
   xmlns:h = "http://xmlns.jcp.org/jsf/html"
   xmlns:a4j = "http://richfaces.org/a4j">

   <h:head>
      <title>Example of command Link</title>
   </h:head>

   <h:body>
      <h:form id = "form">
         <h:panelGrid columns = "3">
            <h:outputText value = "Name:" />
            <h:inputText value = "#{managedBean.message}" />
             <a4j:commandLink value = "Click Me" render = "out" execute = "@form" />
         </h:panelGrid>
      </h:form>
      <br />

      <a4j:outputPanel id = "out">
         <h:outputText value = "Welcome to #{managedBean.message} !" />
      </a4j:outputPanel>
   </h:body>

</html>
No need to change anything in the managed bean class. Run this file and following will be the output in the browser.
<a4j:outputPanel>
The output panel works as a span of the HTML page. It is used to group different components of a webpage rather than specify them individually. In the previous example, we have used the output panel in order to display the message provided in the input text box. Following is the syntax of the output panel.
<a4j:outputPanel id = "out">
   <h:outputText value = "Welcome to #{managedBean.message} !" />
</a4j:outputPanel>
<a4j:region>
This is the key feature of RichFaces, that allows to process some parts of the webpage from. Using this tag, partial tree processing happens in RichFaces. It is mainly used to increase the rendering process. Following example will help you understand this in detail. Please create a “a4jregionExample.xhtml” file using the following code.
<?xml version = "1.0" encoding = "UTF-8"?>
<!DOCTYPE html>
<html xmlns = "http://www.w3.org/1999/xhtml"
   xmlns:h = "http://java.sun.com/jsf/html"
   xmlns:a4j = "http://richfaces.org/a4j" >

   <h:head>
      <title>Region Example</title>
   </h:head>

   <h:body>
      <h:form>
         <h:inputText value = "#{managedBean.message}"/>
         <h:inputText value = "#{managedBean.job}"/>
         <a4j:commandLink id = "one" value = "one"/>

         <a4j:region>
            <h:inputText value = "#{managedBean.message}"/>
            <a4j:commandLink id = "two" value = "two"/>
         </a4j:region>
      </h:form>
   </h:body>

</html>
Along with this xhtml page, please update our managedBean accordingly.
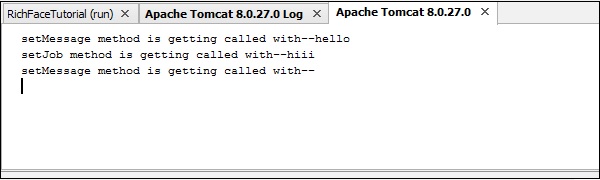
import javax.faces.bean.ManagedBean;
import javax.faces.bean.RequestScoped;

@ManagedBean
@RequestScoped

public class managedBean {
   String message;
   String job;
      public String getMessage() {
      return message;
   }
   public void setMessage(String message) {
      System.out.println("setMessage method is getting called with--"+message);
      this.message = message;
   }
   public String getJob() {
      return job;
   }
   public void setJob(String job) {
      System.out.println("setJob method is getting called with--"+job);
      this.job = job;
   }
}
The above piece of code will yield the following output in the browser.
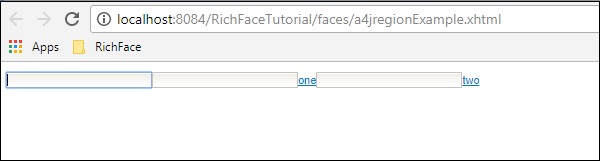
Whenever the command link “one” is clicked, it will process the entire form, however, when we click the command link “two”, only the message instance will be processed as it is enclosed within a region tag. Similarly, if we enclose the command link ‘one’ in another region tag, then it will process only the first two input parameters. Following is the screenshot of the server console, whenever the command link “two” is clicked.

Whenever the command link “one” is clicked, following will be the output.
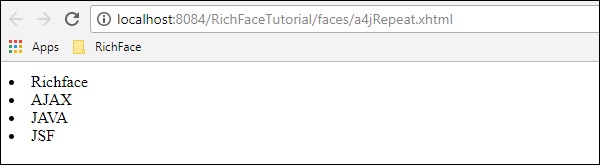
<a4j:repeat>
Repeat tag works exactly similar to <ui:repeat> tag of JSF. It helps to iterate over a list in the webpage. In the following example of “a4jRepeat.xhtml” file, we are iterating through a list from our managed bean class.
<?xml version = "1.0" encoding = "UTF-8"?>
<!DOCTYPE html>
<html xmlns = "http://www.w3.org/1999/xhtml"
   xmlns:h = "http://java.sun.com/jsf/html"
   xmlns:a4j = "http://richfaces.org/a4j">

   <h:head></h:head>

   <h:body>
      <h:form id = "form">
         <h:panelGrid columns = "1" style = "width: 640px">
            <a4j:outputPanel id = "panel" layout = "block">
               <a4j:repeat       value = "#{managedBean.subjectList}" var = "sub">
                  <li>
                     <h:outputText value = "#{sub}"/>
                  </li>
               </a4j:repeat>
            </a4j:outputPanel>
         </h:panelGrid>
      </h:form>
   </h:body>

</html>
Once you run this specific file in the browser, you will get the following output.
<a4j:status>
As the name suggests, this tag is useful whenever you want to display the status of your AJAX request in the front-end. You can include a normal text message or gif or image-based status as per your choice. For a small application such as the following, you will get a glimpse of the status in the front-end, however, whenever you are running a complex AJAX request, this status is very much visible. Please modify the “a4jregionExample.xhtml” as shown below.
<?xml version = "1.0" encoding = "UTF-8"?>
<!DOCTYPE html>
<html xmlns = "http://www.w3.org/1999/xhtml"
   xmlns:h = "http://java.sun.com/jsf/html"
   xmlns:a4j = "http://richfaces.org/a4j">

   <h:head>
      <title>Region Example</title>
   </h:head>

   <h:body>
      <h:form>
         <a4j:status startText = "Working..." />
            <h:inputText value = "#{managedBean.message}"/>
            <h:inputText value = "#{managedBean.job}"/>
            <a4j:commandLink id = "one" value = "one"/>

            <a4j:region>
               <h:inputText value = "#{managedBean.message}"/>
               <a4j:commandLink id = "two" value = "two"/>
            </a4j:region>

         <a4j:status startText = "Done" />
      </h:form>
   </h:body>

</html>
Whenever you are running this application, you can see a glimpse of two statuses “working…” and “Done”. These statuses will automatically disappear whenever the request is completed.
<a4j:include>/<a4j:keepAlive>
Include and keepAlive, both tags were introduced in RichFaces 3.0 but in RichFaces 4 these tags were depreciated as these functionalities can be easily achievable using different other tags used in Facelets such as <ui:include> and <ui:insert>. As the name suggests, include was introduced to include one page into another and keepAlive was introduced to control the scope of the managed bean associate with a JSF page. It is recommended to use the updated version of any software APIs and use <UI> component and “annotation” implementation to achieve the business goals.
<a4j:log>
As the name suggests, this a4j component helps to generate the logging info into the web browser. The following example explains more about this tag. Edit the “a4jregionExample.xhtml” file in the following way.
<?xml version = "1.0" encoding = "UTF-8"?>
<!DOCTYPE html>
<html xmlns = "http://www.w3.org/1999/xhtml"
   xmlns:ui = "http://java.sun.com/jsf/facelets"
   xmlns:h = "http://java.sun.com/jsf/html"
   xmlns:a4j = "http://richfaces.org/a4j">

   <h:head>
      <title>Region Example</title>
   </h:head>

   <h:body>
      <h:form>
         <a4j:status startText = "Working..." />
            <h:inputText value = "#{managedBean.message}"/>
            <h:inputText value = "#{managedBean.job}"/>
            <a4j:commandLink id = "one" value = "one"/>

            <a4j:region>
               <h:inputText value = "#{managedBean.message}"/>
               <a4j:commandLink id = "two" value = "two"/>
            </a4j:region>

            <a4j:log></a4j:log>
         <a4j:status startText = "Done" />
      </h:form>
   </h:body>

</html>
Now run the above code in the browser and following will be the output. a4j:log will generate the required logs of all levels whenever required.

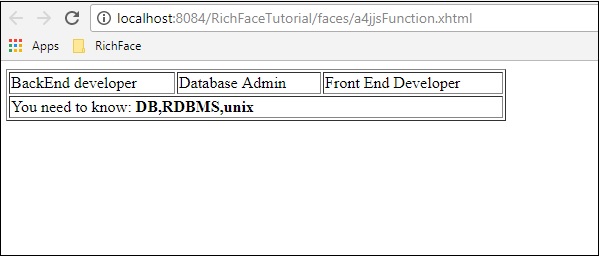
<a4j:jsFunction>
This is the most advanced feature of RichFaces, where an automatic JS function can be created without any JavaScript code. The CDK will generate an automatic JavaScript code based on any JS event.
In the following example, we are creating a JavaScript function that will be called whenever we hover on a specified value.
<?xml version = "1.0" encoding = "UTF-8"?>
<!DOCTYPE html>
<html xmlns = "http://www.w3.org/1999/xhtml"
   xmlns:ui = "http://java.sun.com/jsf/facelets"
   xmlns:h = "http://java.sun.com/jsf/html"
   xmlns:a4j = "http://richfaces.org/a4j">

   <h:head>
      <title>Example of JS Function</title>
   </h:head>

   <h:body>
      <table width = "500" border = "1">
         <tbody>
            <tr>
               <td>
                  <span onmouseover = "showMySkill('core java,J2EE')"
                     onmouseout = "showMySkill('')">BackEnd developer</span>
               </td>
               <td>
                  <span onmouseover = "showMySkill('DB,RDBMS,unix')"
                     onmouseout = "showMySkill('')">Database Admin</span>
               </td>
               <td>
                  <span onmouseover = "showMySkill(
                     'JS frameworks,html,java scripts')"
                     onmouseout = "showMySkill('')">Front End Developer</span>
               </td>
            </tr>
            <tr>
               <td colspan = "3">You need to know:
                  <b><h:outputText id = "showSkillset" value = "#{managedBean.message}"/></b>
               </td>
            </tr>
         </tbody>
      </table>

      <h:form id = "form">
         <a4j:jsFunction name = "showMySkill" render = "showSkillset">
            <a4j:param name = "name" assignTo = "#{managedBean.message}" />
         </a4j:jsFunction>
      </h:form>
   </h:body>
</html>
The above code will generate the following output in the browser. Depending on the JS event, CDK will override the method named “showMySkill()” and the required values will be printed in the browser.
<a4j:AJAXListener>
This tag is used when you want to execute a particular listener just before rendering the result to the browser. This tag is not available in RichFaces 4 because the same functionality is available in , where you can create an AJAX request on any JS event occurrence. Although it is advisable to use the updated software version, if you are still using RichFaces 3, then you can use this tag in the following manner.
<rich:panel>
   <f:facet name = "header">Using a4j:actionListener</f:facet>
   <a4j:commandButton value="Submit" reRender = "#{AJAXBean.areas}">
      <a4j:AJAXListener binding = "#{AJAXBean.renderAreasListener}"/>
   </a4j:commandButton>
</rich:panel>
In the above example, on the click of the “Submit” button, a JS event will be created, which will call the “areas” method implemented inside the bean class and the corresponding result will be rendered as a result.
RichFaces – Rich Skin
RichFaces comes with a new feature to control the look and feel of your website in a centralized manner, called Rich Skin. Skin is a high level implementation of old CSS files, which is more convenient for the back-end developer to control the look and feel of the website. There are some built-in skins available, which can be customized according to your choice.
Built-in Skin
There are a number of built-in skins available in the RichFaces component jar file. Following are some built-in rich skin available.
- Default
- Plain
- emeraldTown
- blueSky
- wine
- japanCherry
- ruby
- classic
- deepMarine
- NULL
In the following example, we will implement ”classic” skin. It is very easy to implement any of the above-mentioned skins. Before proceeding further, please add the skin in the “web.xml” file using the line of code given below. We can add any skin of our choice from the above list. We just need to modify the <param-value> tag with the appropriate skin name.
<context-param>
   <param-name>org.richfaces.skin</param-name>
   <param-value>classic</param-value>
</context-param>
After adding this, please create a “SkinExample.xhtml” file and add the following line of code into it.
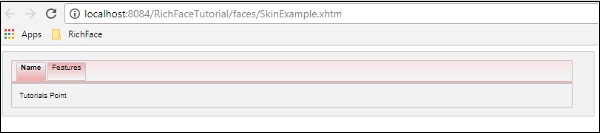
<?xml version = '1.0' encoding = 'UTF-8' ?>
<ui:composition xmlns = "http://www.w3.org/1999/xhtml"
   xmlns:h = "http://java.sun.com/jsf/html"
   xmlns:f = "http://java.sun.com/jsf/core"
   xmlns:ui = "http://java.sun.com/jsf/facelets"
   xmlns:a4j = "http://richfaces.org/a4j"
   xmlns:rich = "http://richfaces.org/rich">

   <f:view>
      <h:head>
         <title>Rich Faces Built in Skin</title>
      </h:head>

      <h:body>
         <h:form>
            <rich:panel style = "width:60%">
               <rich:tabPanel switchType = "AJAX">
                  <rich:tab header = "Name">
                     Tutorials Point
                  </rich:tab>

                  <rich:tab header = "Features">
                     Best Place to learn
                  </rich:tab>
               </rich:tabPanel>
            </rich:panel>
         </h:form>
      </h:body>

   </f:view>
</ui:composition>
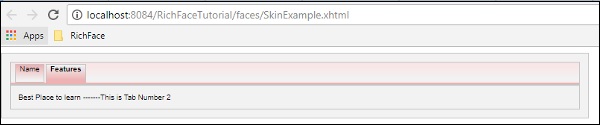
Once we run this page, following will be the output in the browser, where each tab dynamically propagates to generate a different output. Once you hit the next tab, it will show a different output.

In the above example, <rich:panel> creates a panel where we are creating different tabs using <rich:tab>. The <rich:tabPanel switchType = “AJAX”> provides AJAX transition of the used tab.
Creating/Modifying the Skin
Skin is nothing but an extended version of CSS design, which will be applied to the webpage at runtime. In the previous section, we learned some basic in-built functionality of the skin. In this section, we will create our own skin or modify the existing skin. Skin in the RichFaces can be customized at the following three levels.
Skin property file − All the skins are generated through different property files mentioned under “rechfaces-a4j-4.5.17.Final” jar file. All we need to do is create a same property file and keep it under our source folder and edit its property. We need to change our “web.xml” accordingly to reflect on our new skin property in the website.
Component style sheet − Implement new CSS file of choice and use it in the application.
Overwrite style class − One can overwrite the style by directly mentioning the style properties in the xhtml file.
Let us consider an example. We will customize our previous ”classic” skin. Create a property file inside the “source” package and name it “custom.skin.properties”. Following are the entries of this property file that were copied from other property files available in the jar file mention above.
#Colors
headerBackgroundColor = #black
headerGradientColor = #DF5858
headerTextColor = #FFFFFF
headerWeightFont = bold

generalBackgroundColor = #f1f1f1
generalTextColor = #000000
generalSizeFont = 10px
generalFamilyFont = Arial, Verdana, sans-serif

controlTextColor = #000000
controlBackgroundColor = #ffffff
additionalBackgroundColor = #F9E4E4

shadowBackgroundColor = #000000
shadowOpacity = 1
panelBorderColor = #C0C0C0
subBorderColor = #ffffff

tabBackgroundColor = #EDAEAE
tabDisabledTextColor = #C47979
trimColor = #F7C4C4
tipBackgroundColor = #FAE6B0
tipBorderColor = #E5973E

selectControlColor = #FF9409
generalLinkColor = #CF0000
hoverLinkColor = #FF0000
visitedLinkColor = #CF0000

# Fonts
headerSizeFont = 11px
headerFamilyFont = Arial, Verdana, sans-serif
tabSizeFont = 11
tabFamilyFont = Arial, Verdana, sans-serif
buttonSizeFont = 11
CHAPTER 11 â–  SKINS 223
buttonFamilyFont = Arial, Verdana, sans-serif

tableBackgroundColor = #FFFFFF
tableFooterBackgroundColor = #cccccc
tableSubfooterBackgroundColor = #f1f1f1
tableBorderColor = #C0C0C0
tableBorderWidth = 1px

#Calendar colors
calendarWeekBackgroundColor = #f5f5f5
calendarHolidaysBackgroundColor = #FFF1F1
calendarHolidaysTextColor = #980808
calendarCurrentBackgroundColor = #808080
calendarCurrentTextColor = #ffffff
calendarSpecBackgroundColor = #f1f1f1
calendarSpecTextColor = #000000

warningColor = #FFE6E6
warningBackgroundColor = #FF0000
editorBackgroundColor = #F1F1F1
editBackgroundColor = #FEFFDA

#Gradients
Gradient Type = plain
Depending the skill level, we can change any attribute in this property file. We can add new Style class or edit the existing one. Once we are done with the creation of the new property file, it is time to add the same in the “web.xml ” file. Following is the entry of the “web.xml”, which should point to our skin.
<context-param>
   <param-name>org.richfaces.skin</param-name>
   <param-value>custom</param-value>
</context-param>
Note − Make sure the new property file is present inside the source directory, otherwise it will throw a runtime error saying “NoClassFound Exception”.
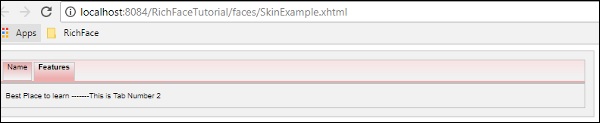
Go ahead and run the previous file named” SkinExample.xhtml”. Following will be the output in the browser, where we will able to see that the entire look and feel of the website has changed to “Ruby” as a new property file was copied from ruby.properties file.
Changing the Skin at Runtime
In this example, we will change the skin at run time. Create a skin class like the following.
import javax.faces.bean.ManagedBean;
import javax.faces.bean.RequestScoped;

@ManagedBean
@RequestScoped

public class skinBean {
   private String skin;
   public skinBean() {
      this.skin="plane";
   }
   public String getSkin() {
      return skin;
   }
   public void setSkin(String skin) {
      this.skin = skin;
   }
}
Then change the “web.xml” file as follows, to populate the skin name at runtime.
<context-param>
   <param-name>org.richfaces.skin</param-name>
   <param-value>#{skinBean.skin}</param-value>
</context-param>
After doing so, we need to change the configuration files of the JSF application. The files can be located under web-INF folder. Add the following bean property to it.
<managed-bean>
   <managed-bean-name>skinBean</managed-bean-name>
   <managed-bean-class>SkinBean</managed-bean-class>>
   <managed-bean-scope>session</managed-bean-scope>

   <managed-property>
      <property-name>skin</property-name>
      <value>plain</value>
   </managed-property>
</managed-bean>
Following is the xhtml file code.
<?xml version = "1.0" encoding = "UTF-8"?>
<!DOCTYPE html>
<html xmlns = "http://www.w3.org/1999/xhtml"
   xmlns:h = "http://java.sun.com/jsf/html"
   xmlns:a4j = "http://richfaces.org/a4j"
   xmlns:f = "http://java.sun.com/jsf/core"
   xmlns:rich = "http://richfaces.org/rich">

   <h:head>
      <title>TODO supply a title</title>
   </h:head>

   <h:body>
      <h:form>
         <div style = "display: block; float: left">
            <h:selectOneRadio value = "#{skinBean.skin}" border = "0"
               layout = "pageDirection" title = "Changing skin" style = "font-size: 8;
               font-family: comic" onchange = "submit()">
               <f:selectItem itemLabel = "plain" itemValue = "plain" />
               <f:selectItem itemLabel = "emeraldTown" itemValue = "emeraldTown" />
               <f:selectItem itemLabel = "blueSky" itemValue = "blueSky" />
               <f:selectItem itemLabel = "wine" itemValue = "wine" />
               <f:selectItem itemLabel = "japanCherry" itemValue = "japanCherry" />
               <f:selectItem itemLabel = "ruby" itemValue = "ruby" />
               <f:selectItem itemLabel = "deepMarine" itemValue = "deepMarine" />
            </h:selectOneRadio>
         </div>

         <div style = "display: block; float: left">
            <rich:panel >
               <rich:panelMenu style = "font-family: monospace; font-size: 12;">
                  Changing skin in runtime
               </rich:panelMenu>

               <rich:panelMenu  style = "font-family: monospace; font-size: 12;">
                  This is a result of the modification "blueSky" skin
               </rich:panelMenu>
            </rich:panel>
         </div>
      </h:form>
   </h:body>

</html>
The above piece of code will produce the following output in the browser.

In the above example, initially we are selecting “plain”, hence it is pointing to plain. Once you propagate through the radio button, it will change the color accordingly.
RichFaces – Input Components
Till now we have learned a lot about different AJAX components of RichFaces along with a new functionality called “Skin”. In this chapter, we will learn different “Rich” components that RichFaces offers in order to develop a modern web application. Following are the different input components provided by “RichFaces”.
<rich:inplaceInput>
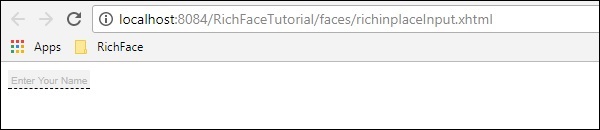
Rich inplaceInput provides an opportunity to create an editable text box instead of a normal input text box. In the following example, we will create an editable text box using this component. Create an xhtml file and name it as “richinplaceInput.xhtml”. Write the following code in that file.
<?xml version = "1.0" encoding = "UTF-8"?>
<!DOCTYPE html>
<html xmlns = "http://www.w3.org/1999/xhtml"
   xmlns:h = "http://java.sun.com/jsf/html"
   xmlns:f = "http://java.sun.com/jsf/core"
   xmlns:ui = "http://java.sun.com/jsf/facelets"
   xmlns:a4j = "http://richfaces.org/a4j"
   xmlns:rich = "http://richfaces.org/rich">

   <h:head>
      <title>TODO supply a title</title>
   </h:head>

   <h:body>
      <f:view></f:view>
      <h:form>
         <rich:inplaceInput  value = "#{managedBean.message}"
            defaultLabel = "Enter Your Name"/>
      </h:form>
   </h:body>

</html>
Save this file and run it. Following will be the output in the browser.
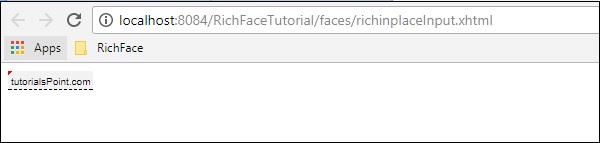
Go ahead and type anything of your choice in that text box and hit enter. This tag also provides inline edit option. Following will be output after editing.
<rich: inplaceSelect>
This is another input markup provide by RichFaces, where the user can select an input value from the dropdown list, which is also inline and editable in nature. We need to populate the dropdown from the internal bean class. Please create a “xhtml” file and name it as “richinplaceSelectExample.xhtml”. Place the following piece of code in that file.
<?xml version = "1.0" encoding = "UTF-8"?>
<!DOCTYPE html>
<html xmlns = "http://www.w3.org/1999/xhtml"
   xmlns:h = "http://java.sun.com/jsf/html"
   xmlns:f = "http://java.sun.com/jsf/core"
   xmlns:ui = "http://java.sun.com/jsf/facelets"
   xmlns:a4j = "http://richfaces.org/a4j"
   xmlns:rich = "http://richfaces.org/rich">

   <h:head>
      <title>TODO supply a title</title>
   </h:head>

   <h:body>
      <h:form>
         <rich:inplaceSelect value = "#{subject.subjectName}" defaultLabel = "Click to Select Country">
            <f:selectItems value = "#{subject.SubJectList()}"></f:selectItems>
         </rich:inplaceSelect>
      </h:form>
   </h:body>

</html>
In the above example, we will populate the dropdown options from the backend. Here is the bean class named ” subject.java”.
import java.util.ArrayList;
import java.util.List;
import javax.faces.bean.ManagedBean;
import javax.faces.bean.ManagedProperty;
import javax.faces.bean.RequestScoped;

@ManagedBean
@RequestScoped

public class Subject {
   String SubjectName;
   public Subject() {
   }
   public Subject(String SubjectName) {
      this.SubjectName = SubjectName;
   }
   public List<String> SubJectList() {
      //this list to be rendered
      ArrayList<String> list = new ArrayList<>();

      list.add("JAVA");
      list.add("DOTNET");
      list.add("COBOL");
      list.add("AJAX");
      list.add("JAVA SCRIPT");
      return list;
   }
   public String getSubjectName() {
      return SubjectName;
   }
   public void setSubjectName(String SubjectName) {
      this.SubjectName = SubjectName;
   }
}
All the subject name that we are passing through the list will be shown inside the dropdown menu. Following will be the output after running this application.

<rich:SuggestionBox>
<rich:SuggestionBox> is used to provide suggestions to the user depending on the input provided in the input text box. This tag creates a JS event internally and invokes the required istener class to provide the suggestion from the backend. Unfortunately, this suggestionBox and ComboBox both are combined into a separate tag called “<rich:autocomplete>” in RichFaces 4, however, if you are using RichFaces 3, you can use this tag as shown below.
<h:inputText id = "city" value = "#{capitalsBean.capital}" />
<rich:suggestionbox for = "city" var = "result"
   suggestionAction = "#{capitalsBean.autocomplete}">

   <h:column>
      <h:outputText value = "#{result.name}" />
   </h:column>
</rich:suggestionbox>
Where “capitalsBean” will be a Java class with different parameters and listener class named “autocomplete” will set the value of the “capital” instance variable at the runtime and provide the required output of choice. It is highly recommended to use RichFaces 4 “autocomplete” instead of using this tag as designers are not supporting this tag any more.
<rich:comboBox>
<rich:comboBox> works exactly similar to <rich:suggestionBox>, however, instead of calling the listener class, this tag pre-renders some suggestions into the client browser that interacts with each other and provides the desired output. Like <rich:sugegstionBox>, this feature is also depreciated in the new version with another tag called as “<rich:autocomplete>” described in the following code.
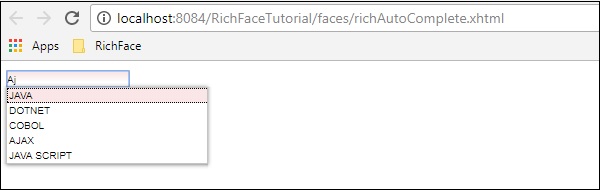
Create a separate file and name it as “richAutoComplete.xhtml”. Place the following code in that file.
<?xml version = "1.0" encoding = "UTF-8"?>
<!DOCTYPE html>
<html xmlns = "http://www.w3.org/1999/xhtml"
   xmlns:h = "http://java.sun.com/jsf/html"
   xmlns:f = "http://java.sun.com/jsf/core"
   xmlns:ui = "http://java.sun.com/jsf/facelets"
   xmlns:a4j = "http://richfaces.org/a4j"
   xmlns:rich = "http://richfaces.org/rich">

   <h:head></h:head>

   <h:body>
      <h:form id = "form">
         <h:form id = "form">
            <rich:autocomplete mode = "cachedAJAX" minChars = "2"
            autocompleteMethod = "#{autoComplete.SubJectList()}" />
         </h:form>
      </h:form>
   </h:body>

</html>
In the above example, we are populating the subject list through the autocomplete feature of RichFaces. Create another Java class and name it is as “autoComplete.java”.
import java.util.ArrayList;
import java.util.List;
import javax.faces.bean.ManagedBean;
import javax.faces.bean.RequestScoped;

@ManagedBean
@RequestScoped

public class autoComplete {
   public autoComplete(){}
   private List<String> autoCompleteList=new ArrayList<>();

   public List<String> SubJectList() {
      //ArrayList<String> list = new ArrayList<>();
      autoCompleteList.add("JAVA");
      autoCompleteList.add("DOTNET");
      autoCompleteList.add("COBOL");
      autoCompleteList.add("AJAX");
      autoCompleteList.add("JAVA SCRIPT");
      return autoCompleteList;
   }
   public List<String> getAutoCompleteList() {
      return autoCompleteList;
   }
   public void setAutoCompleteList(List<String> autoCompleteList) {
      this.autoCompleteList = autoCompleteList;
   }
}
The above file is acting as the bean class and SubjectList() is the method, which is actually rendering the response to the browser. In the <SuggestionBox>,<ComboBox> tag we need to implement the listener class, however, in case of <autocomplete> tag this creation of listener class has been automated, which is easier for the developer. The above piece of code will yield the following output in the browser.
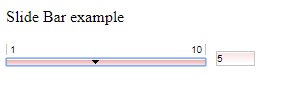
<rich:inputNumberSlider>
This is a very straightforward tag that helps the developer create a numeric slider bar depending on the numeric interval. Create “inputNumberSlider.xhtml” file and place the following code inside it.
<?xml version = "1.0" encoding = "UTF-8"?>
<!DOCTYPE html>
<html xmlns = "http://www.w3.org/1999/xhtml"
   xmlns:h = "http://java.sun.com/jsf/html"
   xmlns:f = "http://java.sun.com/jsf/core"
   xmlns:ui = "http://java.sun.com/jsf/facelets"
   xmlns:a4j = "http://richfaces.org/a4j"
   xmlns:rich = "http://richfaces.org/rich">

   <h:head></h:head>

   <h:body>
      <h:form>
         <h:outputText value = "Slide Bar example"></h:outputText>
         <rich:inputNumberSlider
            minValue = "1"
            maxValue = "10"
            showArrows = "false"
            showTooltip = "false"
            step = "1">
         </rich:inputNumberSlider>
      </h:form>
   </h:body>

</html>
In the above example, the attributes are pretty much descriptive. The above piece of code will yield the following output in the browser.
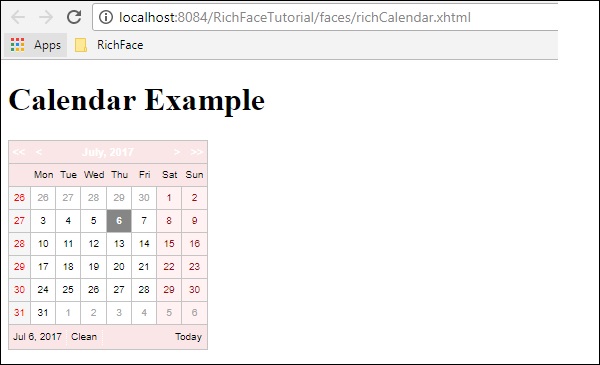
<rich:Calendar>
As the name suggests this tag will help create a calendar in the browser. Create a separate file and name it as “richCalendar.xhtml”. Place the following code inside it.
<?xml version = "1.0" encoding = "UTF-8"?>
<!DOCTYPE html>
<html xmlns = "http://www.w3.org/1999/xhtml"
   xmlns:h = "http://java.sun.com/jsf/html"
   xmlns:f = "http://java.sun.com/jsf/core"
   xmlns:ui = "http://java.sun.com/jsf/facelets"
   xmlns:a4j = "http://richfaces.org/a4j"
   xmlns:rich = "http://richfaces.org/rich">

   <h:head></h:head>

   <h:body>
      <h:form>
         <h1>Calendar</h1>
         <rich:calendar value = "#{calendarBean.selectedDate}"
            locale = "#{calendarBean.locale}"
            popup = "#{calendarBean.popup}"
            datePattern = "#{calendar.pattern}"
            style = "width:200px">
         </rich:calendar>
      </h:form>
   </h:body>

</html>
We need to create another class called “calendarBean.java” in order to hold all the calendar values such as Date, Locale, Date Pattern, etc. Following is the code for “calendarBean.java”.
import java.text.DateFormat;
import java.util.Date;
import java.util.Locale;

import javax.faces.event.ValueChangeEvent;

public class CalendarBean {
   private static final String[] WEEK_DAY_LABELS = new String[] {
      "Sun *", "Mon +", "Tue +", "Wed +", "Thu +", "Fri +", "Sat *" };

   private Locale locale;
   private boolean popup;
   private boolean readonly;
   private boolean showInput;
   private boolean enableManualInput;
   private String pattern;
   private Date currentDate;
   private Date selectedDate;
   private String jointPoint;
   private String direction;
   private String boundary;
   private boolean useCustomDayLabels;

   public Locale getLocale() {
      return locale;
   }
   public void setLocale(Locale locale) {
      this.locale = locale;
   }
   public boolean isPopup() {
      return popup;
   }
   public void setPopup(boolean popup) {
      this.popup = popup;
   }
   public String getPattern() {
      return pattern;
   }
   public void setPattern(String pattern) {
      this.pattern = pattern;
   }
   public CalendarBean() {
      locale = Locale.US;
      popup = true;
      pattern = "MMM d, yyyy";
      jointPoint = "bottomleft";
      direction = "bottomright";
      readonly = true;
      enableManualInput = false;
      showInput = true;
      boundary = "inactive";
   }
   public boolean isShowInput() {
      return showInput;
   }
   public void setShowInput(boolean showInput) {
      this.showInput = showInput;
   }
   public boolean isEnableManualInput() {
      return enableManualInput;
   }
   public void setEnableManualInput(boolean enableManualInput) {
      this.enableManualInput = enableManualInput;
   }
   public boolean isReadonly() {
      return readonly;
   }
   public void setReadonly(boolean readonly) {
      this.readonly = readonly;
   }
   public void selectLocale(ValueChangeEvent event) {
      String tLocale = (String) event.getNewValue();
      if (tLocale != null) {
         String lang = tLocale.substring(0, 2);
         String country = tLocale.substring(3);
         locale = new Locale(lang, country, "");
      }
   }
   public boolean isUseCustomDayLabels() {
      return useCustomDayLabels;
   }
   public void setUseCustomDayLabels(boolean useCustomDayLabels) {
      this.useCustomDayLabels = useCustomDayLabels;
   }
   public Object getWeekDayLabelsShort() {
      if (isUseCustomDayLabels()) {
         return WEEK_DAY_LABELS;
      } else {
         return null;
      }
   }
   public String getCurrentDateAsText() {
      Date currentDate = getCurrentDate();
      if (currentDate ! =  null) {
         return DateFormat.getDateInstance(DateFormat.FULL).format(currentDate);
      }
      return null;
   }
   public Date getCurrentDate() {
      return currentDate;
   }
   public void setCurrentDate(Date currentDate) {
      this.currentDate = currentDate;
   }
   public Date getSelectedDate() {
      return selectedDate;
   }
   public void setSelectedDate(Date selectedDate) {
      this.selectedDate = selectedDate;
   }
   public String getJointPoint() {
      return jointPoint;
   }
   public void setJointPoint(String jointPoint) {
      this.jointPoint = jointPoint;
   }
   public void selectJointPoint(ValueChangeEvent event) {
      jointPoint = (String) event.getNewValue();
   }
   public String getDirection() {
      return direction;
   }
   public void setDirection(String direction) {
      this.direction = direction;
   }
   public void selectDirection(ValueChangeEvent event) {
      direction = (String) event.getNewValue();
   }
   public String getBoundary() {
      return boundary;
   }
   public void setBoundary(String boundary) {
      this.boundary = boundary;
   }
}
The above piece of code will generate the following output in the browser.
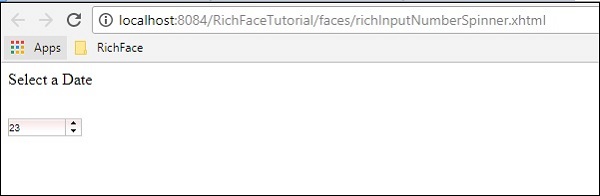
<rich:InputNumberSpinner>
This tag helps the developer to create a spinner to populate an instance of a bean. Following is an example that will help you understand the Spinner tag in detail. Please create a separate xhtml file and named it as “InputNumberSpinner.xhtml” and place the following code inside it.
<?xml version = "1.0" encoding = "UTF-8"?>
<!DOCTYPE html>
<html xmlns = "http://www.w3.org/1999/xhtml"
   xmlns:h = "http://java.sun.com/jsf/html"
   xmlns:f = "http://java.sun.com/jsf/core"
   xmlns:ui = "http://java.sun.com/jsf/facelets"
   xmlns:a4j = "http://richfaces.org/a4j"
   xmlns:rich = "http://richfaces.org/rich">

   <h:head>
      <title>Number Slider Example</title>
   </h:head>

   <h:body>
      <h:form>
         <h:outputText value = "Select a Date"></h:outputText>
         <br/>
         <br/>

         <rich:inputNumberSpinner
            minValue = "1"
            maxValue = "31"
            step = "1">
         </rich:inputNumberSpinner>
      </h:form>
   </h:body>

</html>
The above piece of code will yield the following output in the browser.
RichFaces – Output Components
In the previous chapter, we have learned about different input fields or tags that help the user provide the inputs through the browser. In this chapter, we will learn about different output components provided by RichFaces.
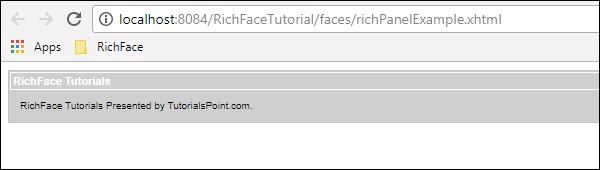
<rich:Panel>
In some of our previous examples, we have already come across the panel tag. <rich:panel> creates a rectangular area inside the webpage, which may contain any information. You can include other panels, images, and any other rich components inside one panel.
In the following example, we will create a custom panel according to choice and we will provide a header to our panel using the “header” attribute. Please create a xhtml file and name it as “richPanelExamlple.xhtml”. Place the following code inside it.
<?xml version = "1.0" encoding = "UTF-8"?>
<!DOCTYPE html>
<html xmlns = "http://www.w3.org/1999/xhtml"
   xmlns:h = "http://java.sun.com/jsf/html"
   xmlns:f = "http://java.sun.com/jsf/core"
   xmlns:ui = "http://java.sun.com/jsf/facelets"
   xmlns:a4j = "http://richfaces.org/a4j"
   xmlns:rich = "http://richfaces.org/rich">

   <h:head>
      <title>Panel Example</title>
   </h:head>

   <h:body>
      <rich:panel header = "RichFace Tutorials " style = "font-size: 500px;
         align-items:center; background-color: activecaption">

         RichFace Tutorials Presented by yoursite.com.
      </rich:panel>
   </h:body>
</html>
The above piece of code will yield the following output in the browser.
<rich:simpleTogglePanel>
The simpleTogglePanel provides an opportunity to the developers to change the contains of the panel in a dynamic way. However, in RichFaces 4, this tag has been suppressed. JBoss has introduced advanced tags such as <rich:togglePanel>, <rich:tab>, and <rich:tabPanel>. It is recommended to use the updated version of RichFaces tags for more features and functionalities. If you are still using RichFaces 3, then you can use the following tag.
<ui:composition xmlns = "http://www.w3.org/1999/xhtml"
   xmlns:ui = "http://java.sun.com/jsf/facelets"
   xmlns:h = "http://java.sun.com/jsf/html"
   xmlns:f = "http://java.sun.com/jsf/core"
   xmlns:a4j = "http://richfaces.org/a4j"
   xmlns:rich = "http://richfaces.org/rich">

   <rich:simpleTogglePanel switchType = "client" label = "SimpleToggle">
      The simple example of SimpleToggle tag
   </rich:simpleTogglePanel>
</ui:composition>
<rich:tabPanel>
This tag helps the developers create different tabs inside a panel. We have used this tag in our skin chapter, where we have created two separate tags inside another panel. Following code will describe how we use <rich:tabPanel>.
<?xml version = '1.0' encoding = 'UTF-8' ?>
<ui:composition xmlns = "http://www.w3.org/1999/xhtml"
   xmlns:h = "http://java.sun.com/jsf/html"
   xmlns:f = "http://java.sun.com/jsf/core"
   xmlns:ui = "http://java.sun.com/jsf/facelets"
   xmlns:a4j = "http://richfaces.org/a4j"
   xmlns:rich = "http://richfaces.org/rich">

   <f:view>
      <h:head>
         <title>Rich Faces Tab Example</title>
      </h:head>

      <h:body>
         <h:form>
            <rich:panel style = "width:60%">

               <rich:tabPanel switchType = "AJAX">
                  <rich:tab header = "Name">
                     Tutorials Point----This is Tab Number 1
                  </rich:tab>

                  <rich:tab header = "Features">
                     Best Place to learn -------This is Tab Number 2
                  </rich:tab>
               </rich:tabPanel>
            </rich:panel>

         </h:form>
      </h:body>

   </f:view>
</ui:composition>
In this example, we have created two tabs with different headers called “Name” and “Features”. These two tags will be created inside the <rich:panel>. The above code will yield the following output.
<rich:panelBar>
Like simpleToggleBar, it allows the developers to implement vertical toggling depending on some JS event. This tag is also suppressed in RichFaces 4. However, you can use it as shown below if you are using RichFaces 3.0. .
<ui:composition xmlns = "http://www.w3.org/1999/xhtml"
   xmlns:ui = "http://java.sun.com/jsf/facelets"
   xmlns:h = "http://java.sun.com/jsf/html"
   xmlns:f = "http://java.sun.com/jsf/core"
   xmlns:a4j = "http://richfaces.org/a4j"
   xmlns:rich = "http://richfaces.org/rich">

   <rich:panelBar height = "400" width = "500">
      <rich:panelBarItem   label = "Toggle1”>
         First vertical toggle
      </rich:panelBarItem>

      <rich:panelBarItem  label = ”Toggle2”>
         Second Vertical Toggle
      </rich:panelBarItem>
   </rich:panelBar >

</ ui:composition >
In RichFaces 4, the same functionality has been implemented using <rich:PanelMenu> tag.
<rich:tab>
We are already familiar with this tag. In the example of <rich:tabPanel>, we have created different tabs with this tag. In the following example, we have created two tags.
<?xml version = '1.0' encoding = 'UTF-8' ?>
<ui:composition xmlns = "http://www.w3.org/1999/xhtml"
   xmlns:h = "http://java.sun.com/jsf/html"
   xmlns:f = "http://java.sun.com/jsf/core"
   xmlns:ui = "http://java.sun.com/jsf/facelets"
   xmlns:a4j = "http://richfaces.org/a4j"
   xmlns:rich = "http://richfaces.org/rich">

   <f:view>
      <h:head>
         <title>Rich Faces Tab Example</title>
      </h:head>

      <h:body>
         <h:form>

            <rich:panel style = "width:60%">
               <rich:tabPanel switchType = "AJAX">
                  <rich:tab header = "Name">
                     Tutorials Point----This is Tab Number 1
                  </rich:tab>

                  <rich:tab header = "Features">
                     Best Place to learn -------This is Tab Number 2
                  </rich:tab>
               </rich:tabPanel>
            </rich:panel>

         </h:form>
      </h:body>

   </f:view>
</ui:composition>
The above piece of code will generate the following output in the browser.
<rich:panelMenu>
Panel Menu helps the developers create a vertical dropdown toggle inside a panel area. The following example will help us understand this tag better. Create the “richPanelMenu.xhtml” file and place the following piece of code inside it.
<?xml version = "1.0" encoding = "UTF-8"?>
<!DOCTYPE html>
<html xmlns = "http://www.w3.org/1999/xhtml"
   xmlns:h = "http://java.sun.com/jsf/html"
   xmlns:f = "http://java.sun.com/jsf/core"
   xmlns:ui = "http://java.sun.com/jsf/facelets"
   xmlns:a4j = "http://richfaces.org/a4j"
   xmlns:rich = "http://richfaces.org/rich">

   <h:head>
      <title>Panel Menu example</title>
   </h:head>

   <h:body>
      <h:form id = "form">
         <h:panelGrid columns = "2" columnClasses = "cols,cols" width = "400">
            <rich:panelMenu style = "width:200px">

               <rich:panelMenuGroup label = "Group 1">
                  <rich:panelMenuItem label = "Database" action = "#{managedBean.subjectList}">
                     <f:param name = "current" value = "DB"/>
                  </rich:panelMenuItem>

                  <rich:panelMenuItem label = "Oracle" action = "#{managedBean.subjectList}">
                     <f:param name = "current" value = "Oracle"/>
                  </rich:panelMenuItem>

                  <rich:panelMenuItem label = "JAVA" action = "#{managedBean.subjectList}">
                     <f:param name = "current" value = "JAVA"/>
                  </rich:panelMenuItem>
               </rich:panelMenuGroup>

            </rich:panelMenu>
         </h:panelGrid>
      </h:form>
   </h:body>

</html>
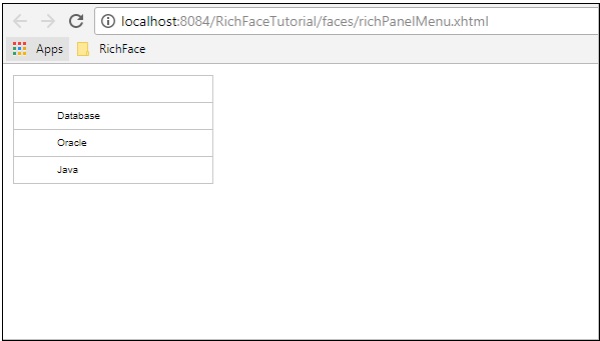
As seen in the above example, panelMenu comes with some other associated tags which helps in a different manner. <panelGrid> helps create a grid inside the panel. <panelMenuGroup> helps group the different components that we are going to populate .<panelMenuItem> is the actual item that will be rendered to the browser. Using the “action” attribute, you can call different action methods depending on the item selected. The “label” attribute is used to populate the value in the front-end and the rendered value will be processed to the back-end once the specified action class is called.
The above piece of code will yield the following output in the browser.
<rich:TogglePanel>
This tag is used to render different outputs that can be switched or toggled using the Toggle control method. This toggle control method can be implemented or customized. In the following example, we will implement this method.
Create an xhtml file and name it as “richTogglePanel.xhtml”. Place the following code inside it.
<?xml version = "1.0" encoding = "UTF-8"?>
<!DOCTYPE html>
<html xmlns = "http://www.w3.org/1999/xhtml"
   xmlns:h = "http://java.sun.com/jsf/html"
   xmlns:f = "http://java.sun.com/jsf/core"
   xmlns:ui = "http://java.sun.com/jsf/facelets"
   xmlns:a4j = "http://richfaces.org/a4j"
   xmlns:rich = "http://richfaces.org/rich">

   <h:head>
      <title>Rich Toggle Panel Example</title>
      <meta name = "viewport" content = "width = device-width, initial-scale = 1.0"/>
   </h:head>

   <h:body>
      <h:form id = "form">
         <rich:togglePanel id = "panel1" activeItem = "item1"
            itemChangeListener = "#{panelMenuBean.updateCurrent}">

            <rich:togglePanelItem name = "item1">
               <p>Content of the toggle 1</p>
            </rich0:togglePanelItem>

            <rich:togglePanelItem name = "item2">
                <p>Content of the toggle 2</p>
            </rich:togglePanelItem>
         </rich:togglePanel>

         <a4j:outputPanel id = "tabs" layout = "block">
            <a4j:outputPanel layout = "block" styleClass = "tabDiv">
               <rich:toggleControl event = "click" targetPanel = "panel1" targetItem = "item1" />
               <a4j:commandButton value = "Toggle1"/>
            </a4j:outputPanel>

            <a4j:outputPanel layout = "block" styleClass = "tabDiv">
               <rich:toggleControl event = "click" targetPanel = "panel1" targetItem = "item2" />
               <a4j:commandButton value = "Toggle2"/>
            </a4j:outputPanel>
         </a4j:outputPanel>

      </h:form>
   </h:body>

</html>
We also need to create a bean class to control the transition of the website. Create “MenuBean.java” class like the following.
import javax.faces.bean.ManagedBean;
import javax.faces.bean.ViewScoped;
import org.richfaces.event.ItemChangeEvent;

@ManagedBean
@ViewScoped

public class MenuBean {
   private String current;
   private boolean singleMode;

   public boolean isSingleMode() {
      return singleMode;
   }
   public void setSingleMode(boolean singleMode) {
      this.singleMode = singleMode;
   }
   public String getCurrent() {
      return this.current;
   }
   public void setCurrent(String current) {
      this.current = current;
   }
   public void updateCurrent(ItemChangeEvent event) {
      setCurrent(event.getNewItemName());
   }
}
The above code will yield the following output in the browser.
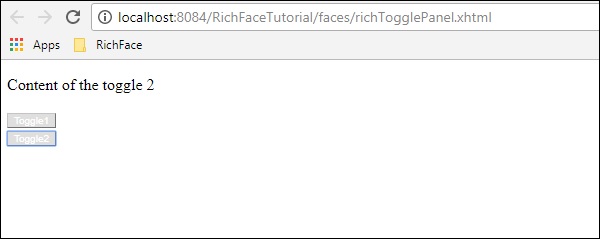
In the above example, the content of the webpage will be changed depending on the button clicked by the user. “updateCurrent()” is the method which handles the JS event content and sets the website content on the go.
<rich:toolBar>
toolBar is used to create a horizontal bar in the panel. It is used to create top level menu in the webpage. In the following example, we will learn how to use this tag in the webpage. Create a “xhtml” file and name it as “toolbar.xhml”. Place the following code in it.
<?xml version = "1.0" encoding = "UTF-8"?>
<!DOCTYPE html>
<html xmlns = "http://www.w3.org/1999/xhtml"
   xmlns:h = "http://java.sun.com/jsf/html"
   xmlns:f = "http://java.sun.com/jsf/core"
   xmlns:ui = "http://java.sun.com/jsf/facelets"
   xmlns:a4j = "http://richfaces.org/a4j"
   xmlns:rich = "http://richfaces.org/rich">

   <h:head>
      <title>ToolBar Example</title>
   </h:head>

   <h:body>
      <rich:panel>
         <rich:toolbar height = "26" itemSeparator = "grid">
            <rich:toolbarGroup location = "left">
               <h:commandButton styleClass = "barsearchbutton"
                  onclick = "return false;" value = "TAB" />
            </rich:toolbarGroup>

            <rich:toolbarGroup location = "left">
               <h:commandButton styleClass = "barsearchbutton"
                  onclick = "return false;" value = "TAB2" />
            </rich:toolbarGroup>

            <rich:toolbarGroup location = "left">
               <h:commandButton styleClass = "barsearchbutton"
                  onclick = "return false;" value = "TAB3" />
            </rich:toolbarGroup>
         </rich:toolbar>

      </rich:panel>
   </h:body>

</html>
The above code will yield the following output in the browser.
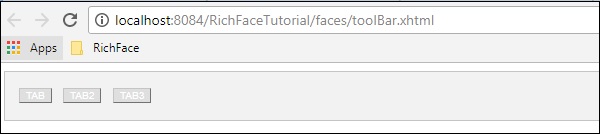
In the above example, <toolbarGroup> tag is used to group different same types of tool. Any number of groups can be created. Location provides the position of the webpage, where the button will be placed.
<rich:separator>
As the name suggests, it is used to separate different components on the webpage. This tag has been suppressed in RichFaces 4, however, if you are still using RichFaces 3, then you can use the following tag.
<rich:separator lineType = "beveled" height = "8" width = "75%" align = "center"/>
<p>Here is more examples of different line types:</p>

<rich:separator height = "2" lineType = "dotted"/><br/>
<rich:separator height = "2" lineType = "dashed"/><br/>
<rich:separator height = "4" lineType = "double"/><br/>
<rich:separator height = "2" lineType = "solid"/><br/>
In the above example, LineType is the attribute that helps us determine the type of separator we want to use. All of these separator names are pretty much self-descriptive in nature.
<rich:Spacer>
Spacer is a self-described tag that helps the developer provide a space between two components. This tag is also suppressed in RichFaces4 along with other tags, however, you can use the following code if you are using RichFaces 3.
<rich:spacer width = "1" height = "5" title = "Here is a spacer..."/>
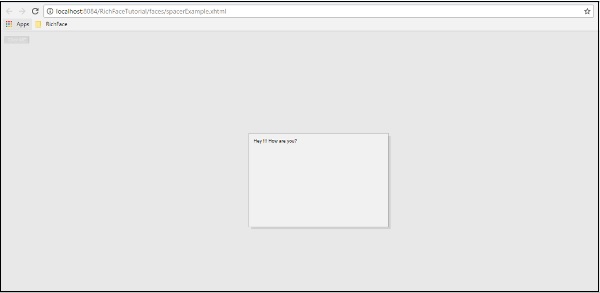
<rich:modalPanel>
Modal Panel is used to show a pop-up on the go. In RichFaces 4, the modal panel tag has been changed to popupPanel. In the following example, we will see how it works. Create a xhtml file and name it as “PopingUp.xhtml”. Place the following code into it.
<?xml version = "1.0" encoding = "UTF-8"?>
<!DOCTYPE html>
<html xmlns = "http://www.w3.org/1999/xhtml"
   xmlns:h = "http://java.sun.com/jsf/html"
   xmlns:f = "http://java.sun.com/jsf/core"
   xmlns:ui = "http://java.sun.com/jsf/facelets"
   xmlns:a4j = "http://richfaces.org/a4j"
   xmlns:rich = "http://richfaces.org/rich">

   <h:head>
      <title>ModalPanel and popupPanel</title>
   </h:head>

   <h:body>
      <h:form>
         <h:commandButton value = "Click ME">
            <rich:componentControl target = "popup" operation = "show" />
         </h:commandButton>

         <rich:popupPanel id = "popup" modal = "true" autosized = "false"
            resizeable = "false">

            Hey !!!
            How are you?
         </rich:popupPanel>
      </h:form>
   </h:body>

</html>
The above example will generate the following output when the “ClickMe” button is clicked.
RichFaces – Iteration Component
In the previous chapters, we have learned about the different input and output components. In this chapter, we will learn how to iterate through different data structures in the website.
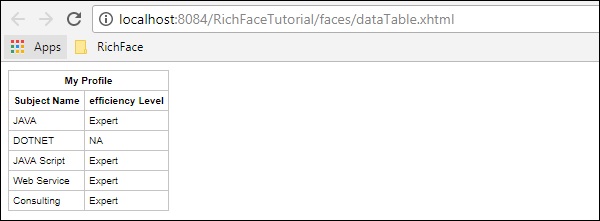
<rich:dataTable>
This tag is used to render a table as a result in the website. In the following example, we will render a subject table along with the pro-efficiency level.
<?xml version = '1.0' encoding = 'UTF-8' ?>
<html xmlns = "http://www.w3.org/1999/xhtml"
   xmlns:h = "http://java.sun.com/jsf/html"
   xmlns:f = "http://java.sun.com/jsf/core"
   xmlns:ui = "http://java.sun.com/jsf/facelets"
   xmlns:a4j = "http://richfaces.org/a4j"
   xmlns:rich = "http://richfaces.org/rich">

   <h:head>
      <title>Rich Data Table</title>
   </h:head>

   <h:body>
      <h:form>
         <rich:dataTable value = "#{subject.subjectListObj}" var = "record" >
            <f:facet name = "header">
               <h:outputText value = "My Profile" />
            </f:facet>

            <rich:column>
               <f:facet name = "header">Subject Name</f:facet>
               <h:outputText value = "#{record.subjectName}"/>
            </rich:column>

            <rich:column>
               <f:facet name = "header">efficiency Level</f:facet>
               <h:outputText value = "#{record.efficiency}"/>
            </rich:column>
         </rich:dataTable>
      </h:form>
   </h:body>

</html>
We need to change our subject.java accordingly to render the list. Following is an example of subject.java.
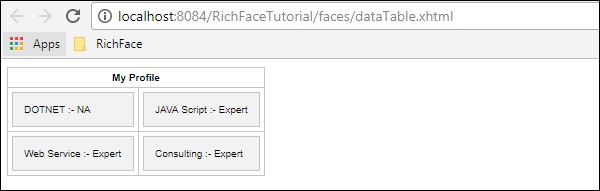
import java.util.ArrayList;
import java.util.List;
import javax.faces.bean.ManagedBean;
import javax.faces.bean.ManagedProperty;
import javax.faces.bean.RequestScoped;

@ManagedBean
@RequestScoped

public class Subject {
   String SubjectName;
   private String efficiency;

   private List<Subject> subjectListObj=new ArrayList<>();
      public Subject() {
   }
   public Subject(String SubjectName,String efficiency ) {
      this.SubjectName = SubjectName;
      this.efficiency= efficiency;
   }
   public String getSubjectName() {
      return SubjectName;
   }
   public void setSubjectName(String SubjectName) {
      this.SubjectName = SubjectName;
   }
   public List<Subject> getSubjectListObj() {
      subjectListObj.add(new Subject("JAVA","Expert"));
      subjectListObj.add(new Subject("DOTNET","NA"));
      subjectListObj.add(new Subject("JAVA Script","Expert"));
      subjectListObj.add(new Subject("Web Service","Expert"));
      subjectListObj.add(new Subject("Consulting","Expert"));
      return subjectListObj;
   }
   public void setSubjectListObj(List<Subject> subjectListObj) {
      this.subjectListObj = subjectListObj;
   }
   public String getEfficiency() {
      return efficiency;
   }
   public void setEfficiency(String efficiency) {
      this.efficiency = efficiency;
   }
}
The above example will generate the following output in the browser.
<rich: dataDefinitionList>
This is the tag used to generate the data definition from a model. This tag is not supported by JBoss since the invention of RichFaces 4. If you are still using RichFaces 3, then you can use this tag in the following manner.
<rich:dataDefinitionList var = "car" value = "#{dataTableScrollerBean.allCars}"
   rows = "5" first = "4" title = "Cars">

   <f:facet name = "term">
      <h:outputText value = "#{car.make} #{car.model}"></h:outputText>
   </f:facet>

   <h:outputText value = "Price:" styleClass = "label"></h:outputText>
   <h:outputText value = "#{car.price}" /><br/>
   <h:outputText value = "Mileage:" styleClass = "label"></h:outputText>
   <h:outputText value = "#{car.mileage}" /><br/>
</rich:dataDefinitionList>
In the above example, “dataTableScrollerBean” is a Java class that is used to generate different values of the car. This is similar to the previous tag where we populated a bunch of object value using the <datatable> tag.
<rich:dataOrderedList>
RichFaces 4 came up with a wide moderation from RichFaces 3. <dataOrderedList> is a tag used to render a list in an ordered manner. This too is suppressed in RichFaces 4 because the ordering of an object or a list is much more easier and less time consuming, if done in Java. If your application uses RichFaces 3, then you can use this tag in the following manner.
<rich:panel style = "width:500px">
   <f:facet name = "header">
      Using rich:dataOrderedList
   </f:facet>

   <rich:dataOrderedList value = "#{airlinesBean.airlines}" var = "air">
      #{air.name}, #{air.code}
   </rich:dataOrderedList>
</rich:panel>
In the above example, “airlinesBean” is a Java bean class with a method named “airlinesBean()”. This method returns an object of type “air”. Later, we can use this air object to populate different properties in a table format.
<rich:dataList>
As the tag name suggests, this tag will be used to render an unordered list into the browser. However, like <orderedList> this tag is also suppressed in the latest version of RichFaces. We can easily render a list into the browser using <a4j:Repeat> and <rich:dataTable> tag in the following way.
<a4j:repeat value = "#{managedBean.subjectList}" var = "sub">
   <h:outputText value = "#{sub}"/>
</a4j:repeat>
In the above example, we are rendering a list which is an output of the method called “subjectList()”. If your application is built in RichFaces 3, then you can use this tag as follows.
<rich:panel style = "width:500px">
   <f:facet name = "header">
      Using rich:dataList
   </f:facet>

   <rich:dataList value = "#{airlinesBean.airlines}" var = "air">
      #{air.name}, #{air.code}
   </rich:dataList>
</rich:panel>
<rich:dataGrid>
Using the <datatable> tag you will be able to render a list as a table, however, <dataGrid> will help you render an object or a list. In the previous example of <rich:datatable>, just change the xhtml page as follows and see what is the output of the same.
<?xml version = '1.0' encoding = 'UTF-8' ?>
<html xmlns = "http://www.w3.org/1999/xhtml"
   xmlns:h = "http://java.sun.com/jsf/html"
   xmlns:f = "http://java.sun.com/jsf/core"
   xmlns:ui = "http://java.sun.com/jsf/facelets"
   xmlns:a4j = "http://richfaces.org/a4j"
   xmlns:rich = "http://richfaces.org/rich">

   <h:head>
      <title>Rich Data Table</title>
   </h:head>

   <h:body>
      <h:form>
         <rich:panel>
            <rich:dataGrid value = "#{subject.subjectListObj}" var = "record"
               columns = "2" elements = "4" first = "1" >

               <f:facet name = "header">
                  <h:outputText value = "My Profile" />
               </f:facet>

               <rich:panel>
                  <rich:column>
                     <f:facet name = "header">Subject Name</f:facet>
                     <h:outputText value = "#{record.subjectName}"/>
                  </rich:column>

                  <rich:column>
                     <f:facet name = "header">efficiency Level</f:facet>
                     <h:outputText value = "#{record.efficiency}"/>
                  </rich:column>
               </rich:panel>

            </rich:dataGrid>
         </rich:panel>
      </h:form>
   </h:body>

</html>
The above piece of code will yield the following output in the browser.
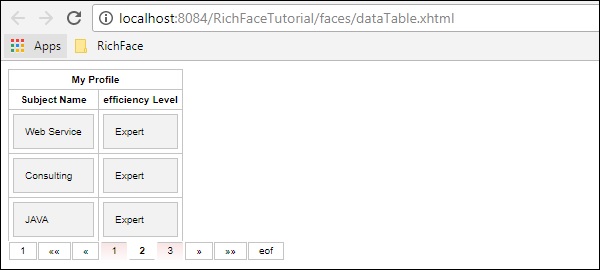
<rich:datascroller>
This tag helps to create a scroll bar while populating the table data. It is pretty similar to the pagination functionality of the JSF. Modify the previous dataTable example in the following manner.
<?xml version = '1.0' encoding = 'UTF-8' ?>
<html xmlns = "http://www.w3.org/1999/xhtml"
   xmlns:h = "http://java.sun.com/jsf/html"
   xmlns:f = "http://java.sun.com/jsf/core"
   xmlns:ui = "http://java.sun.com/jsf/facelets"
   xmlns:a4j = "http://richfaces.org/a4j"
   xmlns:rich = "http://richfaces.org/rich">

   <h:head>
      <title>Rich Data Table</title>
   </h:head>

   <h:body>
      <h:form>
         <rich:dataTable value = "#{subject.subjectListObj}" var = "record"
            rows = "3" id = "MyTable">

            <f:facet name = "header">
               <h:outputText value = "My Profile"/>
            </f:facet>

            <rich:column>
               <f:facet name = "header">Subject Name</f:facet>
               <h:outputText value = "#{record.subjectName}"/>
            </rich:column>

            <rich:column>
               <f:facet name = "header">efficiency Level</f:facet>
               <h:outputText value = "#{record.efficiency}"/>
            </rich:column>
         </rich:dataTable>

         <rich:dataScroller for = "MyTable" maxPages = "3">
            <f:facet name = "first">
               <h:outputText value = "1" />
            </f:facet>

            <f:facet name = "last">
               <h:outputText value = "eof" />
            </f:facet>
         </rich:dataScroller>
      </h:form>
   </h:body>

</html>
In the above example, you can add your style for a good look and feel. We have implemented separate <dataScroller> tags with different facet value. Following will be the output of the above file. Update the style sheer attribute in order to synchronize the table and the data scroller.
RichFaces – Selection Components
In this chapter, we will learn about different selection components provided by RichFaces Technology.
<rich:pickList>
Using this tag, we can select one value from the populated list. It also allows us to add and remove a list component to another List. Following example demonstrates how this works. Go ahead and create one xhtml file and name it as “pickListExample.xhtml” and place the following code in it.
<?xml version = "1.0" encoding = "UTF-8"?>
<!DOCTYPE html>
<html xmlns  =  "http://www.w3.org/1999/xhtml"
   xmlns:h = "http://java.sun.com/jsf/html"
   xmlns:f = "http://java.sun.com/jsf/core"
   xmlns:ui = "http://java.sun.com/jsf/facelets"
   xmlns:a4j = "http://richfaces.org/a4j"
   xmlns:rich = "http://richfaces.org/rich">

   <h:head>
      <title>PickList Example</title>
   </h:head>

   <h:body>
      <h:form>
         <h:outputText value  =  "Pick List Example"/>
         <br/>
         <br/>

         <rich:pickList value = "#{managedBean.subjectList}"
            sourceCaption = "SubjectList"
            targetCaption = "Selected Subject"
            listWidth = "170px"
            listHeight = "120px"
            orderable = "true">

            <f:selectItems value = "#{managedBean.subjectList}"
               itemValue = "#{subject}" itemLabel = "#{subject.subjectName}"/>
         </rich:pickList>
      </h:form>
   </h:body>

</html>
We need to modify our managedBean.java file to populate the list components in the xhtml file. Following is the snapshot of our modified Java file.
import java.util.Arrays;
import java.util.List;
import javax.faces.bean.ManagedBean;
import javax.faces.bean.RequestScoped;

@ManagedBean
@RequestScoped

public class managedBean {
   String message;
   String job;
   private List<String> SubjectList = Arrays.asList(
      "Richface","AJAX","JAVA","JSF","DOTNET","python");

   public String getMessage() {
      return message;
   }
   public void setMessage(String message) {
      System.out.println("setMessage method is getting called with--"+message);
      this.message = message;
   }
   public String getJob() {
      return job;
   }
   public void setJob(String job) {
      System.out.println("setJob method is getting called with--"+job);
      this.job = job;
   }
   public List<String> getSubjectList() {
      return SubjectList;
   }
   public void setSubjectList(List<String> SubjectList) {
      this.SubjectList = SubjectList;
   }
}
The above piece of code will yield the following output in the browser. The “value” attribute of the pickList tag is nothing but the “getSubjectList()” of the bean class. “itemValue” is the abbreviation of the object class and the corresponding “itemLabel” is the instance value name. In this example, our pickList tag automatically creates two separate lists named “sourceCaption” and “targetCaption”. Attribute orderable is used to maintain the selection order in the target List.

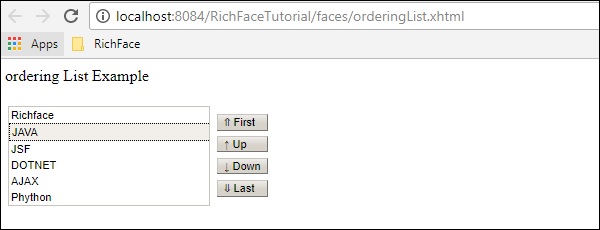
<rich:orderingList>
This tag is used to render a list as a whole. <orderingList> will automatically provide some button like function to propagate through the list and it helps order a selected item. In the following example, we will create one orderingList using the following code for “OrderingListExample.xhtml”.
<?xml version = "1.0" encoding = "UTF-8"?>
<!DOCTYPE html>
<html xmlns = "http://www.w3.org/1999/xhtml"
   xmlns:h = "http://java.sun.com/jsf/html"
   xmlns:f = "http://java.sun.com/jsf/core"
   xmlns:ui = "http://java.sun.com/jsf/facelets"
   xmlns:a4j = "http://richfaces.org/a4j"
   xmlns:rich = "http://richfaces.org/rich">

   <h:head>
      <title>OrderingList Example</title>
   </h:head>

   <h:body>
      <h:form>
         <h:outputText value = "ordering List Example"/><br/><br/>
         <rich:orderingList value = "#{managedBean.subjectList}"
            itemValue = "#{subject}"
            itemLabel = "#{subject.subjectName}" >
         </rich:orderingList>
      </h:form>
   </h:body>

</html>
We need not to change our bean class as we are populating the same list again using different tag for different representation. Like the previous example, even here the value attributes hold the entire list coming from “getSubjectList()”. “itemValue” and “itemLabel” holds the value of the object class and corresponding instance variable respectively.
The above piece of code will produce the following output in the browser.
<rich:ListShuttle>
ListShuttle tag is available in RichFaces 3. It helps propagate through one list and puts the same value into another. In RichFaces 4, this tag has been suppressed because the same functionality can be achieved by another new tag named <rich:pickList> as described above. If you are using RichFaces 3.0, then you can use this tag in the following manner.
<rich:listShuttle sourceValue = "#{toolBar.freeItems}"
   targetValue = "#{toolBar.items}" var = "items" listsHeight = "150"
   sourceListWidth = "130" targetListWidth = "130"
   sourceCaptionLabel = "Available Items"
   targetCaptionLabel = "Currently Active Items"
   converter = "listShuttleconverter">

   <rich:column width = "18">
      <h:graphicImage value = "#{items.iconURI}"></h:graphicImage>
   </rich:column>

   <rich:column>
      <h:outputText value = "#{items.label}"></h:outputText>
   </rich:column>

   <a4j:support event = "onlistchanged" reRender = "toolBar" />
   <a4j:support event = "onorderchanged" reRender = "toolBar" />
</rich:listShuttle>
It is very convenient to use pickList rather than using this tag, as the same functionality can be achieved using pickList by writing only two lines of code.
RichFaces – Menu Components
RichFaces provides a wide version of tags to be used for creating a menu type markup. In this chapter, we will learn some new features along with the old ones using which we can easily render a menu in the browser.
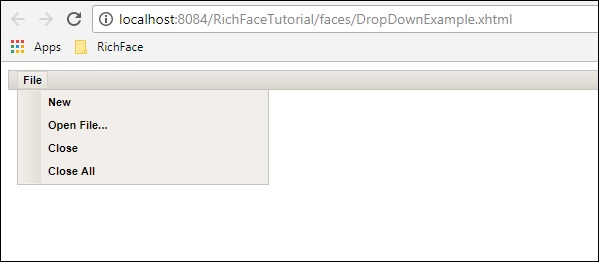
<rich:dropDownMenu>
Using this tag, the developer can create a dropdown menu. This tag is useful for creating the header of a website. In the following example, we will learn how to use this tag in practical life. Create one file and name it as “DropDownList.xhtml”. Place the following code inside it.
<?xml version = "1.0" encoding = "UTF-8"?>
<!DOCTYPE html>
<html xmlns = "http://www.w3.org/1999/xhtml"
   xmlns:h = "http://java.sun.com/jsf/html"
   xmlns:f = "http://java.sun.com/jsf/core"
   xmlns:ui = "http://java.sun.com/jsf/facelets"
   xmlns:a4j = "http://richfaces.org/a4j"
   xmlns:rich = "http://richfaces.org/rich">

   <h:head></h:head>

   <h:body>
      <h:form>
         <rich:toolbar>
            <rich:dropDownMenu>
               <f:facet name = "label">
                  <h:outputText value = "File" />
               </f:facet>

               <rich:menuItem label = "New" />
               <rich:menuItem label = "Open File..." />
               <rich:menuItem label = "Close" />
               <rich:menuItem label = "Close All" />
            </rich:dropDownMenu>
         </rich:toolbar>
      </h:form>
   </h:body>

</html>
In the above example, we are creating one toolbar and inside that toolbar we are creating one dropdown menu. Any number of dropdown menus can be created. If you want to insert any action-based JS function, then you can implement that inside <menuItem> tag with the attribute as “action”. The above piece of code will generate the following output in the browser.
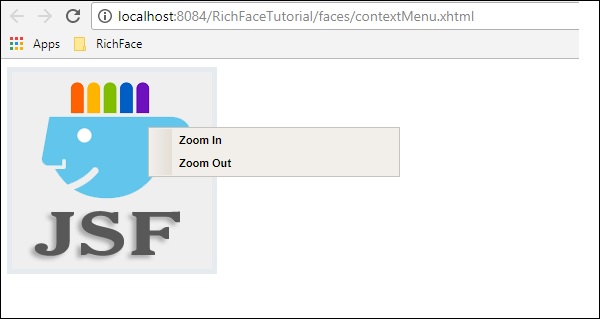
<rich:contextMenu>
This tag is useful to generate event-based dropdown on the client side. It will not work automatically. Users need to create the JS event and then it works accordingly. In the following example, we will create the render image and then create the JS events based on the users response. Following is the xhtml file.
<?xml version = "1.0" encoding = "UTF-8"?>
<!DOCTYPE html>
<html xmlns = "http://www.w3.org/1999/xhtml"
   xmlns:h = "http://java.sun.com/jsf/html"
   xmlns:f = "http://java.sun.com/jsf/core"
   xmlns:ui = "http://java.sun.com/jsf/facelets"
   xmlns:a4j = "http://richfaces.org/a4j"
   xmlns:rich = "http://richfaces.org/rich">

   <h:head>
      <title>ContextMenu Example</title>
   </h:head>

   <h:body>
      <h:form id = "form">
         <h:outputScript>
            //<![CDATA[
               function resize(pic, coeff) {
                  var w  =  Math.round(pic.width * coeff);
                  var h  =  Math.round(pic.height * coeff);

                  if (w > 1 && h > 1 && h<1000 && w<1000) {
                     pic.width  =  w;
                     pic.heigth  =  h;
                  }
               }
               function enlarge(element){
                  resize(element, 1.1);
               }
               function decrease(element){
                  resize(element, 0.9);
               }
            //]]>
         </h:outputScript>
         <h:graphicImage value = "http://www.yoursite.com/images/jsf-minilogo.png"
            id = "pic" style = "border : 5px solid #E4EAEF"/>

         <rich:contextMenu target = "pic" mode = "client" showEvent = "click">
            <rich:menuItem label = "Zoom In" onclick =
               "enlarge(#{rich:element('pic')});" id = "zin"/>
            <rich:menuItem label = "Zoom Out"
               onclick = "decrease(#{rich:element('pic')});" id = "zout"/>

        </rich:contextMenu>
      </h:form>
   </h:body>

</html>
Run the above example and select the rendered image. Following options “Zoom In” and “Zoom out” will be presented. Click the appropriate option and the required functionality will be applied to the image. The above piece of code will generate the following output in the browser.
<rich:Component Control>
This component is user-friendly whenever we want to call any other function from the RichFaces environment. This tag is used to call JavaScript-based action classes. Following example demonstrates how this tag can be used. Create a file and name it as “componentContent.xhtml” file. Place the following piece of code in it.
<?xml version = "1.0" encoding = "UTF-8"?>
<!--
   To change this license header, choose License Headers in Project Properties.
   To change this template file, choose Tools | Templates
   and open the template in the editor.
-->
<!DOCTYPE html>
<html xmlns = "http://www.w3.org/1999/xhtml"
   xmlns:h = "http://java.sun.com/jsf/html"
   xmlns:f = "http://java.sun.com/jsf/core"
   xmlns:ui = "http://java.sun.com/jsf/facelets"
   xmlns:a4j = "http://richfaces.org/a4j"
   xmlns:rich = "http://richfaces.org/rich">

   <h:head>
      <title>Component Control Example</title>
      <meta name = "viewport" content = "width = device-width, initial-scale = 1.0"/>
   </h:head>

   <h:body>
      <h:commandButton value = "Call the popup">
         <rich:componentControl target = "popup" operation = "show" />
      </h:commandButton>
      <rich:popupPanel id = "popup" modal = "false" autosized = "true" resizeable = "false">
         <f:facet name = "header">
            <h:outputText value = "Welcome mesage" />
         </f:facet>

         <f:facet name = "controls">
            <h:outputLink value = "#"
               onclick = "#{rich:component('popup')}.hide(); return false;"
               style = "color: inherit">

               X
            </h:outputLink>
         </f:facet>
         <p>Welcome to RICH FACE tutorial at yoursite.com</p>
      </rich:popupPanel>
   </h:body>

</html>
In the above code, we are calling “onclick()” function using a id “popup”. Once we run it, it shows a button with “Call the popup”. Once we click the button, RichFaces internally calls the JS function and provides the following output in the browser.

RichFaces – Rich Tree
In this chapter, we will learn about tree processing in RichFaces. RichFaces provide all the required components to create and manipulate a tree.
<rich:treeNode>
This tag is used to create a hierarchical tree. Each node provided inside the <treeNode> will be a child node of the tree. This tag will be used with another tag called <rich:tree>. All the instance variables we are using to create a tree must implement any of these three interfaces – org.richfaces.model.TreeNode, org.richfaces.model.TreeDataModel, and javax.swing.tree.TreeNode.
In the following example, we will populate a tree using <rich:treeNode> tag from the backend.
<?xml version = "1.0" encoding = "UTF-8"?>
<!DOCTYPE html>
<html xmlns = "http://www.w3.org/1999/xhtml"
   xmlns:h = "http://java.sun.com/jsf/html"
   xmlns:f = "http://java.sun.com/jsf/core"
   xmlns:ui = "http://java.sun.com/jsf/facelets"
   xmlns:a4j = "http://richfaces.org/a4j"
   xmlns:rich = "http://richfaces.org/rich">

   <h:head>
      <title>TreeNode Example</title>
      <meta name = "viewport" content = "width = device-width, initial-scale = 1.0"/>
   </h:head>

   <h:body>
      <h:form>
         <rich:tree value = "#{tree.populateNode}" var = "tree">
            <rich:treeNode>
               <rich:treeModelRecursiveAdaptor>
               </rich:treeModelRecursiveAdaptor>
               <h:outputText value = "#{tree.data}" />
            </rich:treeNode>
         </rich:tree>
      </h:form>
   </h:body>

</html>
Following is the related java class that implements “TreeNodeImpl” interface.
import javax.faces.bean.ManagedBean;
import javax.faces.bean.RequestScoped;
import org.richfaces.model.TreeNodeImpl;

@ManagedBean
@RequestScoped

public class Tree extends TreeNodeImpl {
   private Tree stationRoot;
   private Tree populateNode;
   private Object data;

   public Tree() {
      super();
   }
   public Tree(boolean leaf, Object data) {
      super(leaf);
      this.data = data;
   }
   public Object getData() {
      return data;
   }
   public Tree getPopulateNode() {
      if (populateNode == null) {
         String[] List_OF_Node = {
            "Frist Node", "Second Node", "Third Node", "Fourth Node", "Fifth Node"};
         stationRoot = new Tree(false, "Example Of Tree");

         for (int i = 0; i < List_OF_Node.length; i++) {
            Tree child = new Tree(true, List_OF_Node[i]);
            stationRoot.addChild(i, child);
         }
         populateNode = new Tree();
         populateNode.addChild(0, stationRoot);
      }
      return populateNode;
   }
}
The above piece of code will produce the following output in the browser.

<rich:treeModelAdaptor>
This component takes a Map as an input, iterates through it, and produces the required output in the browser. Whenever we need to populate a recursive map, we can use another tag called <rich:recursiveTreeModelAdaptor>.
The following example shows how to render the project structure in the browser. In RichFaces 3, these two tags are used <rich:treeNodeAdaptor> and <rich:recursiveTreeNodeAdaptor>.
<?xml version = "1.0" encoding = "UTF-8"?>
<!DOCTYPE html>
<html xmlns = "http://www.w3.org/1999/xhtml"
   xmlns:h = "http://java.sun.com/jsf/html"
   xmlns:f = "http://java.sun.com/jsf/core"
   xmlns:ui = "http://java.sun.com/jsf/facelets"
   xmlns:a4j = "http://richfaces.org/a4j"
   xmlns:rich = "http://richfaces.org/rich">

   <h:head>
      <title>Tree Model and Recursive Model Example</title>
   </h:head>

   <h:body>
      <h:form id = "form">
         <rich:tree toggleType = "AJAX" var = "item" style = "max-width: 400px">
            <rich:treeModelRecursiveAdaptor roots = "#{fileSystemBean.sourceRoots}"
               nodes = "#{item.directories}">

               <rich:treeNode>
                  #{item.shortPath}
               </rich:treeNode>

               <rich:treeModelAdaptor nodes = "#{item.files}">
                  <rich:treeNode>#{item}</rich:treeNode>
               </rich:treeModelAdaptor>
            </rich:treeModelRecursiveAdaptor>

         </rich:tree>
      </h:form>
   </h:body>

</html>
We need to create two new java beans for this example. Following is the code snippet for bean class ”FileSystemBean.java”, which holds the required folder name.
import java.util.List;
import javax.faces.bean.ManagedBean;
import javax.faces.bean.RequestScoped;

@ManagedBean
@RequestScoped

public class FileSystemBean {
   private static final String SRC_PATH = "/WEB-INF";
   private List<FileSystemNode> srcRoots;

   public synchronized List<FileSystemNode> getSourceRoots() {
      if (srcRoots == null) {
         srcRoots = new FileSystemNode(SRC_PATH).getDirectories();
      }
      return srcRoots;
   }
}
Following is the code snippet for bean class “FileSystemNode.java”, which holds the required the leaf node of the project.
import static com.google.common.base.Predicates.containsPattern;
import static com.google.common.base.Predicates.not;
import static com.google.common.collect.Iterables.filter;
import static com.google.common.collect.Iterables.transform;

import java.util.ArrayList;
import java.util.Collections;
import java.util.List;
import java.util.Set;

import javax.faces.context.ExternalContext;
import javax.faces.context.FacesContext;

import com.google.common.base.Function;
import com.google.common.collect.Iterables;
import com.google.common.collect.Lists;

public class FileSystemNode {
   private static final Function<String, FileSystemNode>
      FACTORY = new Function<String, FileSystemNode>() {

      public FileSystemNode apply(String from) {
         return new FileSystemNode(from.substring(0, from.length() - 1));
      };
   };
   private static final Function<String, String>
      TO_SHORT_PATH = new Function<String, String>() {

      public String apply(String from) {
         int idx = from.lastIndexOf('/');
         if (idx < 0) {
            return from;
         }
         return from.substring(idx + 1);
      };
   };
   private String path;
   private List<FileSystemNode> directories;
   private List<String> files;
   private String shortPath;

   public FileSystemNode(String path) {
      this.path = path;
      int idx = path.lastIndexOf('/');

      if (idx != -1) {
         shortPath = path.substring(idx + 1);
      } else {
         shortPath = path;
      }
   }
   public synchronized List<FileSystemNode> getDirectories() {
      if (directories == null) {
         directories = Lists.newArrayList();

         Iterables.addAll(directories, transform(filter(
            getResourcePaths(), containsPattern("/$")), FACTORY));
      }
      return directories;
   }
   public synchronized List<String> getFiles() {
      if (files == null) {
         files = new ArrayList<String>();

         Iterables.addAll(files, transform(filter(
            getResourcePaths(), not(containsPattern("/$"))), TO_SHORT_PATH));
      }
      return files;
   }
   private Iterable<String> getResourcePaths() {
      FacesContext facesContext = FacesContext.getCurrentInstance();
      ExternalContext externalContext = facesContext.getExternalContext();
      Set<String> resourcePaths = externalContext.getResourcePaths(this.path);

      if (resourcePaths == null) {
         resourcePaths = Collections.emptySet();
      }
      return resourcePaths;
   }
   public String getShortPath() {
      return shortPath;
   }
}
The above example will produce the following output in the browser.
RichFaces – Error Handling
In this chapter, we will learn about different error handling methods that can be implemented in RichFaces.
Server Side & Client Side Error Handling
We need to go through the pretty old Java technique (try/Catch) to handle the action class based exceptions. For client side, we can add one extra file, which will show the error message whenever an error has occurred on the client side.
Following code snippet can be added in web.xml in order to handle errors on the client side.
<error-page>
   <exception-type>java.lang.Throwable</exception-type>
   <location>/error.xhtml</location>
</error-page>
Note, the above exception will provide only static exception messages and we might have to use JSF “ExceptionHandler” class in order to use dynamic exception property. At runtime, RichFaces provides some features to validate the input fields, which can be used as a primary building block of the exception in the application.
Create a new file and place the following code in it.
<?xml version = "1.0" encoding = "UTF-8"?>
<!DOCTYPE html>
<html xmlns = "http://www.w3.org/1999/xhtml"
   xmlns:h = "http://java.sun.com/jsf/html"
   xmlns:f = "http://java.sun.com/jsf/core"
   xmlns:ui = "http://java.sun.com/jsf/facelets"
   xmlns:a4j = "http://richfaces.org/a4j"
   xmlns:rich = "http://richfaces.org/rich">

   <h:head>
      <title>Error handling</title>
      <meta name = "viewport" content = "width = device-width, initial-scale = 1.0"/>
   </h:head>

   <h:body>
      <h:form id = "form">
         <rich:panel>
            <f:facet name = "header">
               <h:panelGroup>
                  <h:outputText value = "Student Registration" />
                  <a4j:status>
                     <f:facet name = "start">
                        <h:graphicImage value = "/images/ai.gif" style = "height:12px;width:12px;" alt = "ai" />
                     </f:facet>
                  </a4j:status>
               </h:panelGroup>
            </f:facet>

            <h:panelGrid columns = "3">
               <h:outputText value = "Name:" />
               <h:inputText value = "#{student.name}" id = "name" label = "name">
                  <f:validateLength minimum = "3" maximum = "8" />
                  <f:validateRequired />
                  <rich:validator />
               </h:inputText>
               <rich:message for = "name" />
               <h:outputText value = "Email" />

               <h:inputText value = "#{student.email}" id = "email"
                  validatorMessage = "Ivalid email address">

                  <f:validateRegex
                     pattern =
						   "^(([a-zA-Z0-9_-.]+)@([a-zA-Z0-9_-.]+)
						   .([a-zAZ]{2,5}){1,25})+([;.](([a-zA-Z0-9_-.]+)
						   @([a-zA-Z0-9_-.]+).([a-zAZ]{2,5}){1,25})+)*$" />
                  <rich:validator />
               </h:inputText>

               <rich:message for = "email" />
               <h:outputText value = "Age" />

               <h:inputText value = "#{student.age}" id = "age" label = "age">
                  <f:validateLongRange minimum = "18" maximum = "99" />
                  <rich:validator />
               </h:inputText>
               <rich:message for = "age" />
            </h:panelGrid>

         </rich:panel>
      </h:form>
   </h:body>

</html>
Corresponding java class should be a normal bean class like the following.
import javax.faces.bean.ManagedBean;
import javax.faces.bean.RequestScoped;

@ManagedBean
@RequestScoped

public class Student {
   private String name;
   private String email;
   private int age;

   public String getName() {
      return name;
   }
   public void setName(String name) {
      this.name = name;
   }
   public String getEmail() {
      return email;
   }
   public void setEmail(String email) {
      this.email = email;
   }
   public int getAge() {
      return age;
   }
   public void setAge(int age) {
      this.age = age;
   }
}
The above example will yield the following output in the browser, whenever there will be an error in the <h:form>.

Resource Loading
RichFaces improves standard resource handling procedure in JSF application. This can be implemented either by configuring ResourceServlet or by Resource optimization. To configure ResourceServlet, we need to add the following piece of code in web.xml.
<servlet>
   <servlet-name>Resource Servlet</servlet-name>
   <servlet-class>org.richfaces.webapp.ResourceServlet</servlet-class>
   <load-on-startup>1</load-on-startup>
</servlet>

<servlet-mapping>
   <servlet-name>Resource Servlet</servlet-name>
   <url-pattern>/org.richfaces.resources/*</url-pattern>
</servlet-mapping>
We can also enable the optimization in the JSF application, which will optimize different JavaScript and CSS files. We need to add the following code in order to achieve the optimization in the application.
<context-param>
   <param-name>org.richfaces.resourceOptimization.enabled</param-name>
   <param-value>true</param-value>
</context-param>
Disclosure: We are a professional review site that receives compensation from the companies whose products we review. We are independently owned and we have spent time and effort doing our best to offer you the most relevant and accurate information. All the "customer reviews" are posted by real webmasters (hosting customers) and we're not responsable for their opinions. Purchasing any service from the hosting companies listed on our site is your solely decision.
Statistics Panel
| Stats Panel | Last 24h | Last Month | Total |
| Articles | 0 | 0 | 5166 |
| News | 0 | 0 | 18356 |
| Hosting Sites | 0 | 0 | 2452 |
| Reviews | 0 | 3 | 1810 |
| Coupons | 0 | 0 | 561 |